April 21-28, 2023
A week ago I met up with two wonderfully creative friends, Mimi and Jane, and we spent 4+ hours together making paste papers. And oh what fun we had!
But wait ……. Huh? What? Paste paper?
If you’re like me, you’ve never heard of or made anything called paste paper before. Not so fast …… I’m betting as a child you used to dabble in the fine art of finger painting, or perhaps you’ve created papier-mâché sculptures with flour paste? Well, after a few hours brushing and scribbling on and in a mixture of gloppy cellulose and acrylic paints on paper, I concluded that making paste paper is just like finger painting, but for grownups!

Seriously?
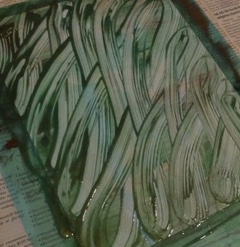
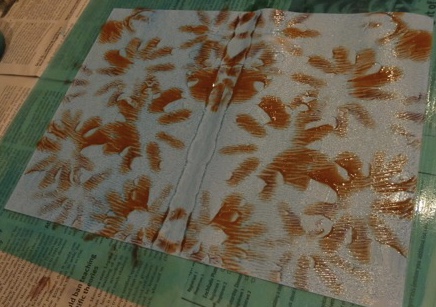
Paste paper is one of the oldest decorated papers used by bookbinders. Open up a centuries old book and there’s a good chance the inside of the covers are decorated with colorful papers adorned with all kinds of designs. Taking leftover bookbinding paste and adding pigment, they then brushed the mix onto paper. While the paste/paint mixture was still wet, they would make strokes and stipples, swirls and zigzags, creating their designs using things like knives, stamps, combs, or just about anything laying about that would leave marks. Then once the paper dried, it was cut to size to fit the inside book covers.
A quick internet search on “paste paper” turns up many recipes for making the paste, what paints to add and proportions, the kind and weight of paper to use, and how to prep the paper (to wet or not to wet?). It’s quite overwhelming.

Thankfully, after conducting exhaustive research on these subjects, Mimi took the matter in hand and decided we should use Elmer’s brand Art Paste, which is powdered methyl cellulose. About a week before our event, she mixed a box of this powder with water, allowed it to sit overnight where it turned into a gallon of a clear gloppy/bloopy substance about the consistency of jello. Actually it reminded me of the goo that floats about inside a lava lamp. You know what I mean, right?
Event day ……
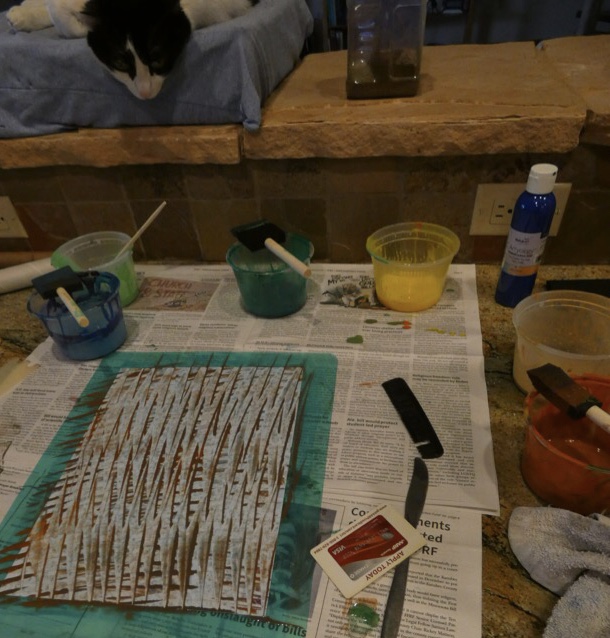
After a mini lesson from Mimi, the three of us donned aprons and surgical gloves and jumped in!
Step 1: mix a few drops of acrylic paint into 1/4 cup of gloppy paste. Stir, stir, stir.
Step 2: wet a sheet of paper with water from a spray bottle, and lay flat on a plastic covered surface.
Step 3: drop a few spoonfuls of the paste/paint mix on the moistened paper.
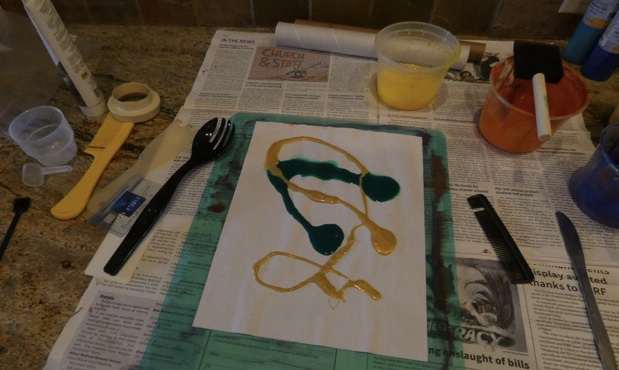
Step 4: using a foam brush, slather the entire paper with the paste/paint mix.
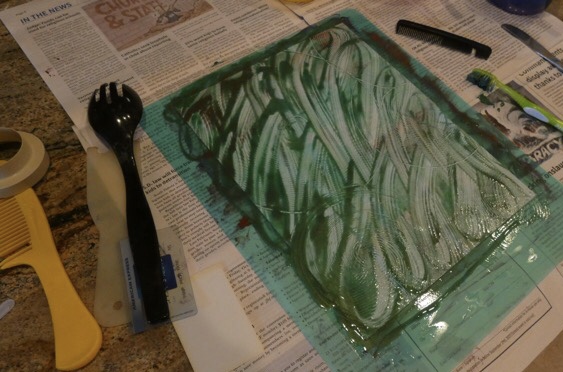
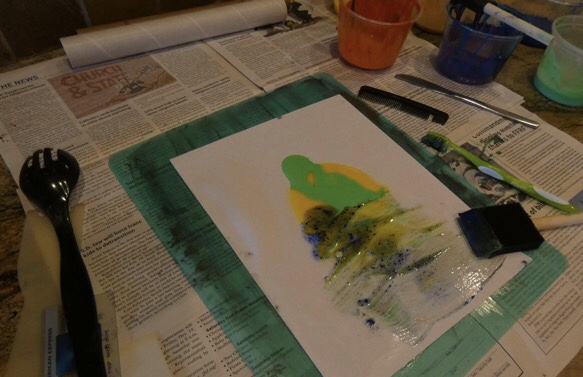
Step 5: pick a tool, any tool, and begin mark-making to create astonishing patterns and designs.
Step 6: if the design isn’t amazing enough, repeat from Step 3 until happy.

Step 7: remove beautifully decorated paper from work surface and set aside to dry.
Step 8: oooh and ahhhh!
That’s it! Almost ……..
Lessons learned from lots of playful experimenting.
Some acrylic paint colors refused to mix with the paste, making the mix look granulated (but we used it anyhow, and got some cool effects).
The thicker you apply the paste/paint mix, the longer it will take to dry on the paper.
Results were better on 98# paper; lighter weight papers proved a bit too flimsy.
Sulfite paper worked great; it was durable, stood up to lots of vigorous mark-making, and the paint didn’t bleed through to the back.
Clean mark-making tools after each mark is made on the paper, to get cleaner lines (of course, in our excitement, we failed to follow this tip, causing interesting blended designs).
If blending colors on the paper (which we did a lot of), the foam brush used for blending usually ends up as the brush used as the dish dipping tool. If you want to keep colors pure, use the brushes for spreading paste/paint mixes and keep the original mixing spoons for doling out the colors onto the paper. On the other hand, some of the blended colors in the dishes looked awesome and ended up on the papers anyhow!
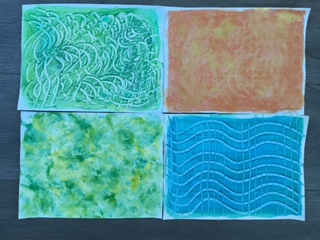
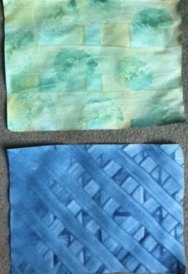
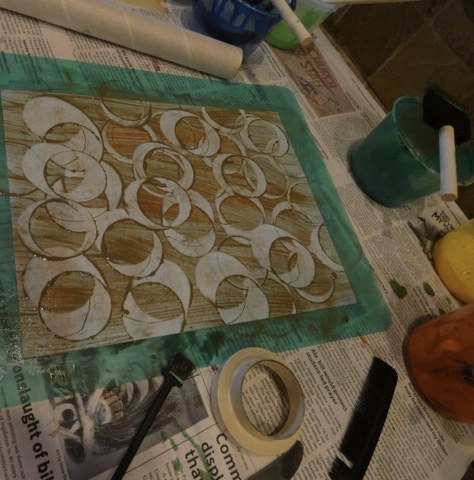
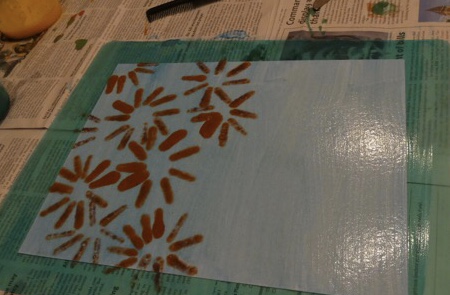
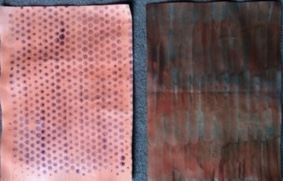
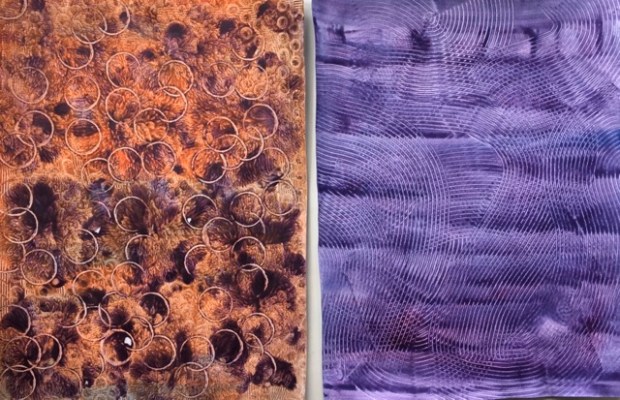
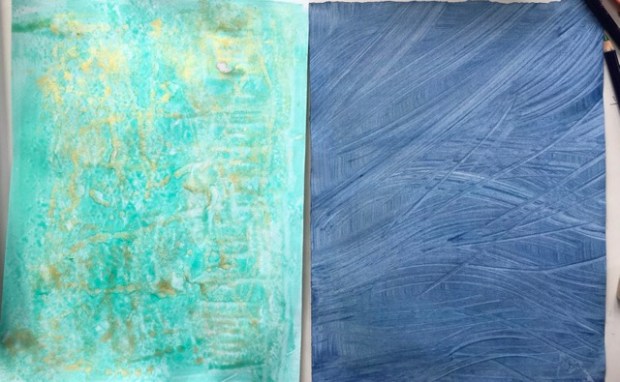
Tools that worked great were combs, balloons, cardboard tubes, bubble wrap, toothbrushes, credit cards, cookie cutters and chopsticks.
Workstation cleanup is recommended after each exquisitely decorated paper is removed for drying, because leftover paint will end up on the next piece of paper. (Actually this wasn’t so bad, if some color is wanted on the backside of the paper.)
Any idea is worth trying; it’s impossible to make mistakes; laugh and have fun!
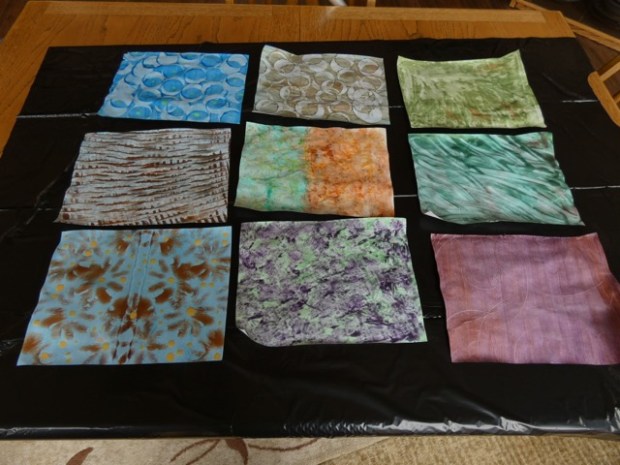
5 Star Rating! What a great project. Thanks so much to Mimi and Jane for making this event a blast! We each ended up with gorgeous papers for things like journal and sketchbook covers, calligraphy backgrounds, or they are definitely suitable for framing!
Follow up: In the week following our paste paper-making extravaganza on April 21st, I decorated 9 more papers on my own, modifying several steps, like totally immersing my papers in water. This is addictive creative project, and a super way to play like a kid again! Maybe you’ll be enticed to create some paste papers of your own?
Need more inspiration? Check out this link!
Madeleine Durham, a fine artist living in Santa Fe, creates gorgeous landscapes, florals and mandalas paste papers, many with a southwest flair. Be sure to watch her videos. Wow! https://www.madeleinedurham.com

OH goodness, Barb!!!! Your post brings back memories and makes me want to paint decorative papers again. More than want… I’m itching to get at it!!! And your papers are lovely! I first learned in the 1990’s when I took a 5-day book making/binding workshop. We painted paste papers for the first 2.5 days, and then created 3 books, covering the covers and making signature covers with our paste papers. Never had so much fun in my life! Continued to paint decorative papers until recently (using the techniques of paste paper, plus stamping and stenciling), and teach it as well. But now it’s been a few years since I painted like that… your post awakened the urge, that’s for sure. I guess I can’t attach a photo here, but I’ll email you one. Thanks for all your posts… I’m bad about commenting, but I am well fed creatively with every one. Hugs!
LikeLike
Wow, Robin! Another paste paper addict! How much fun is this stuff!!! I’ll look for your message with photo (s). I’m so happy you commented and enjoyed the post. Now get busy and decorate some paper!
LikeLike
Hi Barb, as it turns out, I don’t have an email address for you. I’d rather email a couple of pictures of decorative painting to you if possible. You have my email, so if you’re OK with it, please let me know through email. Thanks! Robin
LikeLike
Done and sent you an email! Absolutely I’m ok with seeing pics!
LikeLike
Liz… Here’s the post about painting… the link she gives at the end to another past paper artist is good too. Enjoy!! xo Robin
LikeLiked by 1 person
What fun! And those Madeline Durham landscapes look pretty amazing – just like something you could do.
LikeLike
It was loads of fun! You’d love it too. I’ll leave the beautiful paste paper landscapes to Madeleine tho. She’s a skilled pro!
LikeLike
What a wonderful tutorial, Barb, and I loved seeing all of the colorful, creative results. Never knew this was done as part of the bookbinding process.
LikeLiked by 1 person
Thx so much Dee! You’d love making paste papers. And in the process, I also learned about centuries old decorated books.
LikeLike
How inspiring and fun! I haven’t heard of paste papers, but they do look amazing and fun to make, especially with friends. I really love the one with the circles, wondering how you did that one! There is so much value in experimenting and playing with different supplies & techniques. Thanks for the inspiration, Barb!
LikeLiked by 1 person
Thanks so much for commenting Karen! It was so much fun. I must’ve giggled during our entire event. If you wondered about the papers with the big circles, that was done with a cookie cutter laid on the wet paint then twisted as it slid across the paper. The one with the little circles was done with bubble wrap. The ones that look like sand dollars was done with a slightly inflated balloon. Hey, hoping that ankle is nearly mended and you’re planning on resuming your nature hikes soon!
LikeLiked by 1 person
Fantastic, sliding cookie cutters & bubble wrap! I am back to nature hikes, thankfully, but still cautious.
LikeLiked by 1 person
Yay …. So glad to hear you’re back out there!
LikeLiked by 1 person
I’m so glad you documented this after the fact since we were so excited we forgot to take photos! We were having too much fun.
LikeLiked by 1 person
Thanks Mimi! And thanks for inspiring us to create!
LikeLike