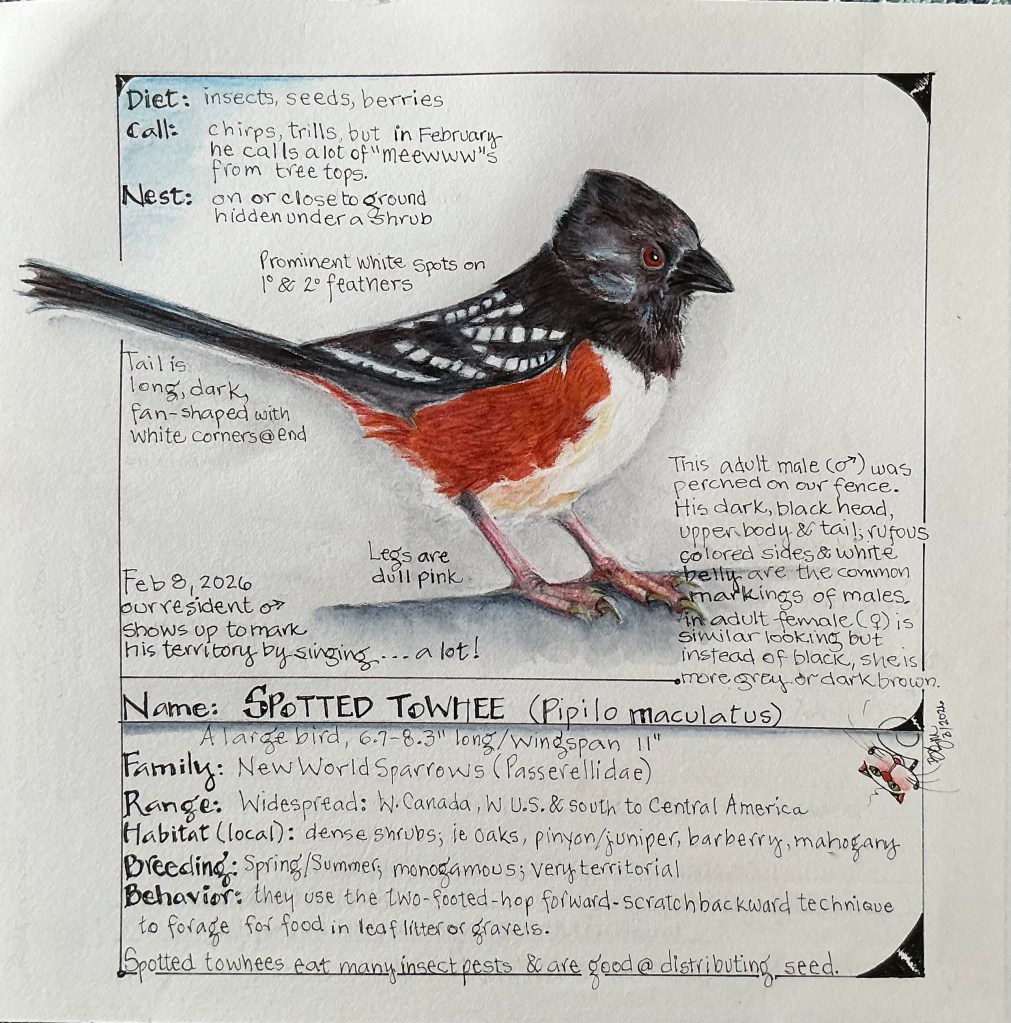
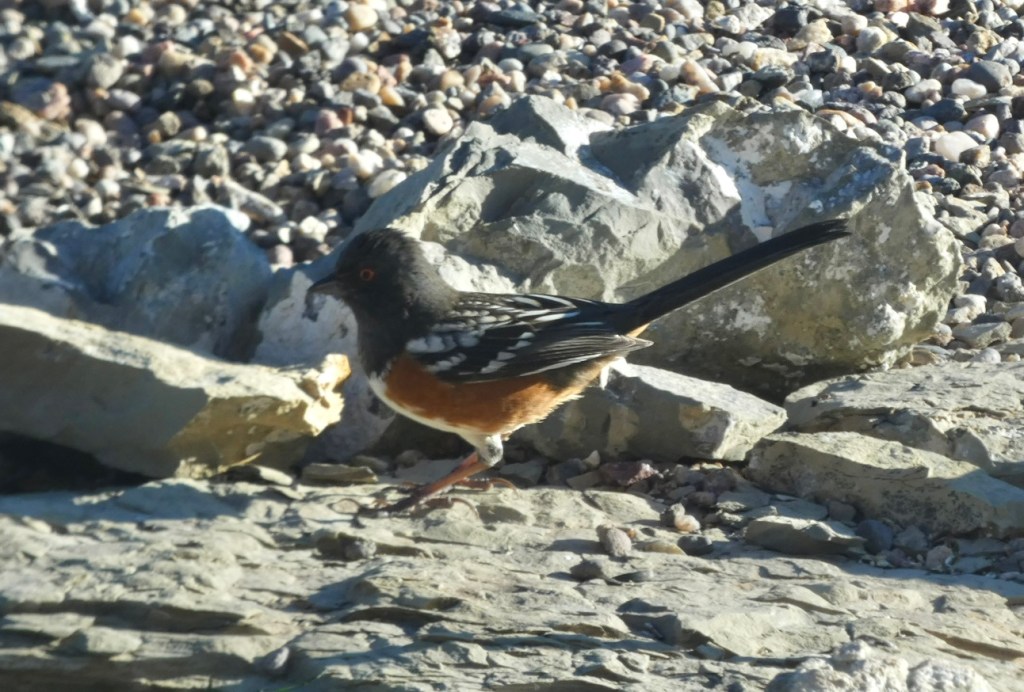
Here’s one of my favorite birds that’s a regular visitor to our yard. Spotted towhees, especially the males, are year-round residents throughout most of New Mexico, which means they breed in the shrubby vegetation surrounding our home. In our area, males sing at the crack of dawn until late afternoon beginning in early February. Instantly recognizable, their beautiful songs carry far and wide. Their songs not only signal to their mate it’s time to pair up again (spotted towhees are monogamous), they also let other male competitors know they’re horning in on his territory.
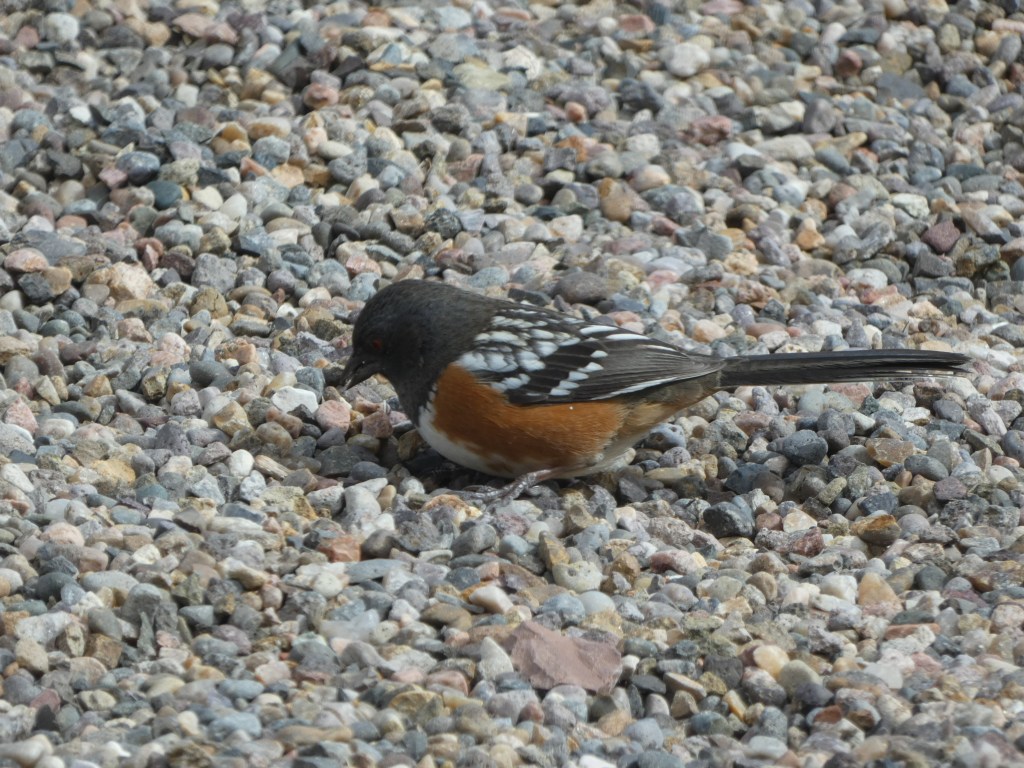
With favorable weather and abundant food, spotted towhees can produce two clutches of chicks during the breeding season. Their ground nests are hidden so well under a dense oak that I’ve never been able to find one. But it’s a lot of fun to watch clumsy fledglings trying to master the “two-footed-hop-forward-scratch-backward” forging technique all spotted towhees use to uncover hidden bugs and seeds.
Fun Facts
The spotted towhee and the eastern towhee were considered to be the same species called the rufous-sided towhee until 1995.
Male towhees have been recorded spending 70% to 90% of their mornings singing during breeding season.
Once a male mates, he only spends about 5% of his time singing.
It’s thought that the spotted towhee’s white spots are a form of camouflage.
Spotted towhees will sun themselves by lying on the ground feathers spread.
They will bathe in the dew or fog that has collected on vegetation.
Nesting females have been seen running away when disturbed rather than flying.
A group of towhees is called a “tangle” or a “teapot.”
When two towhees fight, one bird will pick up a piece of twig and carry it around as a sign of submission.
Their bright red eyes act as a visual signal during the breeding season, standing out in their dark, shady, ground-level habitats.
Do spotted, canyon, green, eastern or any of the towhee species visit your yard?
Hope you enjoyed this post! Thanks for stopping by!
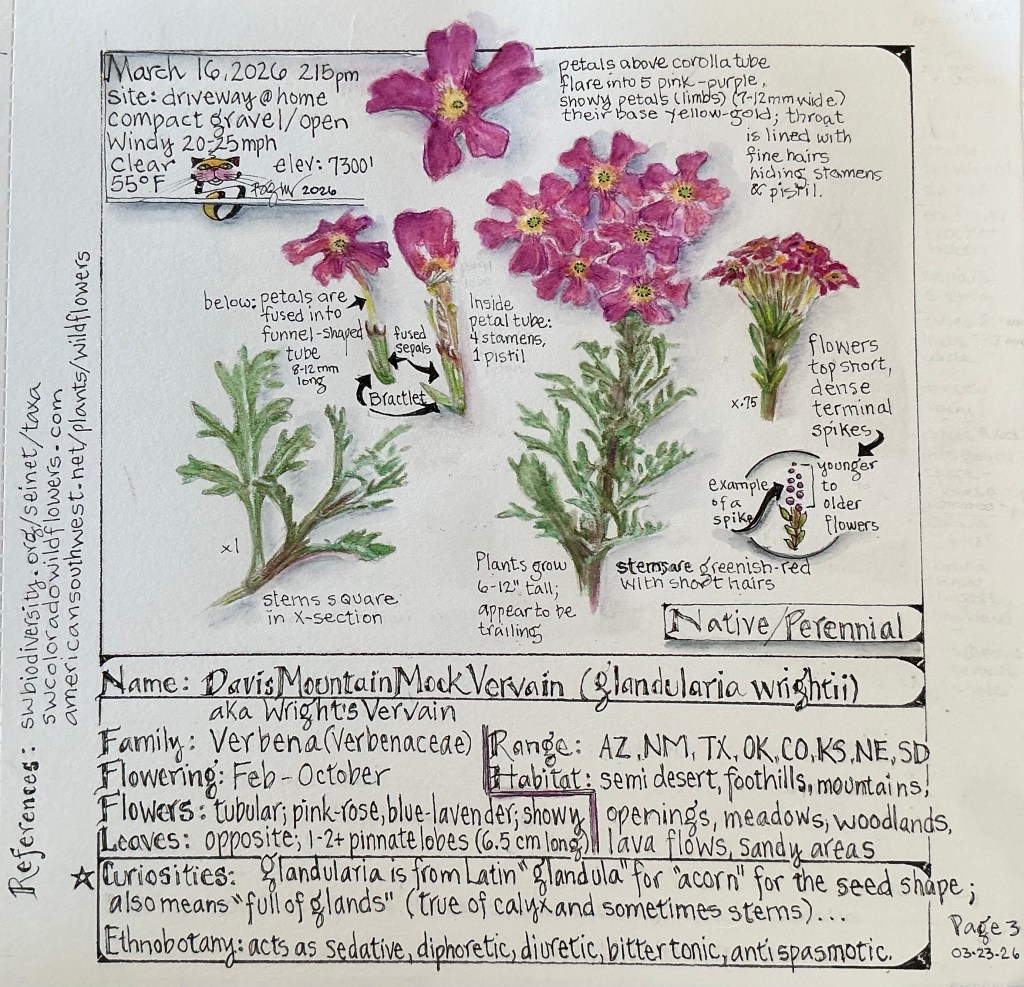
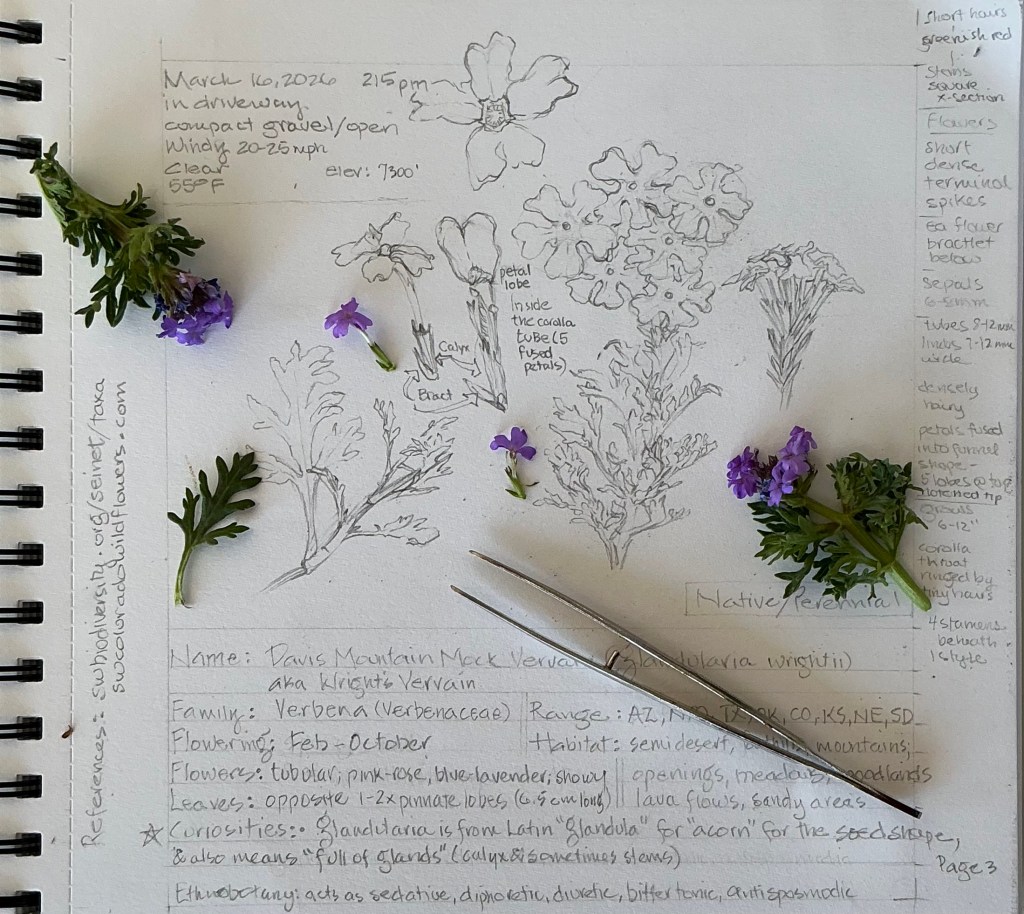
Davis Mountain Mock Vervain (Glandularia wrightii)
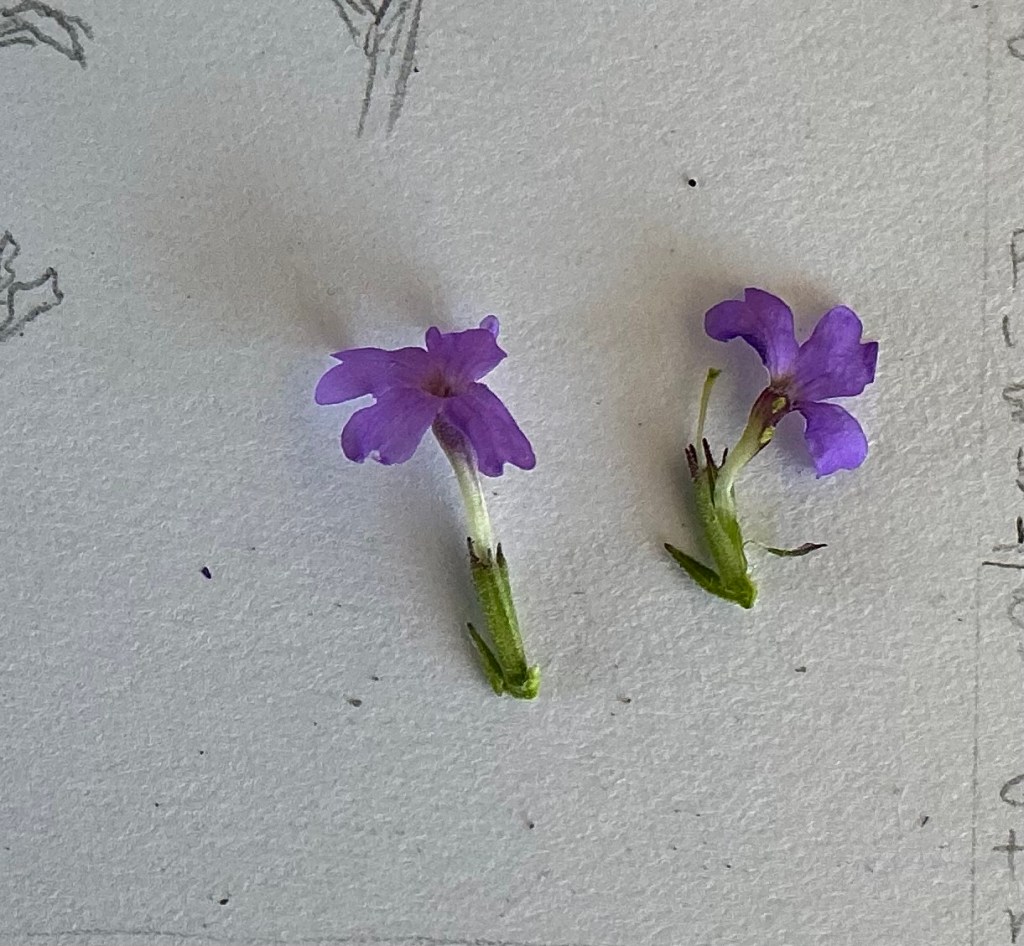
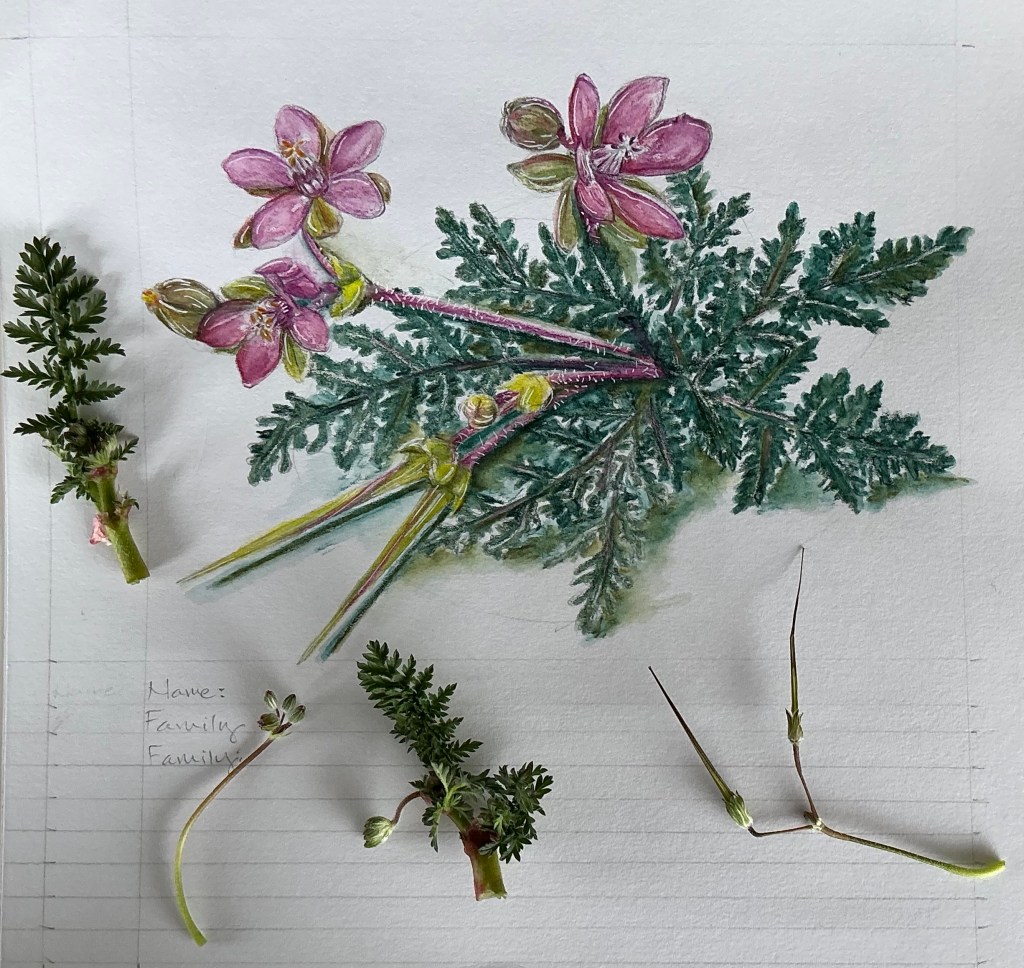
The final pageThis page shows samples from my specimen.. Although the flowers of my specimens are a purple-blue color, I chose to create the flower petals as reddish-pink; this color is also common. This is a photo of the two flowers I sketched for my final painting. The specimen on the left shows the upper part of the flower, the “limb” where 5 petals flair out from the throat ringed by fine hairs. The throat leads to the lower part of the flower – the floral tube (5 fused pale green petals). . Both upper and lower petals make up the flower’s corolla. Below the floral tube are 5 red tipped green sepals (collectively called a calyx) all fused into a cup shape. The specimen on the right is a dissected flower; 2 upper petals are removed, and the floral tube has been opened to reveal the reproductive parts. On the left side are 2 of the female parts of the pistil (pale green style supporting the 2-lobed stigma of the pistil; the ovary was not exposed). Two of the four stamens (male) lie in the mid- to upper right side of the opened floral tube; look for the bright yellow anthers, each sitting atop their own filament
Here’s Another Curiosity to Ponder: I wondered why this plant has 5 petals and 5 sepals but doesn’t also have 5 stamens, which is usually the norm in so many other 5-merous plant species??? Here’s what I learned:
Davis Mountain Mock Vervain (Glandularia wrightii) exhibits a common evolutionary trait in the Vervain (Verbenaceae) family where the flower displays a 5-lobed calyx of fused sepals, and 5 5-lobed petals which fuse into a tube (the corolla). This trait, commonly described as 5-merous, curiously has a reduced the number of functional stamens to four.
This reduction is due to an evolutionary transition from a 5-stamen ancestor. According to literature, the four fertile stamens I observed in my specimens are properly arranged in two pairs (didynamous), both neatly hidden in the floral tube beneath a ring of fine hairs. Also properly so, the filaments (the stalks that support the anthers) of the stamens are fused to the inside of the tube, and not easily teased free.
So apparently, many, many, many, many, Many hundreds of years ago, plants in the Vervain family “decided” having a 5th stamen was unnecessary. “We can do just fine without it, thank you.” Thru the process of evolution, that expendable #5 was ever so slowly reduced to a tiny non-functional structure (referred to as a staminode in modern botanical lingo), or was completely and totally lost, becoming only a memory.
Believe me, this species is an energetic producer of leaves, flowers and seeds. In my experience, Davis Mountain Mock Vervain seems to explode in masses of pink and purple flowers throughout spring, summer and fall, and can last thru winters that don’t freeze. It’s easy to understand why the species has no need of a 5th fertile stamen. Once the plant becomes established, it keeps growing and flowering and spreading, often to the detriment of other desirable plants. If it wasn’t so gorgeous at the height of bloom, it might be considered a weed!
But I’m reminded of the definition of a “Weed ….. a plant out of place.” So yes, you’ll find me actively weeding actively growing Davis Mountain Mock Vervain so my other native plants have a chance at life too!!
For the last few years my “someday” goal has been to create a nature field guide, of sorts, highlighting my many years of observations in the East Mountains of central New Mexico. Well, my “Someday” is officially here! Coinciding with the February 22, 2026 kick-off of the 100 Day Project1(Project), I began by committing an hour/day to developing that field guide as my project and immediately penciled out an outline and a few thumbnail sketches of a sample page. But, after retrieving my iNaturalist lists of East Mountains sightings I’ve made from home and during countless hikes, eliminating redundancies, and totaling up the individual species, my reported observations still numbered in the many hundreds. I would be working on this Project for the next five to six years!
Interlude
When we moved to the East Mountains in the summer of 2017, we quickly fell in love with the beauty of the wide open landscapes, the grasslands and woodlands habitats, the diverse populations of wildflowers and mammals, resident and migratory birds, and the insects and reptiles. So yes, nature is plentiful; species are many.
Now Back to the Project
Not to be overwhelmed (or defeated) by the potential magnitude of my Project, I decided to:
“Divide and Conquer” by focusing on a single location …. our current subdivision and surrounding area and trails; and
Prioritize quality over quantity by creating one page over two days, keeping each work session to one hour; and
Keep the Project motivating and interesting, by adding fun facts or other research tidbit about each species.
“These guidelines seemed more realistic,” I thought, with a cautiously optimistic chance of achieving my goal of creating a nature field guide.
So with that as an introduction to my Project, here’s Page 1 to “An Illustrated Guide to the Nature of Las Leyendas Subdivision & Environs, Tijeras, East Mountains, New Mexico” — with many more pages to follow. 🤞
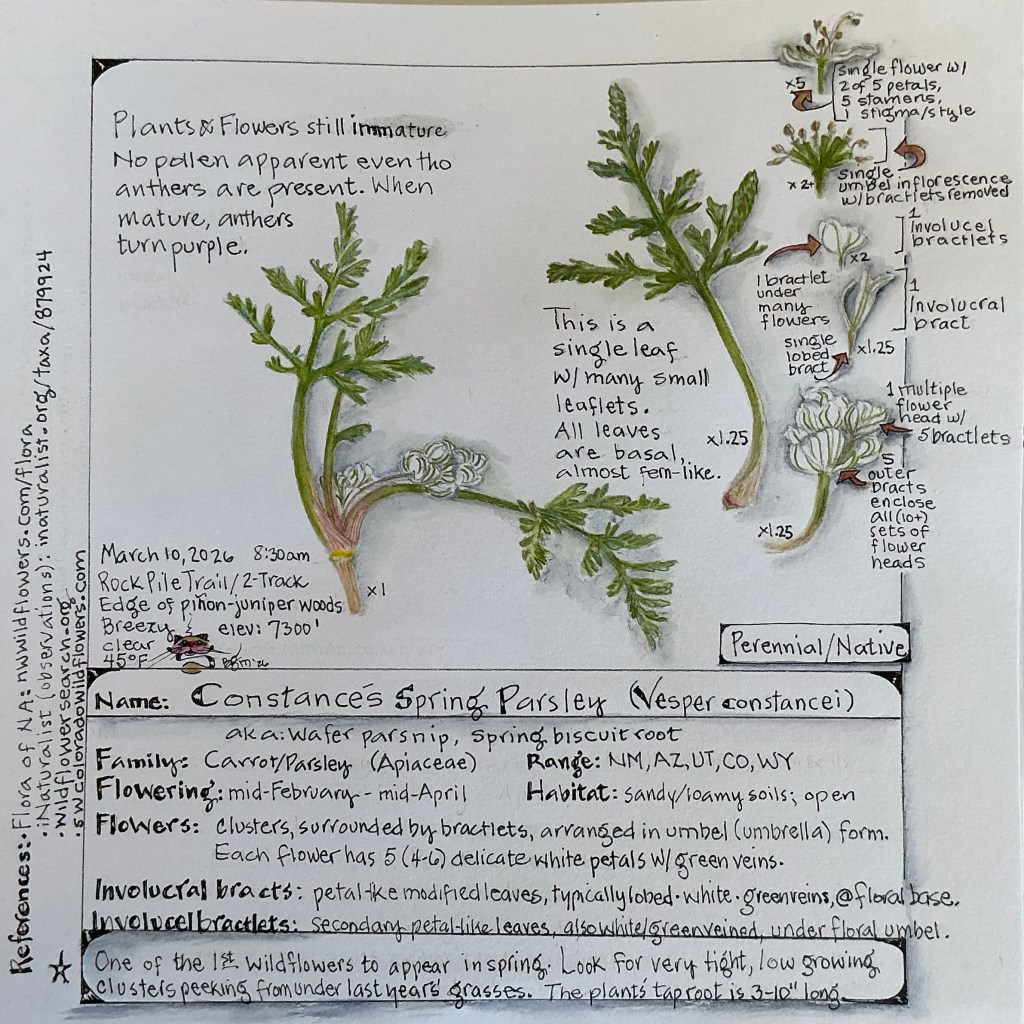
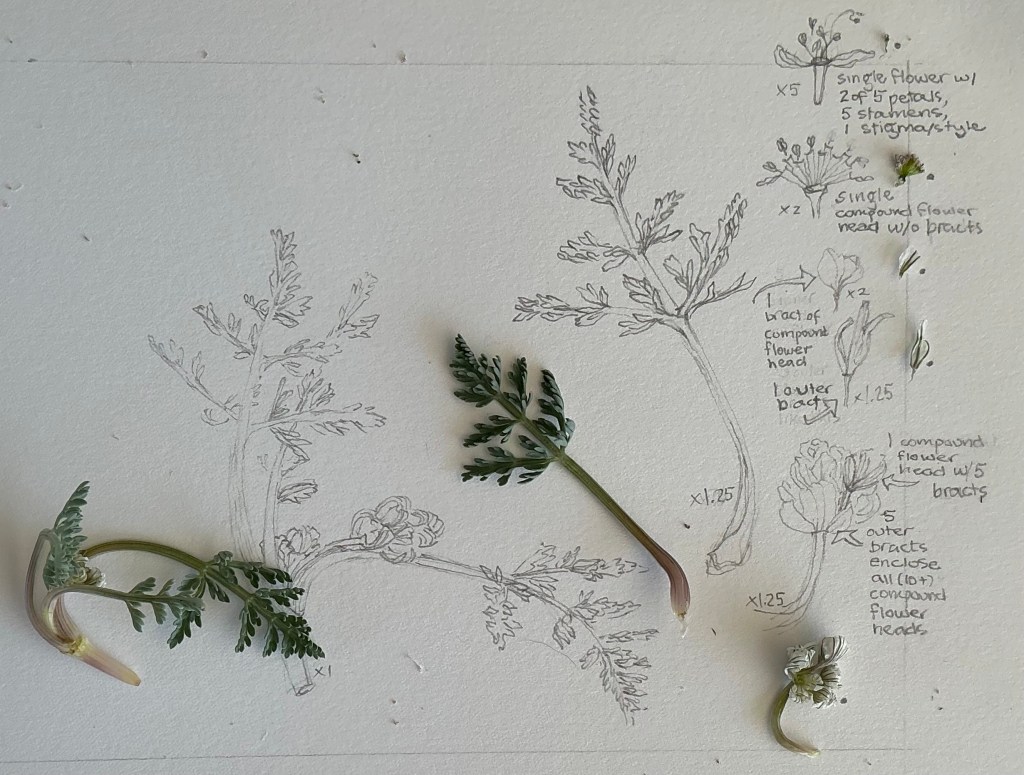
Constance’s Spring Parsley (Vesper constancei)
The final pageAn early draft of the page with live samples of this pretty wild parsley
1“The 100 Day Project is a free global art project that takes place online (https://www.the100dayproject.org/). Every year, thousands of people all around the world commit to 100 days of creating, and anyone can participate. The idea is simple: choose a creative project, do it every single day for 100 days, and document and share your process online. The most recent round of the Project began February 22, 2026, but any day is a great day to begin.”
One of my virtues is impatience ……. when it comes to Spring ….. and its arrival ….. finally.
Admittedly, winter has its perks. After a long, hot summer and fall, winter’s crisp air is a mood lifter, and cooler air temps allow for cozy sleeping under piles of blankets. Longer nights mean my favorite constellations hang in the sky longer, and somehow the moon always seems brighter and friendlier. In New Mexico, winter hiking about is more casual without having to watch every step for rattlesnakes, and certainly any snowfall we’ve been fortunate enough to get helps recharge water tables, tempers our risk of wildfire, and is absolutely beautiful to watch while falling.
But ….. since Winter Solstice and with daytime hours lengthening, I’m ready for Spring. And the closer it gets, my impatience for the upcoming change in season is obvious. My nature journal, pencils and 10x magnifying loop are packed and ready, each daily hike begins by plucking from a yucca one of last year’s flower stalks to poke the ground for signs of growth, and I’m anxious to snap photos of any passing migrating bird or resident roadrunner in search of a perfect nesting spot.
Meanwhile, I’m thankful for my late winter attack of impatience, because it get’s me out there every day, in anticipation of the first flower bud!
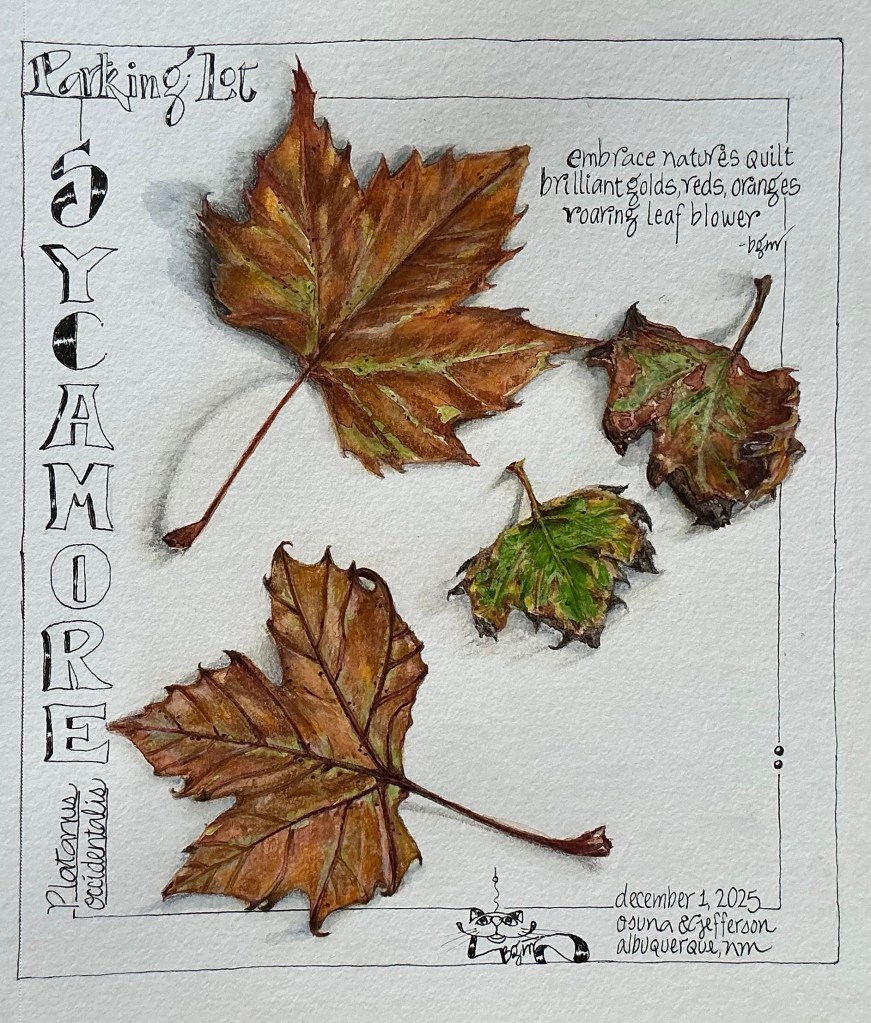
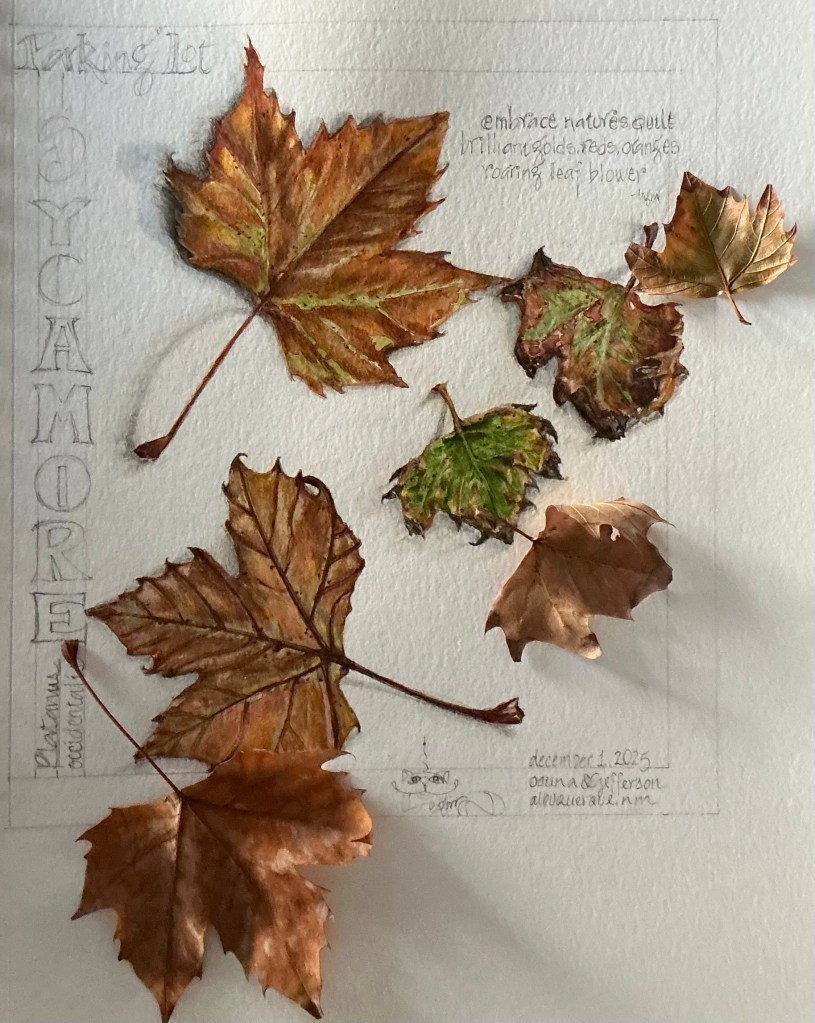
My search for still-beautiful Autumn leaves, half hanging, half fallen to the ground, took me to Albuquerque where temperatures hadn’t yet dipped below zero. Striking ‘gold’ in a large vacant parking lot next to a Disc Golf course, are at least 30 full-grown Sycamore trees with what looked to be full canopies of foliage still clinging tight. But for all the leaves yet to fall, there must’ve been 50x that number covering the ground. The morning breeze was causing the recently-fallen leaves to skid across the pavement in jerky movements, coming to rest in the parking lot’s gutters.
It was in these ankle deep gutter piles where the range of leaf sizes, colors and patterns were found. These 1” to 10” broad, palmately veined and ragged-toothed leaves appeared locked together like pieces from a newly-opened 5000 piece jigsaw puzzle. And, oh my! The lid to the box just blew away! Now I was faced with a dizzying jumble of multi-colored golden-yellows, burnt oranges, Ruddy duck rust, fading-to-spring greens and saddle browns. It was from these ankle deep gutter piles that I collected Autumn leaves for this project.
Lost in thought, I overlooked the white noise of the city ……. traffic mostly, constantly humming and impatiently honking ……. until a painful ringing in my ears invaded the relative calm of the morning. No longer able to think, I turned around and found an invasion of leaf blowers! Never was there a more loudly screaming, obnoxiously noxious sound. Coming closer and closer, louder and more insistent, their ear-muffled and gas-masked operators approached without hesitation, each blowing away (to where?) every bit of the “unsightly and offending” leaf-litter in their path.
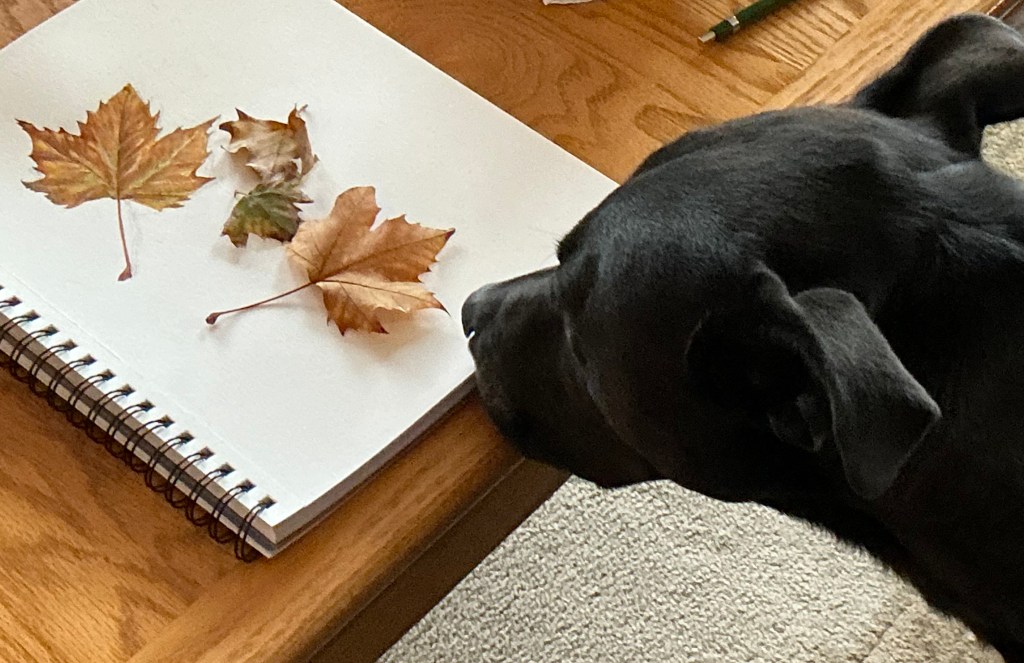
Luna approving of my Sycamore leaf selection
Dang-blasted!
It finally dawned on me this Friday morning that the vacant parking lot only opened for use on Sunday’s. Not agreeable to working weekends, the leaf blower operators were determinedly cleaning up the “messy” lot for the regular Sunday crowd. I was in their way.
Saving as many fallen Sycamore leaves as my collection bags could hold, and silently wishing all remaining leaves a happy landing somewhere on a nutrient-needy plot of land, I ran for the quiet of my car.
My Fallen Leaf Project
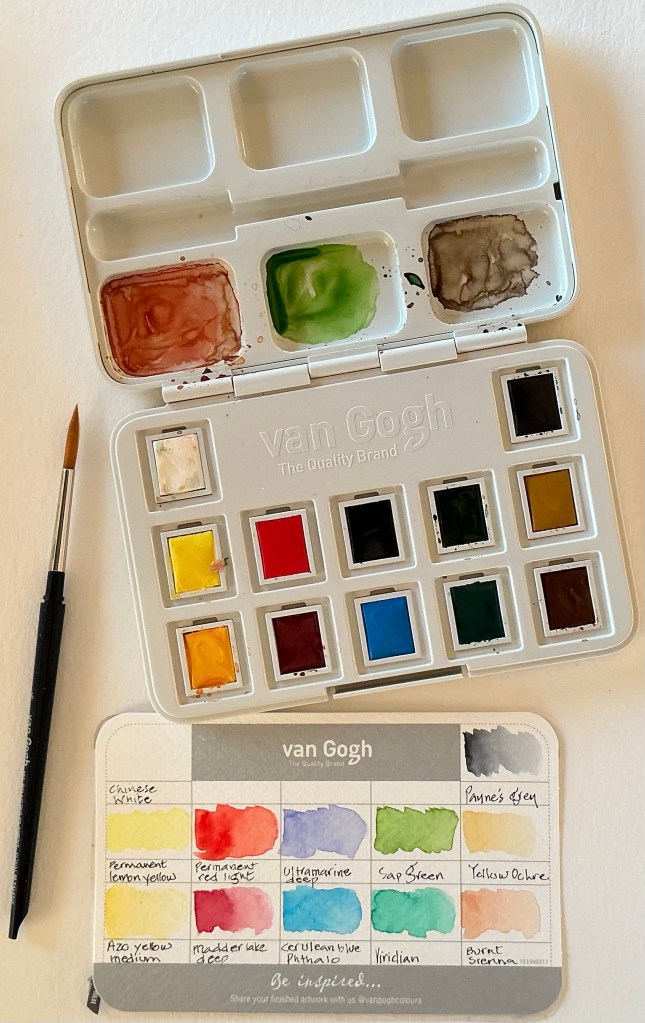
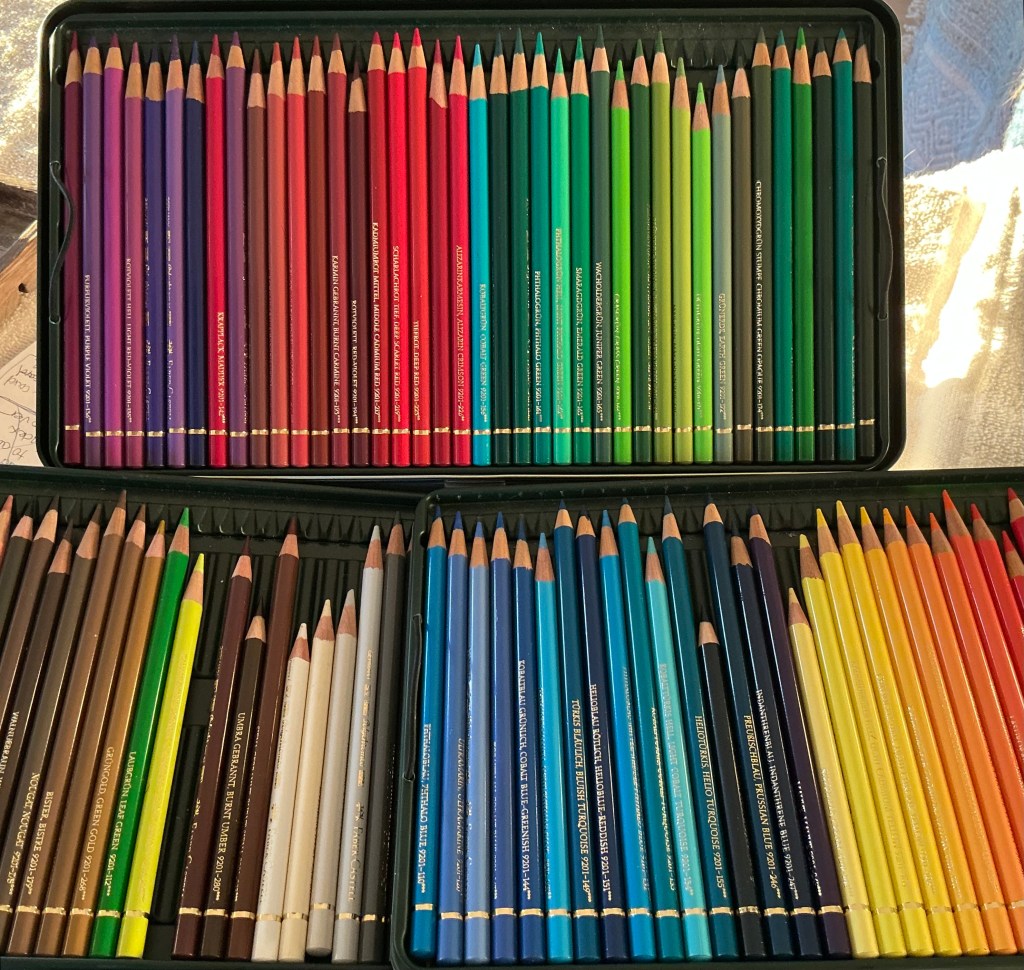
Using Sycamore leaves collected from that vacant Albuquerque parking lot, I tried my hand at a new technique; combining watercolor layers with layers of colored pencil. Using my new set of Van Gogh watercolors, I began each leaf with a layer of plain water followed by a light base layer, mixing Azo yellow medium with a touch of Yellow ochre. The bottom leaf (which was the underside of the top leaf) was duller and lighter in color, calling for a bit of Permanent lemon yellow. Allowing that layer to dry, I used various earthy colors from my set of Faber-Castell Polychromos colored pencils over the watercolor wash, mixing and matching the colors of my pencils with the actual leaf colors. This step tended to leave some areas uncolored with the pencils, so I applied another watercolor wash with Sap green, Burnt Sienna+Yellow ochre, and/or Madder lake deep+Azo yellow medium. I finished each leaf with a Dark sepia colored pencil outline, tipped the leaf margins with Dark sepia, and added shadowing first with Payne’s grey watercolor then Dark sepia colored pencil.
12 half-pan watercolor set and color swatch
The leaves were painted on 140# Canson XL Watercolor paper
Faber-Castell colored pencil set
If you have and questions or comments, please let me know. If you use this combined media technique, any tips you’d like to share would be greatly appreciated too.
…………………………………………………………………………………………
I’d like to send a shout-out and my deep gratitude to Wendy Hollender, botanical artist/illustrator/teacher extraordinaire, who announced in her newsletter free access for over a week to 19 of her bite-sized video lessons. Designed as companions to her book, The Joy of Botanical Drawing, each lesson focused on a different botanical subject and how to artistically render them using watercolor and colored pencil combined. I’ve always wanted to learn this technique and gave it a try with her leaf examples and then mine. Incorporating both media into the same painting was very challenging and way out of my comfort zone.
Thanks so much Wendy, for such wonderful lessons and your fabulous companion book! With lots more practice, my goal is that some day my botanical art looks as natural, skilled and professional as yours.
Were you ever so challenged by something so clever, while at the same time so frustrated with something so beautiful? No, no, wait….. that question may be more complicated than need be. Let me put it this way ……
Were you ever at your wit’s end finding a solution to a seemingly simple problem that you thought was obviously and repeatedly staring you right in the face?
My reply? Yes!
It’s All About the Genes
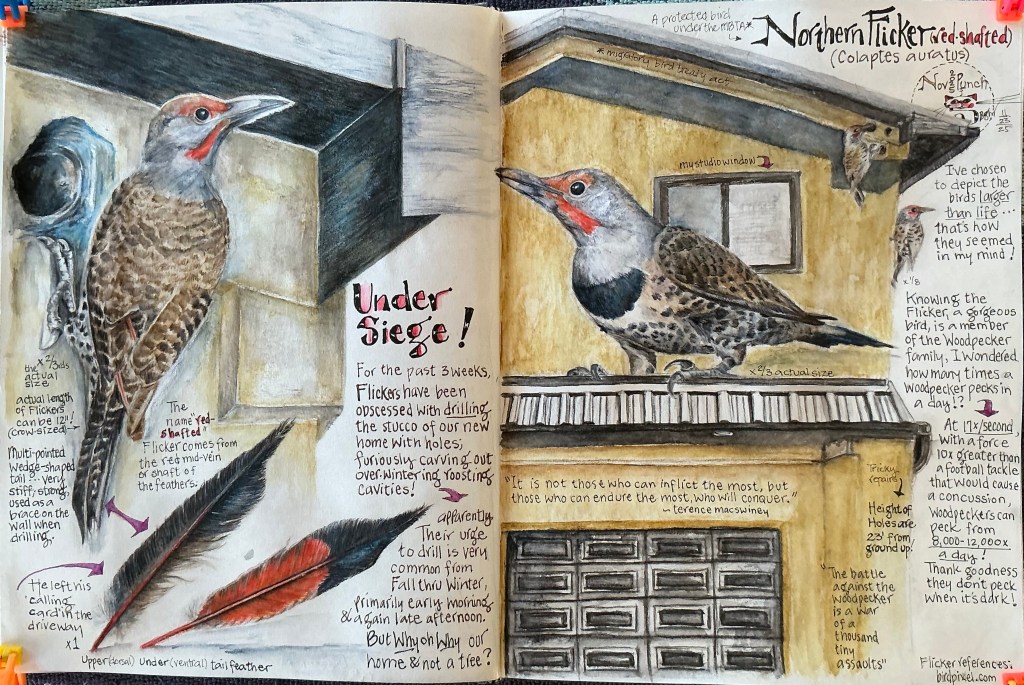
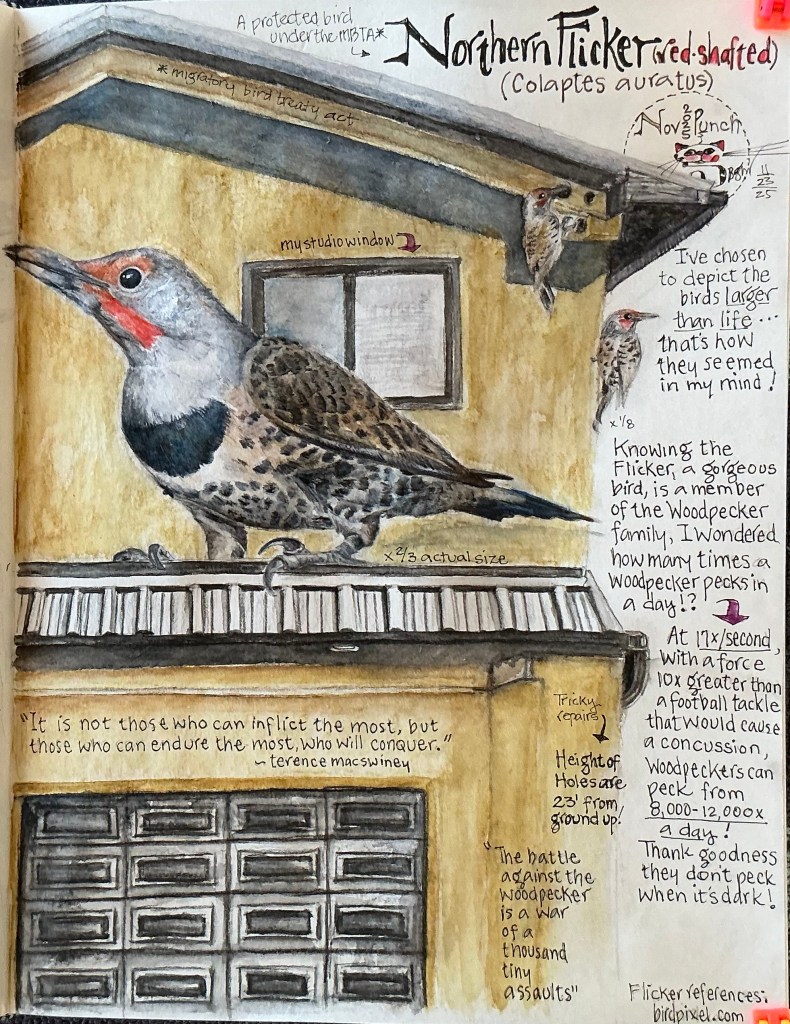
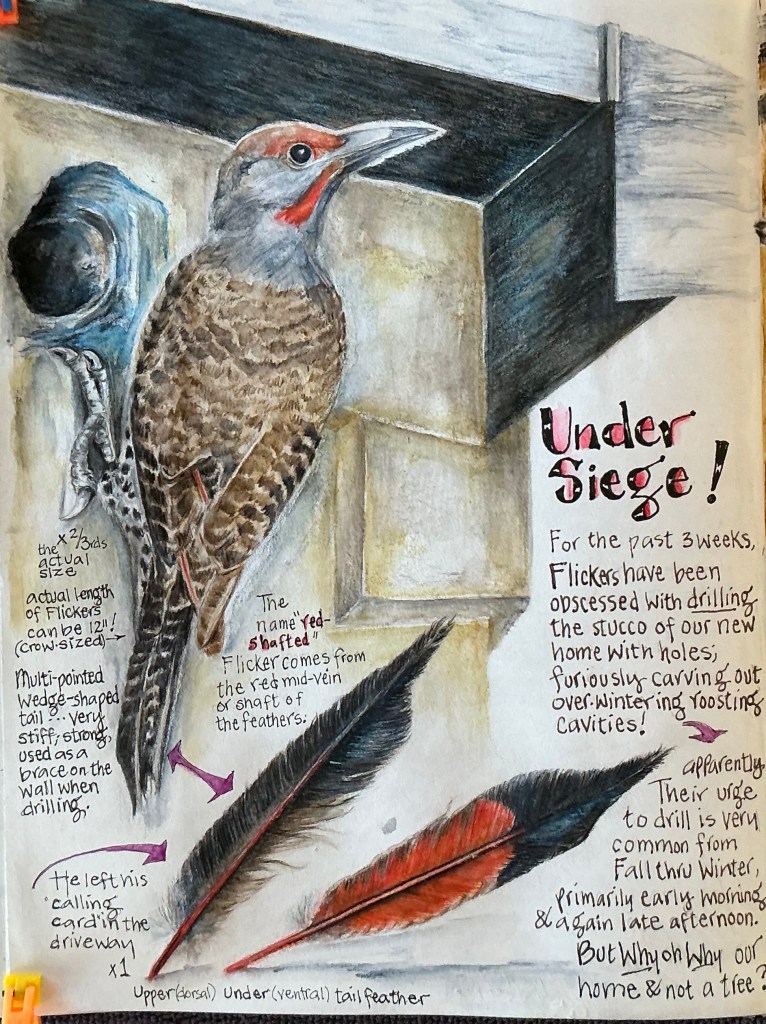
Meet the Northern Flicker (Colaptes auratus) … or more specifically, the Western red-shafted flicker (C. auratus ssp. cafer)*, a gorgeously flamboyant and noisy member of the Woodpecker family, that’s common throughout its western range.** And as woodpeckers do so well, they peck and peck and hammer and drill with the determination and force of a jackhammer*** on nearly any vertical (preferably wooden) surface. They’re single-minded, from start to finish, when it comes to creating a cozy nesting or roosting cavity, whether in a tree trunk or into your home. (More about that in a bit.)
Flicker ID – 101
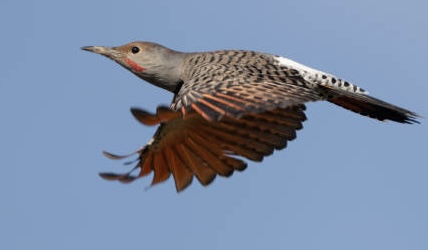
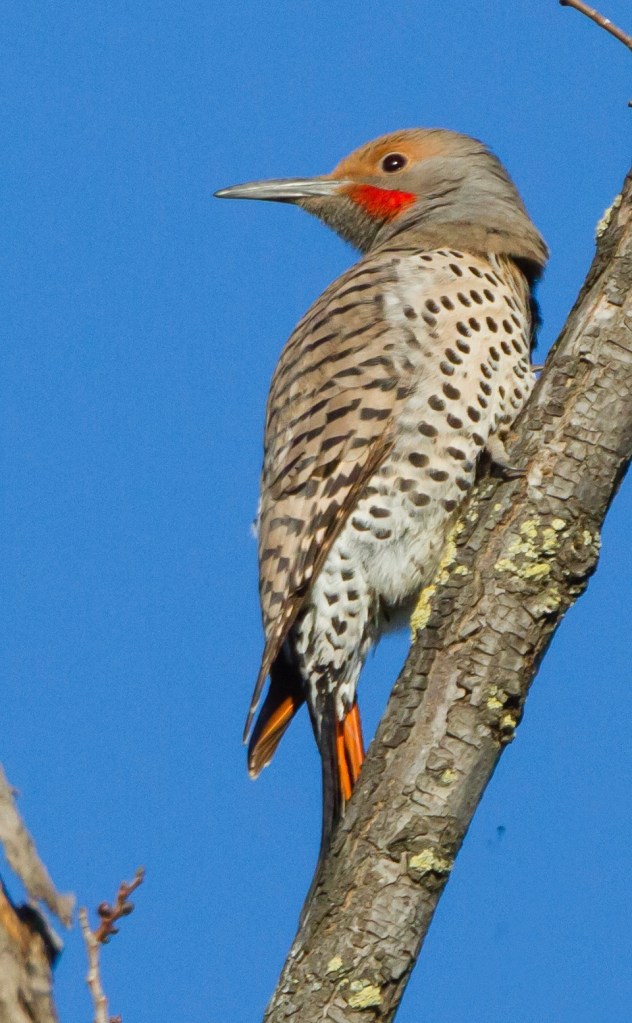
How do you know a Flicker has laid claim to your place? Well, he’s a big, heavy-bodied bird, and when flying overhead, your first thought might be “Crow!” At 12-14” long, with a wingspan of 18”-21”, the size is right. But as he flashes a large showy white rump patch bookended by reddish-orange underwings, you realize he’s not black. Anything but! As his flight slows and dips you notice his brown back is marked with narrow black bars. In preparation for landing, with wings open wide, he vertically aligns his body and feet with the wall, exposing a pale gray belly with bold black spots and a chest-wide black patch. Two strong clawed-toes up, two down (zygodactyl), and a stiff wedge-shaped tail adjusted as a brace, he taps out a few test spots, drawing your attention to his long and heavy bill, on a slate gray head broken by a buff-brown crown, a bright red whisker (male), and light gray cheeks.
Male Western red-shafted flicker in flight. Note white rump patch (unsplash.com)
On a crisp cool Autumn morning, as you watch in horror ……
Before you can declare, “It’s a Male Flicker!” ……
This bigger-than-life bird has landed, tested, and pecked away at his chosen spot 170 times in 10 seconds! He’s created an entry hole about 3” wide, right through the stucco and foam sub layer. This determined Flicker knows winter is coming and he intends to drill into our home, making a cozy roosting cavity in which to hunker down until Spring!
Oh no, No, NO!
We love Flickers and have no wish to harm this beautiful bird.**** But he’s already caused enough damage (23 feet high on the wall) that needs immediate repair. So I clap my hands and holler loudly (something unintelligible), and off he flys to a nearby snag to see how serious my noise-making was.
That’s the story of Flicker hole #1
Oh Not Again, and Again, and Again!
Since early November, our resident Flicker (I call him Jack), has continued to return many times, usually between sunrise and 10am. Sometimes he’ll make a fly-by before sunset. Often his quiet arrival escapes our notice; either we’ve been running errands, we’re out hiking with Luna, or enjoying a short roadtrip. These are the times he’s been able to drill six 3”-wide holes on the initial wall, and another 3”x6” hole just around the corner which was so deep, he almost penetrated the interior of Roy’s woodshop! This gives a whole new meaning to the term “Airbnb!”
After a few weeks up and down our fully-extended extension ladder to make a 2-step/2-day repair job/hole, we were making ZERO headway. Jack, unable to resist the need to drill him a roost cavity, was always one hole ahead of us. And because he didn’t hesitate to redrill newly repaired holes, was there something we were doing wrong?
All Flicker painting are larger than life, because that’s how they seemed to me!
It’s an Education in Biology and Patience
So we learned to listen for his noisy “kerrreee” scream-like call announcing his presence from one of Jack’s many favored perches around the house. Unless we missed it, his territorial call would put us on high alert, ready for action. We also listened for his series of warm-up test pecks that usually sounded inside the house. This “alarm” would catapult one or both of us from a comfy chair and run outside yelling and clapping our hands.
Between listening, running, clapping and yelling (and wondering what the neighbors might be thinking), I discovered a few interesting things on-line…..
Woodpeckers can’t resist drilling holes in synthetic stucco. This product provides the perfect surface for woodpeckers to hammer. When they begin tap pecking, it creates a hollow sound because the synthetic stucco includes a foam layer. The woodpeckers peck through the hard outer surface into the foam where it is easier to create a larger cavity to nest.
#1 …. Our entire home happens to be covered with synthetic stucco! While this might explain Jack’s insatiable desire to drill his roosting cavity into our home and not into one of the surrounding hardwood piñon pines, we’re not going to replace the stucco.
Basil, mint, cinnamon and/or lavender are suggested as natural, non-toxic deterrents for woodpeckers, who dislike strong aromas. The scent of basil, in particular, can be overwhelming and confusing to woodpeckers. Crushing one or a mix of these herbs with adding a bit of water, creates a green slurry that can be filtered and applied with a spray bottle to the affected area(s).
#2 …. This idea was worth a try, especially since there’s still have basil and mint growing in the garden. After collecting several handfuls of each, I popped the mix into the food processor with a bit of water and flipped the on switch. Gathering the resulting slurry, I filtered it through paper towels and collected the liquid for a spray bottle. That was several weeks ago, and with every hole repair, Roy’s been thoroughly soaking first the patch job then follow-up stucco coating with the basil/mint spray. It’s hard to know if it’s actually working, but the initial drilling sites haven’t been redrilled in the past week. It could also be that Jack is gone; pushed out with one of our heavy rainstorms. Or he’s begun drilling more recent holes over the RV garage door. With each repair, Roy continues to spray the basil/mint mix.
The Federal Migratory Bird Treaty Act*** provides protection for Flickers (and all woodpeckers), making it illegal to harm or kill them. But when warranted, migratory birds can be killed under a depredation permit issued by the Law Enforcement Division of the USDI-Fish and Wildlife Service (USFWS). Authorization by the relevant state wildlife agency also may be required before lethal control methods are initiated. Sound justification must be present for the issuance of depredation permits.
#3 …. Applying for a depredation permit may be our last resort, if Jack and his cohorts threaten to turn our brand new home into Swiss cheese.
AGAIN!
That’s the story, almost. This clear Conflict of Interest; an obvious Battle of Wits, continues. Just yesterday, one of the holes Roy patched above the RV garage door was redrilled this morning!
Oh Good Grief!
It’s already been repatched and resprayed, and while writing this story in my studio with window cracked and a clear view of the patched hole, I’m sure to hear and see that gorgeously determined Flicker if he returns to jackhammer away, once again, into a side of our home!
I’d love to know if you or anyone you know has a proven solution to this natural dilemma. Meanwhile …..
Thanks for stopping by, and Happy Thanksgiving!
……………………………………………………………………………………………………………
*Northern Flickers are divided into 2 subspecies, the Western red-shafted flicker (C. auratus ssp. cafer) and the Eastern yellow-shafted Flicker (C. auratus ssp. auratus). The red-shafted subspecies is found throughout Mexico, western and west-central U.S. (where it is common allyearlong), and British Columbia, Canada. The closely related yellow-shafted subspecies, which is highly migratory, is found in eastern and east-central U.S., the Canadian provinces and Territories (except B.C.), and far north into AK.
**Where the range for both subspecies overlaps (in the ‘lower 48’), a lot of hybridization occurs. It’s common to see a red-shafted flicker with more orange feather shafts and/or shades of yellow-orange on the underside of their flight feathers. The same holds true for the yellow-shafted hybrid. Otherwise, appearances differ notably between both subspecies of the Northern Flicker, primarily where the malar (mustache), nape pattern (back of the head below the crown), face color, and tail and flight feathers are concerned. See the table below for non-hybrid subspecies characteristics. For hybrids, any color and pattern variation(s) and combination(s) you can imagine have probably been found!
Northern Flicker subspecies
Red-shafted
Yellow-shafted
Face color
Gray
Buffy to warm, light brown
Malar color
Male: red Female: brown
Male: black Female: brown
Nape color & pattern
Gray, unpatterned
Male: Red crescent on gray Female: gray, unpatterned
Feather shaft/under flight feathers
Pinkish to reddish to red
Yellow
***A woodpecker can peck wood 17x/second, and from 8,000-12,000x/day! Really! And they can drill into wood at a force 10x greater than a football tackle that would cause a concussion. On the November 17, 2025 episode of the Science Friday (SciFri) podcast, biologist Nick Antonson stated that woodpeckers can peck 20-30x their body weight. Now that’s amazing for a Flicker that weighs about 6 ounces!
****Because we had no desire to harm the Flicker(s) drilling into our new home, even when we reached our point of extreme frustration, we wanted to ensure our deterrent efforts aligned with wildlife regulations; especially with the Federal Migratory Bird Treaty Act (Act). Flickers (and all woodpeckers) are considered a migratory non-game bird species, and protected under the Act. It’s illegal, punishable by fine and/or imprisonment, to harm or kill them.
Male Western red-shafted woodpecker with his tail braced against the branch(bird pixels.com)
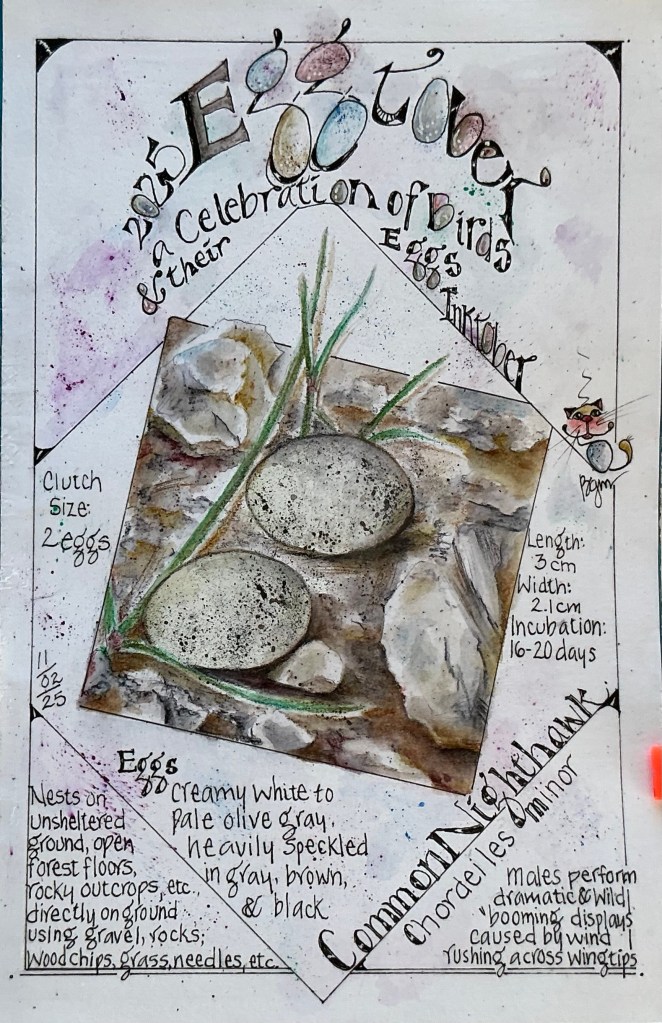
It’s a wrap! EggTober 2025 – the Full Four Submissions- all in one place!
My 3 minute YouTube video (see link below) features all 32 annotated bird egg paintings submitted for Inktober2025, along with several bonuses you won’t want to miss!
1) a pair of never-seen-before annotated Common Nighthawk eggs painted for the cover of my 6”x9” handmade journal ………
2) an index, by common name and date of appearance, of the 32 bird eggs painted and annotated between October 1 and November 1, 2025 ………
3) an accordion book attached to the inside back cover that has all the fascinating details about each of the 8 layers of an avian eggshell
YouTube Video Link
For some reason, I’m unable to embed my YouTube video directly into this post. This is rather inconvenient, huh! So until I can troubleshoot the player issue, I’d love for you to click on the link below to view the video on my YouTube channel!
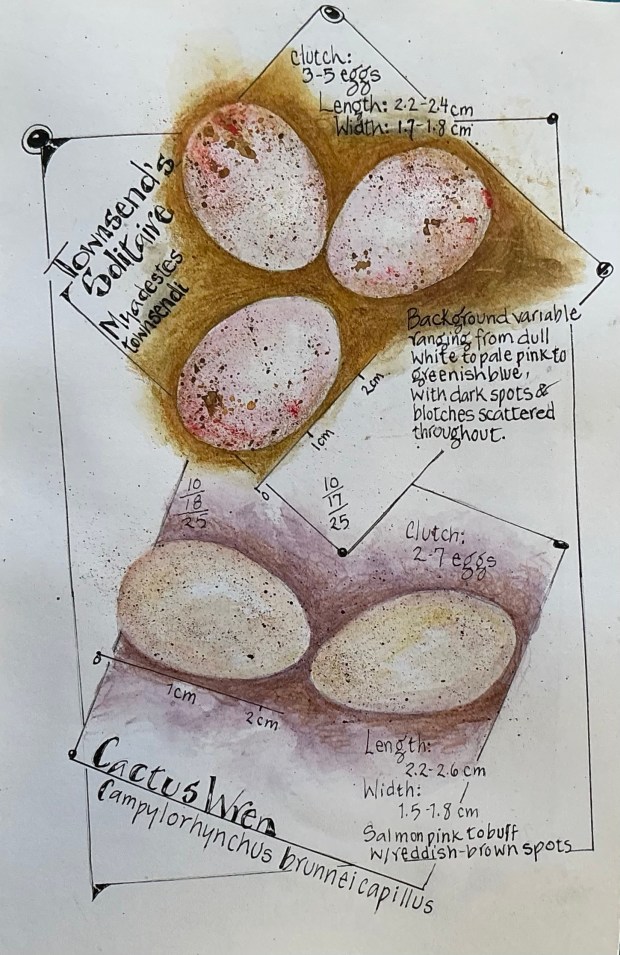
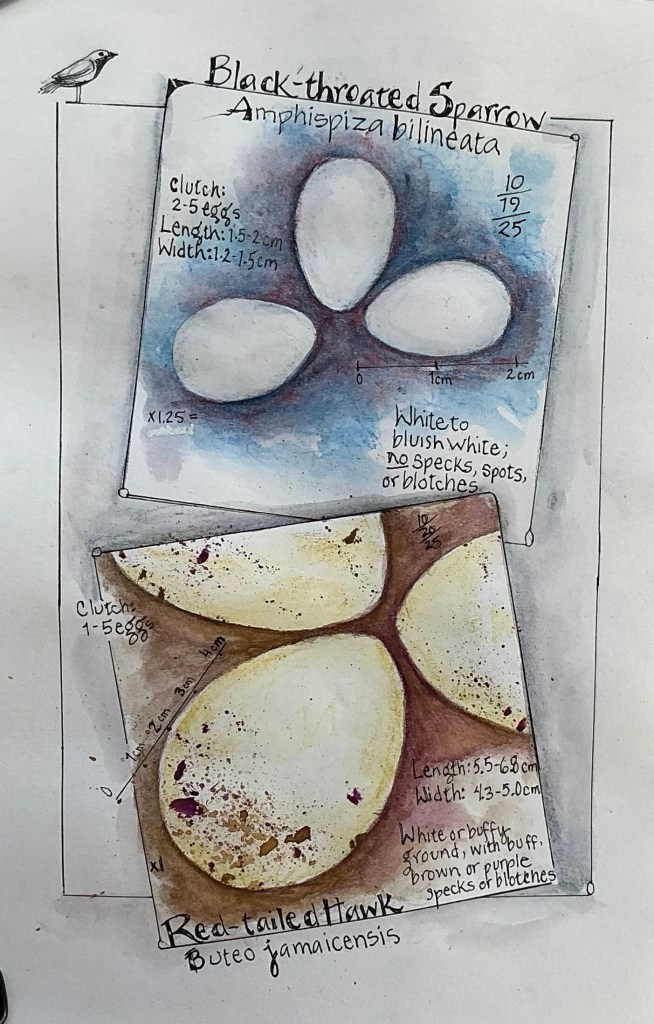
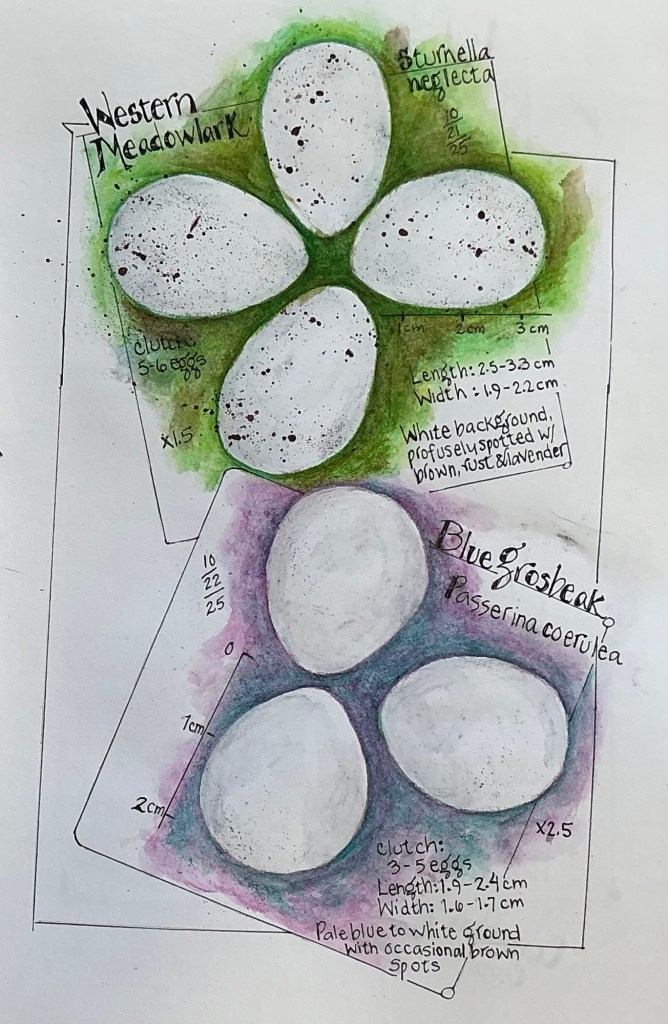
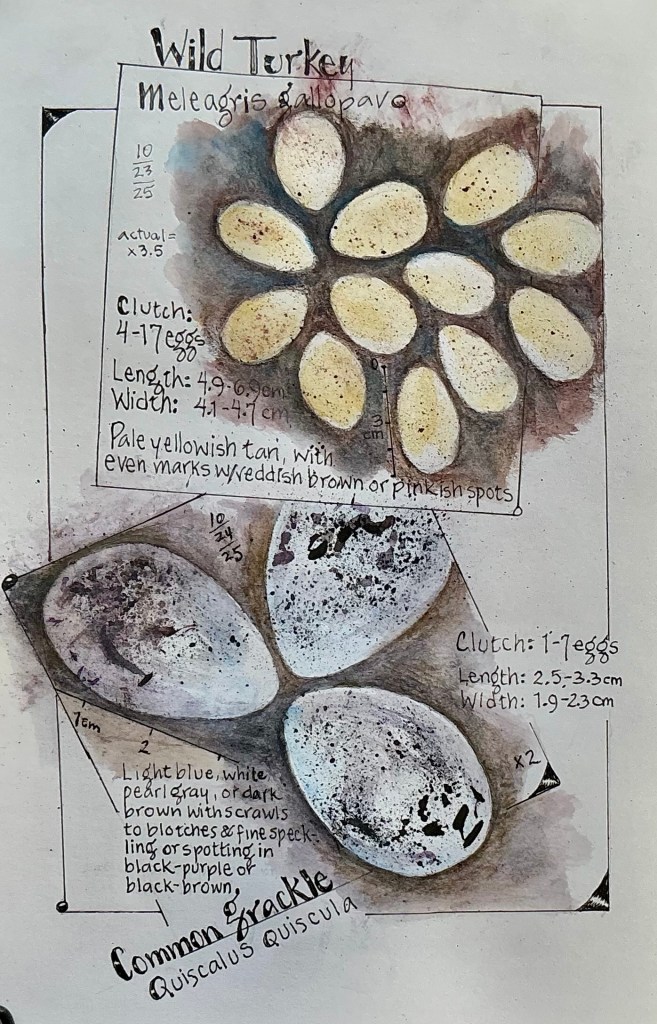
EggTober 2025 has officially ended! And Wow … I’m so eggs-cited to share Submission Four, the finale, with all-y’all! The eggs showcased for Days 25-31 +1 (yes, another random bird flew in and laid a bonus clutch on the last page) are all snug in their New Mexico nests. Also, you’ll notice a bit more text surrounding those nests.
Following Submission Three, where my narrative focused on the different layers of the eggshell membrane, I was curious about how avian eggshells are constructed. Then I wanted to know more about the entire reproductive system of birds, from ovulation to fertilization, to egg laying. And Then I couldn’t rest without knowing about the embryo, the yolk, the egg white, and all the bits and pieces you see when cracking open an egg! I didn’t know any of this, and if you don’t know, you’re head is about to explode in wonder!
October 25 and 26
The Avian Oviduct and Egg Formation
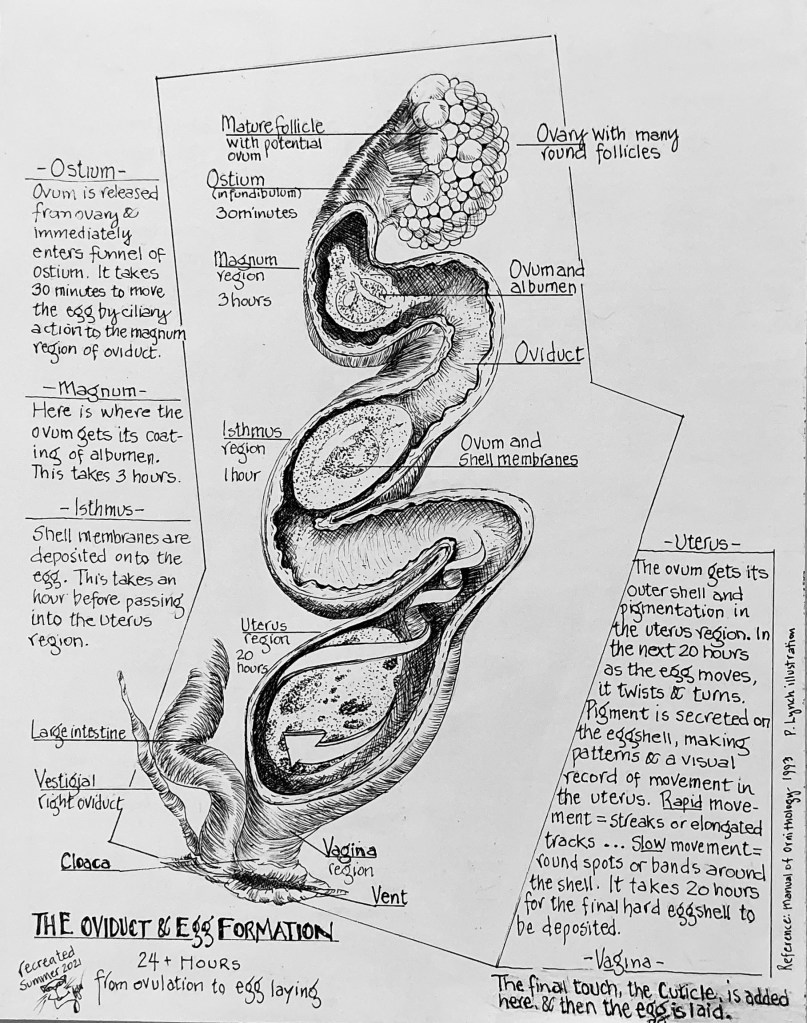
It takes about one day to build an egg. But to prepare for the journey, about 7 to 9 days before the egg will be laid, the Yolk must be formed. Here’s the story of …..
The Yolk …..
….. formed in one of the many Follicles of the Ovary, the vitellus or Yolk begins as an immature Ovum that is stimulated to enlarge over several days by receiving deposits of yolk material. Once growth is initiated, over the next 7 to 9 days the Yolk’s formation intensifies as 99% of its nutrient-rich layers are deposited until it’s fully formed. Now mature, the Follicle ruptures and the Yolk is released in a process called Ovulation.
And this is where the Journey through the Oviduct begins! Over the next 24 hours, the developing embryo acquires the many layers it needs for nourishment, respiration, and protection until it’s formed into a perfect egg ready for laying. The entire journey takes place in the Oviduct …..
….. which can be divided into several regions: the Infundibulum, Magnum, Isthmus, Uterus, and Vagina. What happens in each of these regions is nothing short of fascinating!
The Regions of the avian oviduct
Infundibulum – After Ovulation, the Yolk immediately enters the funnel of the Infundibulum (the Ostium) where the Ovum is fertilized and the Chalazae is formed. With the help of ciliary action, it takes 30 minutes for the Ovum to move through this region of the Oviduct to the next, the Magnum.
Magnum– It’s this region where the Yolk, together with the now developing embryo and the Chalazae, gets a protective coating of protein-rich Albumen, a process that takes about 3 hours to complete, before moving along to the Isthmus.
Isthmus – The Inner and Outer Shell Membrane Layers and the NucleationSites are formed in this region of the Oviduct. This takes about an hour before the package is delivered to the Uterus.
Uterus– This is where five of the six layers of the outer Eggshell are formed. They are the Mammillary Layer and Mammillary Bodies, Organic Matrix Layer, Crystalline Palisade Layer, Vertical Crystal Layer, and Shell Pigment Layer. Also, as much as one-third of the protein in an egg is added while in the Uterus.
It takes about 20 hours for the egg to move through the Uterus while these layers are deposited. And as the egg moves, it twists and turns. When it’s time to add pigment, the rate of rotation adjusts to ‘paint’ the species-specific patterns we see on the eggshell, leaving a visual record of the egg’s movement in the Uterus. For example, if streaks or elongated tracks on the shell are required, movement is more rapid than when creating round spots, blotches, speckles, or bands. After pigment is added to the outer shell structure, the layers of background color and any markings are enclosed in calcite crystals.
Vagina – The last region of the Oviduct where the Cuticle (the Bloom) is added to the shell just before the egg is laid.
The egg is now complete. The entire process, beginning with the release of the mature Yolk and Ovum from its Follicle until the egg’s final touches, takes 24 hours! And the timing ensures the egg is always laid sometime during the day.
………………………………………………………………………………………………………………
Glossary and Other Interesting Things
Albumen – refers to the “white” of the egg. The Albumen is an effective barrier against microbes that might cross over and cause disease in the developing embryo. Albumen contains over a hundred antimicrobial proteins.
October 27 and 28
Chalazae – two spiral bands of white, stringy tissue that suspend and hold the Yolk in the center of the Albumen.
Crystalline Palisade Layer – A tough, mineralized structure of calcium carbonate crystals that grow into dense columnar units above the MammillaryBodies (the mineralized base of the crystalline eggshell). The amount of shell deposited is determined by the time spent in the Uterus.
Eggshell – Depending on species, the eggshell represents from 9-15% of the total weight of the egg.
Eggshell Formation – The Crystalline Palisade Layer is essential to the process of eggshell formation which takes place in the Uterus.
Nucleation: The process begins at the Nucleation Sites, located on the External Shell Membrane, which are the specific places where the mineralization of calcium carbonate begins.
Initial growth: As calcium salts are deposited and crystallize, inorganic calcium carbonate crystals grow around and outward from the Nucleation Sites, forming the cone-shaped Mammillary Bodies; the first, innermost calcified layer of the eggshell, anchored to the External Shell Membrane. This base of mineralized shell provides mechanical strength, and serves as the main source of calcium for the developing embryo’s skeleton.
Maturation – The calcium carbonate crystals continue to grow into the dense columnar units that form the Crystalline Palisade Layer, creating a tough, mineralized structure that protects the embryo. The amount of shell deposited is determined by the time spent in the Uterus.
Follicle – an enclosed cavity in the Ovary
Labile Medullary Bone– a temporary, highly porous, and woven bone tissue that forms, driven by hormonal changes in female birds, in her medullary (marrow) cavities in the period leading up to and during egg-laying. As a highly porous, woven bone, medullary bone has no significant mechanical function or structural strength. Its role is strictly metabolic.
The word labile means the bone is unstable and readily undergoes rapid and frequent change. Once the egg-laying period is complete, hormones change and medullary bone is reabsorbed.
Labile Medullary Bone Formation and Calcium Requirements – It’s interesting to note that an egg-laying hen requires 10% of her the total body calcium reserves during each 24-hour period she is producing eggs. To meet this calcium requirement, primarily for eggshell formation, it’s necessary that her plasma (blood) calcium levels triple during egg formation. This calcium is mainly obtained from increased intestinal absorption and a highly labile reservoir found in the medullary bone. In other words, to meet the calcium requirement, the hen’s body naturally produces it as medullary bone.
Eggshell Layers
Mammillary Bodies – The first, innermost calcified layer of the eggshell, anchored to the External Shell Membrane. These cone-shaped Mammillary Bodies form the base of mineralized calcium carbonate which provides mechanical strength to the shell, and serves as the main source of calcium for the developing embryo’s skeleton.
Nucleation Sites (aka Organic Cores) – form in the Isthmus region of the Oviduct, and are found on the External Shell Membrane. Composed primarily of organic material (proteins, proteoglycans, collagens), they are the specific locations where the mineralization of the calcium carbonate shell begins. In other words, the Nucleation Sites provide the initial template or “seed” for calcium carbonate crystals to start forming.
Oviduct – the tube that transports the developing egg with embryo from the Ovary to the Vagina.
Oviduct … Only One? – Yup! Most bird species have only one Ovary and adjoining Oviduct, the other having degenerated when the hen was, herself, a developing embryo. This evolutionary modification probably resulted because egg production from two ovaries would deplete the female’s body of calcium to excess. As has been demonstrated in chickens that are on a calcium deficient diet, egg production ceases.
Ovulation – The process in which the mature Yolk and Ovum is released from its Follicle in the Ovary and is received into the Oviduct through the Infundibulum.
Ovulation Rate – Within 1 hour after a hen has laid an egg, the next mature Follicle in the Ovary ruptures (aka ovulates), releasing the mature Yolk and Ovum.
Ovum – an unfertilized egg
October 29 and 30
Pigment or Not? – Whether an eggshell is white, or decorated with a background color and/or markings, it’s appearance is influenced first by the species of bird, then by lifestyle and nest location. The specific color of an egg is an adaptation to its environment. This is where camouflage and/or thermal regulation may be required.
Thermal regulation is still being studied, but where camouflage is beneficial, egg color depends strongly on nest locations:
White eggs – prevalent among birds like pigeons, doves, swans, many seabirds, etc. These birds often build concealed nests where camouflage isn’t necessary, or inconspicuous locations are chosen for nesting where white coloring helps camouflage the eggs, reducing the risk of drawing attention.
Blue or green eggs – Bluebirds, robins, sparrows, parrots and other birds that lay pale to bright blue, blue-green or green eggs blend in with the sky or the foliage of nesting sites, providing natural camouflage.
Brown or speckled eggs – Brown or highly marked eggs with speckles, spots, blotches, or scribbles provide excellent camouflage for ground-nesting birds like quail, avocets and killdeer. The mottled appearance of these eggs blend well against rock, sand, soil, foliage and branches. The eggs’ colorations are camouflaged well in nests woven from a variety of materials to nests that may be nothing more than a scrape or depression in the ground.
ShellPigment Layer – Pigment granules are deposited on the outer shell structure, forming color layers which are then enclosed in calcite crystals.
Sperm Storage – a female bird need mate only once for the sequential formation of her eggs to be fertilized. In other words, each newly ovulated egg that arrives at the Infundibulum, which occurs every 24 hours (more-or-less), becomes fertilized from a single mating. That’s because female birds can actually store sperm in Sperm Storage Tubules (SSTs). SSTS are tubular “invaginations” in the Infundibulum where sperm can be kept alive for 2 to 15 weeks (depending on the species), and can be released after Ovulation.
Uterus – the Shell Gland
Yolk – The nutrient-bearing portion of the egg containing most of its fat, minerals, and many of its proteins and blood vessels.
Yolk Behavior – The Yolk always rotates so the developing embryo floats to the top, regardless of the egg’s position
Zygote – the fertilized Ovum
Wow, gosh! I’m egg’s-hausted ….. how about you!?! But wasn’t that a fascinating journey through a bird’s oviduct? A literal look behind the scenes!
October 31 and November 1 (bonus)
And that concludes my Inktober/EggTober 2025. Researching so much information not only took me down some fascinating rabbit trails, but everything I learned in the month of October blew my mind! And everything I uncovered had to be shared with you all. The bounty was voluminous, resulting in each Submission eggs-panding to accommodate nearly everything. Yes, you read that right ….. I nearly got everything shared, and there’s still so much more to learn about past, present and future bird eggs and all eggs in general. Maybe once my notes are gather and organized, and I pursue answers to countless questions on the when’s, why’s and what-for’s, it will be time for EggTober 2026!
Did you participate in this year’s Inktober? Maybe my four submissions gave you ideas for Inktober 2026? Share your thoughts and ideas. Meanwhile ….. That’s all for now, yolks!
As always, thanks for stopping by!
P.S. in case you missed any of my previous EggTober 2025 Submissions, you can catch up with the following links: Submission One, Submission Two, and/or Submission Three! Enjoy!
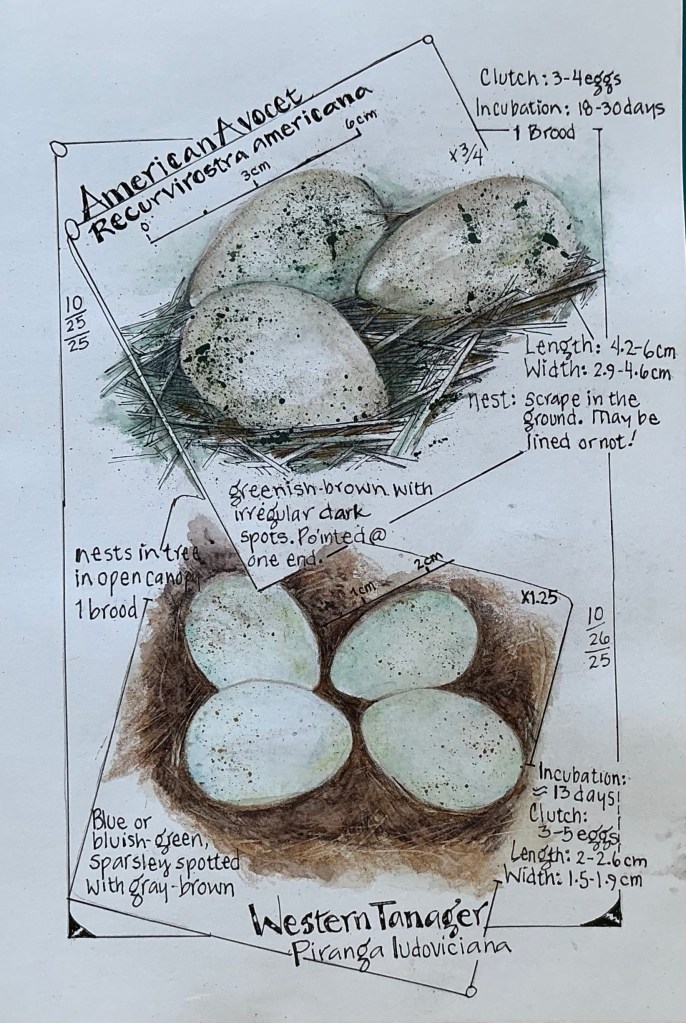
October is ‘flying” by! It seems amazing how quickly my Inktober 2025 sketchbook is filling up with daily EggTober watercolor paintings of bird eggs. Week three is now complete, and the eggs of eight more breeding birds of New Mexico can be viewed below. As with Submissions One and Two, included are a few fascinating facts about bird eggs, this time with a focus on the eggshell.
In case you missed my first and/or second EggTober posts, and would like to catch up, click the following link(s) to read Submission One, and/or SubmissionTwo.
October 17th & 18th
A Bird’s Eggshell
At first glance, you may think all bird eggs are covered in a hard, solid shell. You would be right about the shell being hard, but have you ever taken a close look at the shell surface? The outer shell appears to have dimples, a bit like a golf ball. Those dimples are pores in the eggshell. Bird eggs are considered “amniotic” which means their eggs not only have a hard shell; they have a porous membrane to allow for oxygen and carbon dioxide exchange. Also, an important characteristic of amniotic eggs is they resist dehydration, which is why birds can lay them on dry land. So, is the porous membrane sandwiched between the eggshell and the ‘egg white’ (albumen), and why?
In Submission Two, I noted that the typically oval-shaped bird egg is able to withstand the weight of the incubating parent(s); the shell having the strength and resilience to withstand external pressures which minimizes the chances of the developing embryo becoming deformed or suffering bone fractures. So, just how thick must an eggshell be, yet still allow the developing embryo to breathe?
What are the main functions of the eggshell?
The shell of an egg contributes to successful formation and development of the embryo, by providing protection, respiration and water exchange. The eggshell is also the major source of calcium for the development of high-calcium consuming organs, like the skeleton, muscles and brain.
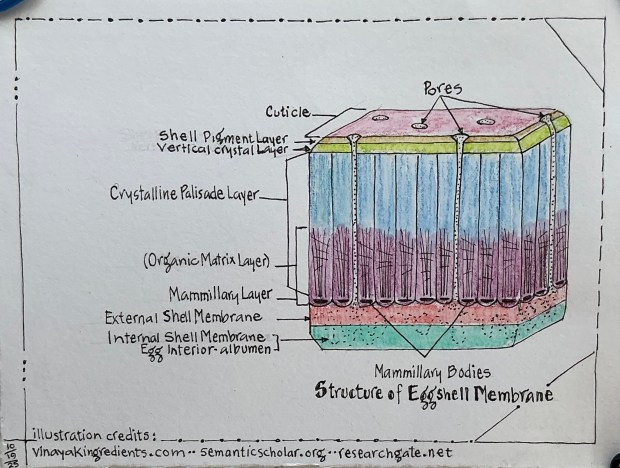
But what we think of as the eggshell, is actually Eight Separate Layers (!) that stack together from the outside of the egg to the inside where layer eight meets the albumen. It’s through these layers that the embryo breathes.
These layers, from the outside in, are the Cuticle layer with Pores, ShellPigment layer, VerticalCrystal layer, CrystallinePalisade layer, OrganicMatrix layer, Mammillary layer with MammillaryBodies, ExternalShellMembrane layer, and InternalShellMembrane layer. These will be summarized below. I’m also compiling a more complete description of each layer and detailing their importance, which should be complete and posted before the end of the month.
But before taking a brief ‘look’ at the eight eggshell layers, I wanted to share a snapshot about their thickness ….. because, quite frankly, I couldn’t imagine how all those eight layers manage to fit!
Eggshell Thickness
Most bird eggshells must be thin enough for the chick to peck through when it hatches, but at the same time it must be thick enough to bear the weight of the growing embryo inside, and the weight of the parents incubating it. The thickness of eggshells varies among species and individual birds, but also among individual eggs laid in a clutch. Eggshell thickness is also influenced by factors like the bird’s age, diet, and where the measurement is taken on the egg. In general, bird eggshells are usually 5% thicker at the mid-section of the egg (the area called the equator) than the ‘bottom’ (the sharp egg pole) and ‘top’ (the blunt egg pole) ends.
To ‘illustrate’ how thickness varies by a few species, the egg of a Blue-tailed Emerald (a species of hummingbird that lays an egg with one of the thinnest recorded eggshells among all bird species) has a shell that’s 0.029 mm (0.0011 inch) thick. Compare that with an Ostrich egg, the largest egg with the thickest eggshell in the world, measures in at 1.92 mm (0.08 inch) thick. For many common species, like the Mallard, shell thickness is around 0.337 mm (0.013 inch); a domestic chicken eggshell varies from 0.33 – 0.36 mm (0.013 – 0.014 inch) thick.
It may be helpful to relate these small sizes in eggshell thickness to an average human hair, which can be anywhere from 0.06 mm (0.0024 inch), to 0.10 mm (0.004 inch) thick. I’m still amazed how an eight-layered eggshell happens!
October 19th & 20th
Structure and function of eggshell layers: Cuticle layer and the Pores, Shell Pigment layer, Vertical Crystal layer, Crystalline Palisade layer
Cuticle (aka Bloom)
The Cuticle’s primary functions are to act as a physical and chemical barrier against invading microbes, protect the eggshell pores, and regulate the exchange of gas (Oxygen and Carbon Dioxide) and moisture (water vapor). The Cuticle also affects the egg’s wettability, which helps prevent water and bacteria from entering, and fine-tunes the eggshell’s appearance, including ultraviolet (UV) reflectance.
Eggshell Pores
The texture of the outer eggshell is due to the Pores that form openings in the Cuticle. Depending on species, there can be anywhere from 7,500 to 17,000 Pores covering an eggshell, most located at the blunt end of the egg (the top end where the air cell is located). Each Pore is connected to a Vertical Pore Canal that penetrates the next five eggshell layers, down to the External Shell Membrane. The shells of most bird eggs have simple, straight pore canals that widen slightly toward the openings through the Cuticle. The exceptions are found in swans and the ratites (the group with ostriches and emus), where their Vertical Pore Canals are highly branched. Covering the exterior opening of the Pores of all bird species (except pigeons and doves [hmmmm ….. wonder why]) are tiny plugs or caps, which may act as pressure-sensitive valves.
The Pores and their canals provide a critical passageway for gas and moisture exchange between the inside and outside world. This exchange allows the developing embryo to breathe by taking in oxygen and releasing carbon dioxide and water vapor.
Shell Pigment Layer
The Shell Pigment Layer serves multiple critical functions, including camouflage, thermoregulation, and protection for the developing embryo. The colors and patterns come from two main pigments, protoporphyrin (brown/red) and biliverdin (blue/green), and their function varies depending on the bird’s environment and nesting behavior.
Vertical Crystal Layer
The Vertical Crystal Layer provides mechanical strength and structural integrity. Its tightly packed, vertically oriented crystals form a dense, outer layer that protects the embryo from physical shocks, while also being integrated with the PalisadeLayer (below) to form a tough, ceramic-like structure. This outer layer’s density and arrangement make it resistant to impact.
Crystalline Palisade Layer
The Crystalline Palisade Layer serves two primary functions: providing mechanical strength and regulating gas exchange for the developing embryo. This is a thick, mineralized layer, that forms a dense matrix of calcium carbonate crystals, and is critical for protecting the egg’s contents while also aiding metabolic processes (i.e. all the chemical reactions within the embryo that are essential for life).
October 21st & 22nd
Structure and function of eggshell layers: Organic Matrix layer, Mammillary layer with Mammillary Bodies, External Shell Membrane layer, and Internal Shell Membrane layer
Organic Matrix Layer
The Organic Matrix Layer plays a crucial role in controlling biomineralization, forming the shell’s microstructure, and providing antimicrobial defense. Consisting of proteins, glycoproteins, and proteoglycans, this layer acts as a scaffold that controls the eggshell’s strength and protective properties.
Mammillary Layer and Mammillary Bodies
The Mammillary Layer and Mammillary Bodies form the foundation for the rest of the eggshell. Their primary function is to provide the calcium for the embryo’s skeletal development. This inner layer is composed of calcite microcrystals that dissolve easily, allowing the embryo to extract about 80% of its calcium needs before hatching.
This layer also helps during the “pipping” process because its globular texture makes it easy to crack and break through the shell from the inside. Pipping is the,process where the chick breaks through its eggshell to hatch. There are two phases during pipping: internal and external. Internal pipping is when the chick breaks through the InnerShell Membrane Layer (see below) to reach the air cell and take its first breath followed by chirping! This first phase not visible from the outside and can take 12-24 hours. External pipping is when the chick uses its egg tooth to peck a visible hole or holes in the eggshell, a process that can take a few hours to a few days, requiring the chick to rest frequently… those outer layers of shell are hard. The long time due to the chick needing to rest This can take anywhere from a few hours to a couple of days. The final step is “zipping,” where the chick turns in the egg, cracking the shell into two halves to fully hatch.
External Shell Membrane Layer
The External Shell Membrane Layer functions primarily as a barrier to protect the egg’s contents from bacterial invasion and to prevent moisture loss. This membrane is made of proteins and acts as the first line of defense after the Cuticle, preventing microorganisms from entering the egg.
Internal Shell Membrane Layer
The Internal Shell Membrane’s primary functions are to provide a barrier against bacterial invasion and to support the formation of the hard eggshell. It also helps prevent excessive moisture loss while allowing gases to pass through, a process that becomes more significant when the External and Internal Shell Membrane Layers separate to form an air cell.
October 23rd & 24th
Summary
Eggshells! I never knew they are such complex structures with many unique features. And eggshells are unfathomably critical to the development and survival of the embryo right up until the moment they “Pip” their way into the world. Without their bioceramic characteristics, microscopic pores, front-line bacterial defense systems, color patterns, and their surprising strength despite the shell’s thinness. birds might be something completely different or perhaps might not ‘be’ at all. Something worth pondering!
Hope you have enjoyed Submission Three of EggTober! If so, please leave me a comment. And as always, thanks for popping in!
p.s. Stay tuned for Submission Four, landing in your in-basket next week!