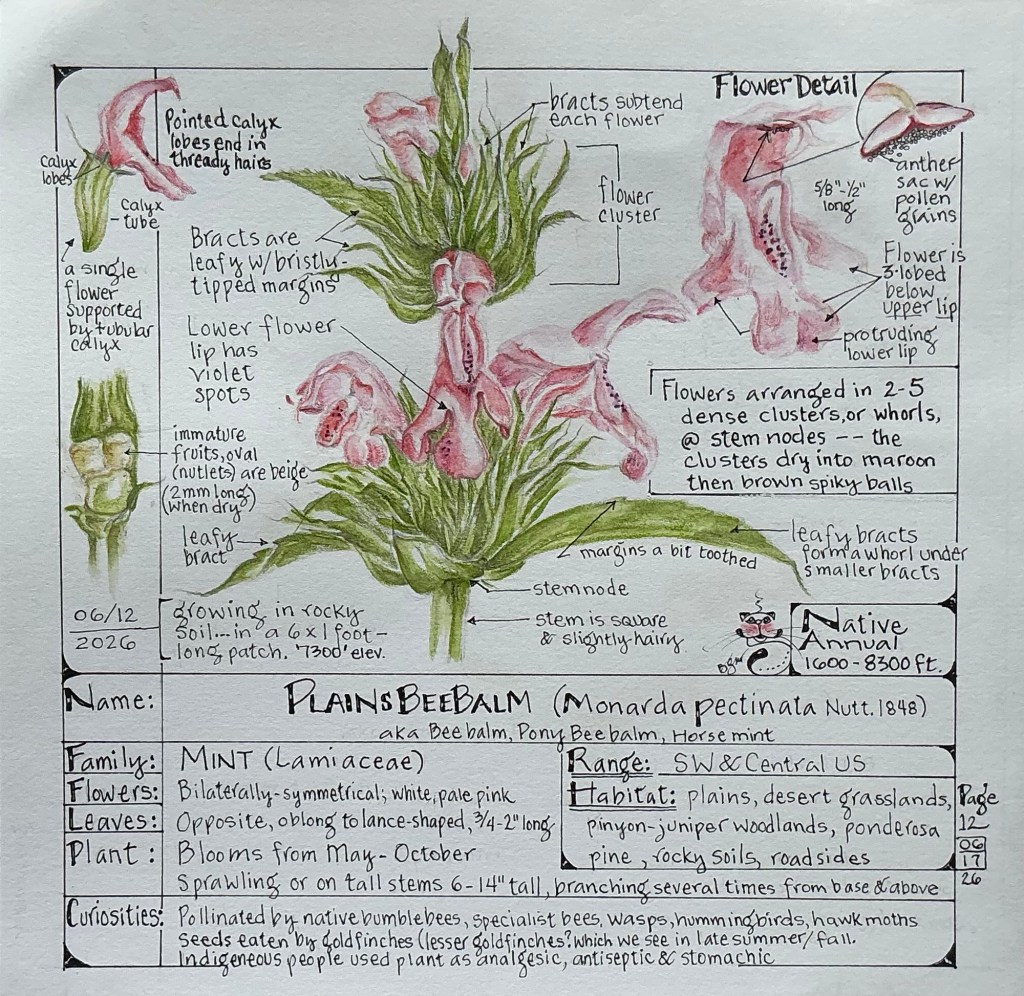
July 14, 2026
House Finch (Haemorhous mexicanus ssp. frontalis)
aka Common House Finch

More than likely you’ve seen the sparrow-sized House Finch if you live almost anywhere in the U.S., southern Canada, or Mexico. The males are particularly showy with their bright red heads, throats and breasts, and their bouncy flight is sure to catch your attention. Just filling a backyard bird feeder with black oil sunflower seeds can bring a flock of 50 House Finches in to feast. They tend to dominate their favorite feeders, often chasing off competitors, after which you’ll have plenty of time to observe these finches as they sit still while shelling seeds by rapidly biting and crushing them with their large beaks.
If you aren’t familiar with House Finches, you’ve probably heard their long, twittering song, which they belt out in most neighborhoods from coast to coast. Their song, so full of excitement and energy, is usually sung from the top branch of a tall juniper or pinyon pine tree. House Finches seem to be pleading urgently for attention by clearly singing, “Talk to me PLEASE, isn’t anybody THERE!!” (At least that’s what I hear over and over again first thing every morning throughout the Spring and Summer!)
Not knowing how many broods have been reared this year, to date, it seems like we’ve enjoyed a large number of family groups around the house. Fledglings are fun to watch in flight as they constantly chase adults to beg for food. These futile attempts for free handouts strengthens their wing muscles and hones their acrobatic skills. Usually defeated, these novice students soon land in a tree and begin a long, hard practice session to learn their parents’ complex song.
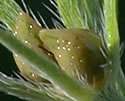
Completely exhausted, they will return to a certain cholla and the nest where the adult female fed and defended them as nestlings during the first 12-20 days of their lives. Finding even one of their well-hidden nests in any of those 4 to 7 foot tall cactus “trees” is quite the prickly endeavor! Even knowing how to recognize a House Finch nest hasn’t prevented me from experiencing plentiful and painful spiny jabs. What an excellent defensive location our local birds choose for nesting.
The Nest and Nesting Habits
In as little as two days, the female builds a cup-shaped nest made of fine stems, leaves, rootlets, thin twigs, string, wool, and feathers, with similar, but finer materials for the lining. This sturdy nest, durable enough to raise up to six broods a season, measures 3-7 inches wide; the inside cup is 1-3 inches across and up to 2 inches deep.
House Finches usually build their nests in cavities in deciduous and coniferous trees, on cactus and rocky ledges, and in or on buildings using sites like vents, ledges, street lamps, ivy, and hanging planters. They will also claim nests abandoned by other birds.
A western House Finch is likely to build its nest within 60 feet of where it was the previous breeding season; eastern birds choose sites more than half a mile away from prior nests. Despite these differing habits, all nest sites have a few things in common: a sturdy base and a roof-like overhang to shelter against sun and rain.
House Finch Facts
- With over 40 million House Finches across North America, they are currently one of the most widespread and common bird species across the United States, second only to the American goldfinch.
- Native to the Southwest U.S. and Mexico, in 1939 a few House Finches captured in Santa Barbara, California, were sold to a New York City pet store owner as “Hollywood Birds.” Even back then, the sale of these birds was recognized as illegal under the Migratory Bird Treaty Act of 1918. To avoid prosecution under the Act, the pet store owner released the finches …. they were set free on New York’s Long Island. By the early 1940s wild nests were discovered on Long Island, and from there the spread continued.
- Sometime before 1870, House Finches were introduced to Oahu from San Francisco. By 1901, they had become abundant on all the major Hawaiian Islands.
- Where House Finches are an introduced species, they are considered naturalized 1. They’re also considered an invasive species in some places, largely in unforested lands across the eastern U.S. where they’ve displaced the native purple finch (and even the non-native house sparrow!).
- In their native range in the Southwest U.S. and Mexico, House Finches live in desert, grassland, shrubland, and open woodland environments, as well as near human dwellings and cities. The biggest House Finch flocks in the East are found in cities, and it’s much more common to find the eastern birds in habitats developed by people than anywhere else.
- Depending on where they live, House Finches can appear very different. Within the 11 officially recognized subspecies, body size, beak size and shape, wing length, tail length, and coloring can all vary regionally. For example, the northeastern migratory populations have longer and more pointed wings better suited for longer flights than the western finches which tend to be permanent, year-round residents. Also, House Finches on Guadalupe Island off the coast of Baja California, Mexico, have heftier beaks than mainland birds.
- The bright red (and sometimes orange or yellow) plumage on the head, throat and chest of mature House Finch males comes from compounds in their food (bird species are unable to produce red or yellow other than by diet). These pigments, called carotenoids (the same ones found in carrots and tomatoes), come from the berries and other fruits they eat. Females prefer mates with the biggest and brightest red-colored patches — a sign of a well-fed male.
- House Finches are among the strictest avian vegetarians: seeds, buds, fruit, and foliage comprise 97% of their year-round diet. Most seed-eating birds not only eat insects in the spring and summer when they are abundant, but will feed bugs to their nestlings to add protein for growth. Except for the occasional fly larva, House Finches stick to a vegetarian diet.
- Dealing with a pandemic for decades, these birds suffer from “House Finch Eye Disease,” a form of conjunctivitis that was first detected in Washington D.C. in the winter of 1994. Since then, the bacterial illness has expanded continent-wide causing big declines in House Finch numbers. Infected birds often have swollen or reddened eyes and may appear inactive or confused. Over time, it leads to birds becoming blind, disoriented, and vulnerable to predators. Other finch species, such as the American Goldfinch, are also affected. Because the disease is spread through social contact, it’s very important to keep bird feeders and baths clean.
- The mite, Pellonyssus reedi, is often found on House Finch nestlings, particularly later in the season. However, the adult female has a clever strategy in response to these often fatal attacks. Since male chicks are more vulnerable to a mite outbreak, she will lay eggs containing females first to reduce the length of time male chicks are exposed to mites. This strategy increases the likelihood that representative numbers of both sexes will survive.
…………………………………………………………………………………………………
Share stories of your local House Finches!
Hope you found this interesting!
As always, thanks for stopping by!
1 A species is considered “naturalized” if it didn’t originally evolve in an area but has successfully adapted, established a permanent population, and is reproducing independently in the wild. These species are non-native, surviving without human help. Note: not all naturalized species are considered invasive.
References