Last month (mid-March), while looking everywhere for signs of spring (something green and growing), I dared to peek under a flat rock and gasped with surprise! Instead of uncovering a tiny flower bud was a gigantic “creepy-crawly” bug! Yikes! After quickly dropping the rock back on his head I realized my run-away imagination had gotten the better of me.
So gathering my courage, I took another look. There, hiding under that rock was a “cuddly” Jerusalem cricket trying his best to be invisible (while avoiding the bright sunlight).
This wasn’t my first Jerusalem cricket, but seeing this guy prompted me to learn more about this curious insect……
Firstly, Jerusalem crickets are neither true crickets nor are they native to Jerusalem
Taxonomists agree, “Jerusalem crickets are in a very different family than true crickets. This includes a bunch of flightless varieties, and some with wings, found in Africa. The Jerusalem crickets are wingless and are found in the Americas.”
“The origins of the name, “Jerusalem” cricket isn’t certain, but it’s thought that it comes either as a reference to the skull-shaped head (they’re also known as skull crickets), which is associated with skull hill in Jerusalem; or, comes from a watered-down swear word from the ‘40s and ‘50s. Around this time, in the US, both “Jerusalem” and “Cricket” were expletives, associated with being startled.”
Next, some Jerusalem Cricket Mating Characteristics
Similar to true crickets, each species of “sings” a different song during mating. They actually sing by drumming and they drum by beating their butts on the ground.
Once a larger female has successfully mated with a smaller male, and before she lays eggs, females usually eat the males!
She lays her egg masses in holes in the soil. After hatching, over the next 1-2 years, nymphs undergo several molts (as many as 10) until they reach sexual maturity which lasts for only 2-6 months.
Adults can reach up to 2 to 3 inches in length. Females are often larger in size; males have longer hind legs.
Third, Jerusalem Cricket Habitats and Out-of-Sight Living Quarters
They are “well-adapted to living in sandy soils, but can be found in sand dunes, chaparrals, grasslands, woodlands, and forests.”
Being nocturnal, they spend a majority of their lives underground.
They hide underneath organic matter and other debris like rocks, wood. With their powerful mandibles, spiny legs and specially adapted feet, they also dig underground burrows for comfortable living quarters.
And Almost Lastly …. the Cultural Significance of Jerusalem Crickets
Of great importance to Native Americans as food, many tribes in southwestern U.S. also considered Jerusalem crickets as a powerful cultural symbol. Its striking appearance leads some to think the cricket brings mortality, as depicted in the folklore of the Chumash people of southern California.
The Hopi, who settled in Arizona, portrays this cricket as a spirit being (a Kachina) named Sösööpa who races. As a result, it’s often carved into their Katsina dolls as a yellow humanlike character with black beady eyes, a black-and-white plaid skirt, and antennae made from sand grass, depicting traits of the cricket.
The Navajo associated the Yucca plant with the insect; you had to eat the plant as a cure of the cricket’s painful bite. This myth possibly gave rise to the misconception that their bite is venomous.
It’s Greek to Me! (Entomologically Speaking)
Learning the meaning of a scientific name assigned to a species not only helps me remember uncommon words and how they’re pronounced, but often describes aspects of a species’ characteristics that may help differentiate it from another similar-looking species. Learning about these complex names falls into a study called entomology.
Ammopelmatus fuscus, the scientific name for the Dark Jerusalem Cricket, is quite a mouthful. Curious about the meanings (in plain English) of these two strange words, I learned the name originates from Greek and Latin roots meaning “dark sand-sole” or “dark sand-burrower,” obviously referring to their sandy habitats, dark color, and burrowing behavior. But to learn how the common name with the word “sole” ties to one of the cricket’s characteristics, my dive continued. Here’s the entomology breakdown:
Genus Ammopelmatus
Ammos (Greek) means “sand,” referring to the cricket’s specialized adaptation to arid, sandy environments.
pelma (Greek) means “sole of the foot,” highlighting the specialized leg structures the cricket uses for burrowing.
tus (Greek) is a common word meaning either “them” or “their.” In this case, “tus” ties the first two parts together into “their sand sole.”
Species fuscus (Latin) means “dark,” “dusky,” or “brown,” describing the cricket’s color.
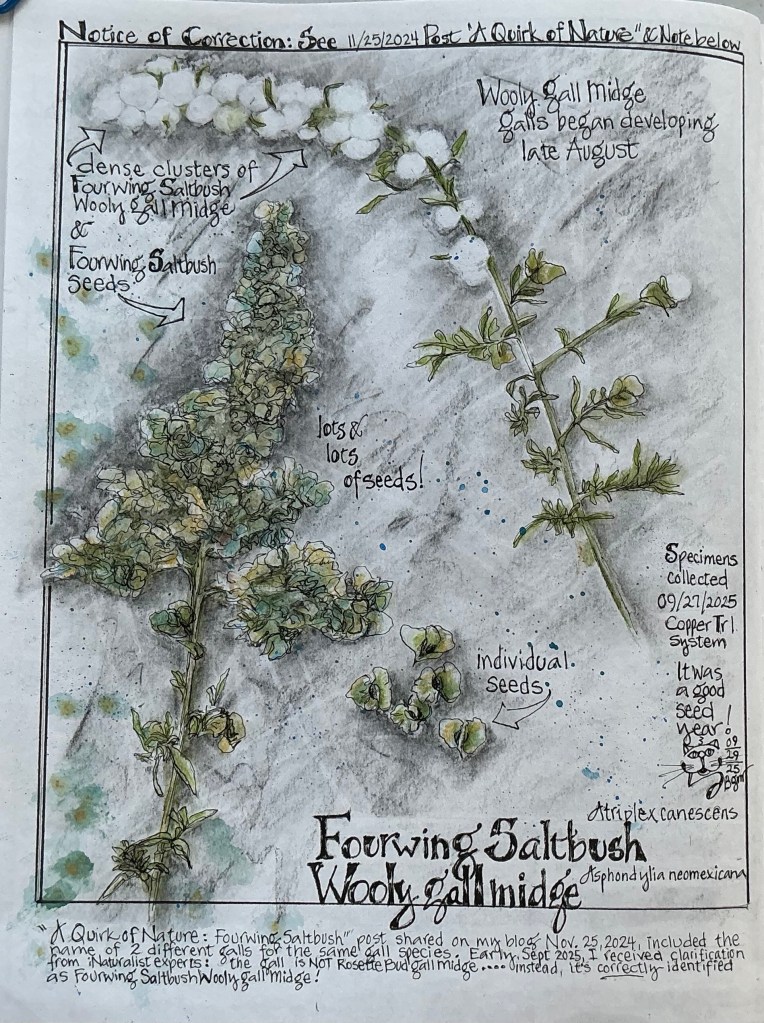
Here’s the underside of my Dark Jerusalem Cricket. The leg spines really show well as does the strong mandible. A scary fascinating view!
After learning more about the Dark Jerusalem Cricket, maybe next time I discover one, I won’t jump so high?! Do you think?
Have you seen a Jerusalem cricket hiding out in your yard? If so, what was your reaction?
Hope you enjoyed this post! Thanks for stopping by!
Eaton, Eric R.; Kenn Kaufman (2007). Kaufman Field Guide to Insects of North America. New York: Houghton Mifflin. p. 84.
Milne, Lorus Milne, Lorus and Milne, Margery (1980) The Audubon Society Field Guide to North American Insects & Spiders. Alfred A. Knopf, Inc, pp. 437.
Stoffolano JG, Wright B (2005). “So so opa —Jerusalem Cricket: An Important Insect in the Hopi Katsina Pantheon.”American Entomologist. 51 (3): 174–179. doi:10.1093/ae/51.3.174
Here’s one of my favorite birds that’s a regular visitor to our yard. Spotted towhees, especially the males, are year-round residents throughout most of New Mexico, which means they breed in the shrubby vegetation surrounding our home. In our area, males sing at the crack of dawn until late afternoon beginning in early February. Instantly recognizable, their beautiful songs carry far and wide. Their songs not only signal to their mate it’s time to pair up again (spotted towhees are monogamous), they also let other male competitors know they’re horning in on his territory.
With favorable weather and abundant food, spotted towhees can produce two clutches of chicks during the breeding season. Their ground nests are hidden so well under a dense oak that I’ve never been able to find one. But it’s a lot of fun to watch clumsy fledglings trying to master the “two-footed-hop-forward-scratch-backward” forging technique all spotted towhees use to uncover hidden bugs and seeds.
Fun Facts
The spotted towhee and the eastern towhee were considered to be the same species called the rufous-sided towhee until 1995.
Male towhees have been recorded spending 70% to 90% of their mornings singing during breeding season.
Once a male mates, he only spends about 5% of his time singing.
It’s thought that the spotted towhee’s white spots are a form of camouflage.
Spotted towhees will sun themselves by lying on the ground feathers spread.
They will bathe in the dew or fog that has collected on vegetation.
Nesting females have been seen running away when disturbed rather than flying.
A group of towhees is called a “tangle” or a “teapot.”
When two towhees fight, one bird will pick up a piece of twig and carry it around as a sign of submission.
Their bright red eyes act as a visual signal during the breeding season, standing out in their dark, shady, ground-level habitats.
Do spotted, canyon, green, eastern or any of the towhee species visit your yard?
Hope you enjoyed this post! Thanks for stopping by!
One of my virtues is impatience ……. when it comes to Spring ….. and its arrival ….. finally.
Admittedly, winter has its perks. After a long, hot summer and fall, winter’s crisp air is a mood lifter, and cooler air temps allow for cozy sleeping under piles of blankets. Longer nights mean my favorite constellations hang in the sky longer, and somehow the moon always seems brighter and friendlier. In New Mexico, winter hiking about is more casual without having to watch every step for rattlesnakes, and certainly any snowfall we’ve been fortunate enough to get helps recharge water tables, tempers our risk of wildfire, and is absolutely beautiful to watch while falling.
But ….. since Winter Solstice and with daytime hours lengthening, I’m ready for Spring. And the closer it gets, my impatience for the upcoming change in season is obvious. My nature journal, pencils and 10x magnifying loop are packed and ready, each daily hike begins by plucking from a yucca one of last year’s flower stalks to poke the ground for signs of growth, and I’m anxious to snap photos of any passing migrating bird or resident roadrunner in search of a perfect nesting spot.
Meanwhile, I’m thankful for my late winter attack of impatience, because it get’s me out there every day, in anticipation of the first flower bud!
While my quest to learn the facts and fancies of diatoms and their curious lifestyles hasn’t wavered since Part 1 – Diatomaceous Earth posted last fall, and continued in earnest through Part 2 – Diatoms!! Jewels of the Sea posted in early January, understanding, compiling and following through with the information for Part 3 – Diatoms!! Microscopic Lifestyles has been the most challenging, especially related to their reproduction. The asexual and sexual phases of a diatoms’ life is complex and unique; full of “ah-ha” moments. No sooner had I thought all the pieces and parts had fallen into place and made sense, then another answer to an elusive loose end revealed a certain puzzle piece no longer fit! Rewrites and intense edits caused many corrections to my illustrations as well, and kept leading to additional diagrams. But loving a challenge, I worked slowly and carefully, and never gave up. Can’t guarantee everything is absolutely 100% correct, but I’m confident it’s darn close!
By the way, if you missed parts 1 and/or 2, click on the links above to catch up!
With that explanation and bit of a disclaimer, I give you …..
WIP!
Part 3 – Diatoms!! Microscopic Lifestyles
In this post, I’ll discuss and/or answer the following questions:
Do Diatoms Breathe? Do Diatoms Eat?
How do Diatoms Reproduce? How Long do Diatoms Live?
As in Part 2, if something in the narrative is bold and italicized, it’s a word or phrase further defined in the updated version of the Glossary
Do Diatoms Breathe?
Yes, diatoms breathe! These single-celled microscopic organisms take atmospheric inorganic carbon dioxide (CO2) that’s been dissolved in water, and “breathe it in” by absorbing it through their silica shell (frustule) into their cell. Once inside, the CO2 is transported into the chloroplast where it is converted into organic carbon (glucose/sugar) through photosynthesis. One of the byproducts of photosynthesis is oxygen (O2), which is “exhaled” (released) into the water where it’s available for all kinds of aquatic organisms. The O2 that escapes inhalation eventually ends up in the atmosphere. Scientists estimate 20 to 50% of the O2 we breathe is produced by diatoms.1 At a minimum, that equates to every 5th breath we breathe! Diatoms release so much O2 that it exceeds that produced by all the world’s rainforests!
1Here’s one of more than a dozen scientific references I found with estimates on the amount ofO2 released by diatoms. https://www.mpi-bremen.de/en/Algae-in-darkness-Survival-strategy-unraveled.
Diatoms breathe and eat through the process of photosynthesis
Do Diatoms Eat?
Yes, diatoms eat! In the way similar to plants, they produce their own food through photosynthesis. Using energy from sunlight, diatoms combine water (H2O) with inorganic carbon dioxide (CO2) to make organic carbon in the form of glucose/sugar (C6H12O6). Glucose provides the carbon and energy source needed for diatoms’ growth and survival. It’s used to produce valuable compounds like lipids, fuel cellular processes through glycolysis, for respiration (especially in low light), and when supplementing photosynthesis. Glucose allows diatoms to achieve a higher biomass and to produce high-value products like Omega 3s (more about that in Part 4).
The glucose not required for immediate cell functions, goes into long-term storage as lipids (oil droplets) rather than carbohydrates like plants. Should diatoms drift into nutrient-deficient water, they can use the energy-packed lipids to perform critical cell functions. And lipids also provide them the buoyancy needed to stay in the upper sunlit levels (photic zone) of a water body.
But their appetites don’t stop there. Diatoms must also “eat” nitrate and phosphate, often from decaying organic matter. By absorbing these critical macronutrients, along with the mineral silicon dioxide (SiO2) from the water, diatoms convert them into organic forms crucial for building cells, cell membranes, growth, making proteins, DNA and RNA, reproduction, and structure when building their silica shells (frustules).
Now there are many species of diatoms (the benthic species) that live deep in the ocean or lakes, sometimes buried in sediments, well below the photic zone. At these depths the sun’s light can’t penetrate. How these diatoms are able to survive involves nitrate. They accumulate large amounts of this macronutrient inside their cells that can be used for respiration when light and other macronutrients are scarce, allowing them to thrive and reproduce in deep and dark waters.
Too much of a good thing? Diatom Blooms
While on the topic of diatom cuisine, it’s a good time to mention their appetite. Every year around the world diatom populations increase exponentially, seemingly overnight. As annual events, these Diatom “Blooms” peak during Spring, coinciding with an overabundance of nutrients and minerals (specifically nitrogen, phosphorus, and silica) and favorable environmental conditions (like high sunlight, warm water, and low water flow). Under these conditions, diatoms can double their numbers every 24 hours and continue that growth rate for up to 6 weeks. Because diatoms are considered “first colonizer” algae, they thrive in disrupted or newly established ecosystems, not only in the Spring, but they’re “blooming” earlier and more frequently year-round due to climate-induced triggers (more about ‘triggers’ in Part 4).
Southern CaliforniaDuck & Manteo, North Carolina coastDewey’s Island, South CarolinaPhotos of diatom blooms in the U.S. lasting more than 2 weeks. (Photo credits: NOAA)
Have you witnessed a Diatom “Bloom?”
You have, if you have or have ever had an aquarium! And you know the few weeks following a new set-up can turn into a horror show. All your carefully chosen and arranged features like rocks/pebbles, gravel/sand, the plants, soil and driftwood, and those tiny plastic houses, all the way to the filter, water heater and even the tank’s glass became densely covered in a golden-brownish feathery slime! These coatings of goo, all the ‘norm’ during the initial cycling phase, are caused by a diatom “bloom” (aka brown algae “bloom”). Obviously you’ve unwittingly provided the now resident diatoms (having arrived in the tank when you filled it) the ideal combination of conditions …. an abundance of silica from the rocks to sand, the glass tank walls made of silica, and the silicone-formed plastics derived from silica, along with the nitrogen (nitrates) and phosphorus (phosphates) from all the organic features like live plants and speciality soils. All abundant and new sources of food for always hungry diatoms which happily consume and reproduce with wild abandon. Voilà!A Diatom Bloom!
If the only place you’ve ever gazed into an aquarium was at your dentist’s office, you may still have witnessed a diatom “bloom.” Ever try to tip-toe across a lovely mountain stream without getting soaked? You probably chose a likely crossing where the rocks in the water looked perfectly spaced with only a hint of wetness. Off you go with your confidence soaring, when halfway there your right boot makes contact with something brownish covering the top of the rock. Before your left foot makes its move, down you fall into the stream. As you look at that offending rock you have now fully grasped in one hand (very relieved it wasn’t that brown “thing”), you experienced a cold and slimy feeling that somehow resembles rotting lettuce, but not quite. And while you’re thoroughly soaking your jeans, you glance around and notice more rocks covered with this brown stuff. This may have been your first diatom “bloom” encounter!
Diatom “blooms” will be revisited below and in Part 4 of my Diatom series, where I’ll include a detailed description of the key factors triggering their rapid growth, examples of some recent occurrences, and the effects their huge populations have on nutrient cycling, aquatic organisms and human health.
How do Diatoms Reproduce?
Diatoms are very versed in two (wow! TWO!) ways of reproduction; asexual, biologically called Mitosis; and sexual, otherwise known as Meiosis. To understand the reproduction process of diatoms, one would need a few lifetimes. It’s taken me months of study to try and make sense of all the basic steps. And just when everything seemed to click, those microscopic organisms threw me a cargo ship full of curveballs! My following narrative and accompanying illustrations are a “summary” of what I think I now know about the unique, fascinating and involved steps diatoms take to conduct the most common forms of asexual and sexual reproduction. It makes perfect sense to me; my wish is that it makes sense to you too!
Asexual Reproduction (Mitosis) …..
……… also called vegetative cell division or binary fission, is the predominant method of reproduction in diatoms where a single diatom (parent cell) divides into two genetically identical daughter cells. Like many other eukaryotes, diatoms are diploid (2n) during the vegetative stage of their life cycle, dividing by mitosis and cytokinesis.
The reproduction process begins when the nucleus migrates to a specific location in the cell; usually somewhere along the bisectingvalvarplane (the exact site is species specific). The nucleus then undergoes mitosis, with the chromosomes condensing and forming a ring around a cylindrical core of microtubules. Next, the chromosomes separate and move to opposite sides of the cell. More typical of animals than plants, the parent cell initiates cytokinesis by progressively closing a cleavage furrow, pinching the diatom’s cytoplasm in two. After the daughter cells receive half a valve (theca) from the parent’s frustule (that becomes their epitheca), the silica deposition vesicle is used to synthesize and export their second, smaller valve (the hypotheca) to fit inside the epitheca. After each newly synthesized hypotheca adjoins the half donated by the parent, the daughter cells grow then separate from one another, leaving behind what’s left of the parent cell to eventually become part of the marine snow.
Supplemental Note: The daughter cell that inherits the larger parent valve (epitheca) stays close to the original size of the parent, but the one that gets the smaller parent valve (hypotheca) always ends up notably smaller. The downside of mitosis is the process repeats over and over again, causing diatoms to shrink in size over generations. When their cells become too small, they must, somehow, be restored to their maximum size. Sexual reproduction (meiosis) is the most common of four known methods2 used by diatoms to accomplish this task, and prevent a species from extinction.
Takeaway
Every time a diatom divides via asexual reproduction (mitosis), the size of its silica cell wall (frustule) is reduced … and once the cell reaches a critical threshold, it switches to sexual reproduction (meiosis). What “an elegant method for a unicellular organism to escape death.”
Sexual Reproduction (Meiosis) …..
….. is triggered when the size of a diatom’s cell becomes less than critical threshold (usually smaller than half the original (maximum) size for most species). And to complicate things even more, sexual reproduction in centric diatoms is different than what happens in pennate diatoms. Of course!
Centric Diatoms undergo oogamous meiosis. But first there’s a crucial decision to be made by diatoms; which cell becomes the male and which the female?3 Once decided, the designated male cell (the male gametangia) undergoes a series of divisions to form usually four (up to 128) sperm mother cells (microspores) which undergo meiosis to form four small haploid (n) flagellated (motile) sperm. Next, the female cell (oogonium) produces one to four large non-motile haploid (n) eggs; one remains functional and three degenerate. Then the protoplast of the oogonium allows only one of the four sperm to enter the cell by means of its species-specific mechanism; the unlucky three sperm degenerate. Fertilization (fusion of the sperm and egg) follows, resulting in the formation of a diploid (2n) zygote. The zygote then enlarges by water uptake to form a typically spherical-shaped, specialized reproductive cell (auxospore). As the auxospore enlarges it outgrows the now empty oogonium, pulling apart the two valves. Growth continues until the auxospore is large enough to contain the initial cell with its developing frustule. When the initial cell is restored to the maximum size of its species, the auxospore wall is either shed, raptured or decays, the oogonium valves drift to the seabed, and the new vegetative cell is released to begin asexual reproduction (mitosis), producing daughter cells smaller than itself. Whew! And that’s how centric diatoms undergo sexual reproduction!
Pennate Diatoms undergo isogamous meiosis. For most pennate diatoms meiosis doesn’t involve motile sperm. In fact, there’s no “assignment” of sex to the two gametes that undergo fusion in isogamous meiosis. Before meiosis can begin, two diatoms align themselves side-by-side, pairing up their gametangial cells. Then to fuse them together, each diatom secretes enough mucilage to form a sheath (copulating envelope), completely surrounding their frustules and to embed their gametangia during copulation. Now meiosis begins.
First the diploid (2n) nucleus in each diatom divides and divides again to produce four haploid (n) gametes followed by the degeneration of one of each pair. The four remaining viable gametes are then separated into their own compartments (gametangia); two per diatom. They then become amoeboid in shape. To undergo conjugation, each of the two pair of amoeboid-shaped gametes must find a partner by moving, via pseudopodium-like appendages, and then penetrating their gametangial cells and the frustule wall adjacent to their paired diatom (a step enabled by the mucilage production that embedded the copulating cells) to fuse and form diploid (2n) zygotes. The two zygotes immediately begin forming one or two auxospores (depending on the species). As in centric diatoms, auxospore growth continues until they are large enough to accommodate the developing initial cells and their new frustules. When the initial cells have reached their maximum size, both are released from their auxospores and copulating envelope as vegetative cells ready to begin asexual reproduction (mitosis).
2 In addition to conventional sexual reproduction (meiosis), diatoms can restore their maximum cell size through other methods: vegetative cell enlargement, apomictic auxosporulation, and apomictic (apogamous) auxospore formation. These asexual processes allow small-sized cells to bypass sexual pairing, reorganize their protoplast, and form a large, initial cell. These mechanisms are often reported in specific, particularly centric, diatom species as a way to maintain large populations. Check the glossary for a brief description of these methods.
3 During asexual reproduction (mitosis), all vegetative cell division begins and ends with diploid (2n) asexual daughter cells. When meiosis is triggered in centric diatoms, and two asexual cells prepare for sexual reproduction (meiosis), one cell must be the male and one the female. So, how do these cells decide which will be which? This is how:
Once cell size falls below the critical size threshold, it becomes Sexually Competent, meaning it’s now capable of choosing its sex. In general, a cell chooses “female” if the cell is still relatively larger among the small/competent population making it capable of producing a large egg. But a cell chooses “male” if the cell is relatively smallish in the small/competent population, or if the cell is under stress. One or both of these conditions still enable it to produce 4-128 small, motile sperm.
Now that you’re aware of the factors diatoms consider when faced with such an important decision, and those factors make sense (right?), their “final” verdict is always subject to change. The ultimate determining factor in the sex a compatible pair of diatoms will become as they prepare for meiosis is determined by environmental conditions.
How Long do Diatoms Live?
The answer to this question may not be as straight forward as you might think! Experts who study diatoms (phycology/diatomology) consistently report that an individual diatom cell lives only a short time, usually less than a week. But they’ve also discovered some species can enter a resting stage and will survive for decades or even millennia. Diatom populations can exhibit short duration “blooms” in their populations, while large populations of single and/or multiple species assemblages can be long-lived under the right conditions. So in this section, the lifespan of diatoms is described in several ways, short-term and long-term, and by individuals and populations.
However, before having a specific discussion about lifespan, it seemed necessary to understand how scientists define an individual diatom when compared and contrasted with a diatom population.
Individuals vs Populations
The primary difference between an individual diatom and a population of diatoms centers around scale and ecological function. An individual is a single-celled microalgae with a finite lifespan and size-reduction cycle. A population represents a collective group that drives ecosystem processes like nutrient cycling, genetic diversity, blooms, oxygen production and carbon sequestration.
Some differences characterizing individual diatoms vs their populations
Individual diatom: A single microscopic cell (2–2000𝜇m) encased in a silica cell wall (frustule), with a maximum lifespan of about six days. Reproduction is by mitosis, where the dividing individual (parent) gives rise to two daughter cells that each grow a smaller half frustule inside half of the parent’s donated frustule causing cells to become progressively smaller with each generation. Individuals may be solitary or live in colonies.
Population of diatoms: A massive assemblage (e.g., millions per liter) of individuals of the same or diverse species living in a specific aquatic habitat. A population often contains a wide range of cell sizes due to the progressive shrinkage of individuals, necessitating meiosis to restore the individuals’ maximum cell size, and therefore, the population’s maximum size. Populations are characterized by seasonal “bloom and bust” cycles in high-nutrient conditions. During non-bloom phases, they maintain diversity through sexual recombination. Populations are key primary producers, responsible for 20–50% of global oxygen production and significant carbon fixation.
To summarize, individual diatoms are the basic units of growth, while populations are the functional units of ecosystem processes.
Short-term lifespan of an individual diatom: When sunlight and nutrients are ideal, an individual vegetative cell (the parent) divides by mitosis every 1–6 days, with each division resulting in two new daughter cells genetically identical to the parent, but smaller. Each of these daughter cells, now parent cells, will divide every 1-6 days, producing two new daughter cells each. And on it goes until a critical size threshold is reached triggering meiosis. This rate of reproduction under ideal conditions, especially for species dividing once a day, results in a doubling of their population a minimum of once every 24 hours.
Waxing Philosophical
Is it entirely correct to define the lifespan of an individual diatom as equal to the frequency rate of mitosis of an individual cell (e.g. once a day)? Perhaps an individual diatom’s life is calculated based on the number of daughter cell generations produced beyond the original parent cell, based on passing down halves of the parent’s frustule? From a philosophical standpoint, these types of questions have actually been pondered! I’ll leave you with this one from diatoms.org: “If a parent diatom cell divides and gives one cell wall to one daughter and the other cell wall to the other daughter, does the parent still exist?”
Pinnularia species, a fresh water pennate diatom. A individual of this genus divides every 24 hours, but its lifespan is said to last 6 days. The center of this diatom is where the nucleus lies, along with other organelles, like Golgi bodies and endoplasmic reticulum. To both sides of center are large plate-like yellow-brown chloroplasts (the large brown-ringed circles); 1 per side. Also visible throughout the image are numerous oil bodies (lipids) that look like small round circles. The Pinnularia genus has some of the largest individuals of all freshwater diatoms. This microscopic photo, girdle view, was taken of a live specimen, looking through the transparent frustule, into the cell; 40X (Photo credit ‘Diatom Flora Britain and Ireland)
Short-term lifespan of a diatom population: Diatom “blooms” illustrate well populations that are short-lived. These blooms, coinciding with an overabundance of nutrients and minerals (specifically nitrogen, phosphorus, and silica) and favorable environmental conditions (like high sunlight, warm water, and low water flow), cause diatoms to double their numbers every 24 hours. Their explosive growth, continuing for 2-6 weeks, inevitably depletes one or all of the nutrients and minerals they depend on to live, resulting in a rapid population crash.
A dormant resting state is triggered if (when) the environment they live in becomes too inhospitable.4 Instead of dying, certain diatom species develop resting spores, which gather in deep sea sediments where they remain, surviving for centuries to millennia, patiently awaiting conditions favorable enough to revive them. “We revived hundreds of genetic individuals of diatoms and induced them to start dividing again and to form cloned cultures. The oldest [were] more than 100 years old; the youngest quite fresh. ….. ” said Anna Godhe of the Department of Marine Ecology at the University of Gothenburg. A diatoms’ ability to survive as dormant resting spores for such long time periods, allow scientists to revive them to study past environmental conditions.
Long-term lifespan of individuals and populations of diatoms: Some diatom species form long-lived resting spores that can survive in ocean bottom sediments, allowing individuals and even populations to persist for vast periods of time. They wouldn’t be able to survive if it weren’t for their protective and persistent heavy silica shells (frustules). It’s well known that diatoms’ frustules last for millions of years as fossils, as evidenced by layers and layers of diatomaceous earth. So it’s no surprise that resting spores are able to survive dormant for millennia, displaying their remarkable longevity in geological time.
Therefore, while the lifespan of an actively growing diatom population exists on a scale of days, the population as a dormant, viable seed bank can survive for thousands of years in the sediment. While a living diatom is ephemeral, its durable “glass house” ensures its presence in the Earth’s history for eons. What an incredible feat of resilience!
4Key characteristics of an inhospitable environment causing diatom populations to crash:
Nutrient Limitation: A rapid bloom quickly exhausts nitrogen, phosphorus, and/or silica, critical for the growth and development of a diatom’s frustule, resulting in a sudden, sharp decline in population.
Ocean Acidification: Acidified seawater slows the dissolution of dead diatom shells, preventing nutrients (silica) from returning to the surface and resulting in a long-term reduction in available nutrients, causing a persistent, and large-scale decline in diatom biomass.
Reduced Vertical Nutrient Mixing: A shallower mixed layer in the ocean limits the availability of nutrients from deeper, colder waters, causing starvation and collapse in diatom populations.
Viral Infection: Viruses can infect and rapidly terminate diatom populations (especially blooming populations) during their stationary growth phases.
Environmental Stress (programmed cell death): Stressors such as extreme light levels, temperature changes, or pollution can trigger programmed cell death (PCD) in diatoms, causing a swift population collapse.
Loss of Biological Turnover: Decreased sediment resuspension, caused by reduced marine life (e.g., groundfish), reduces the supply of silica necessary for new diatom growth.
…………………………………………………………………………………………………
It’s a Wrap!
DIATOMS!! MICROSCOPIC LIFESTYLES//Part 3 – The Sequel
Hope you’ve enjoyed learning some fascinating facts about the lifestyles of diatoms. Spread the joy and tell all your family and friends! They will be so impressed with your new-found knowledge of diatoms, and may even want to learn more about these microscopic gems!
………………………………………………………………………………………………
As I was compiling and organizing my notes for Part 3, many additional questions and curiosities about diatoms and their lifestyles popped up. I’d love to know if you came up with some questions as well, and what they were. Also, if you have any questions about or would like clarifications regarding the information in any of my diatom posts, please let me know via message or in a comment to this post.
And now …. a teaser from Part 4 in my Diatom Series – The Good and the Bad
More things I’ve wondered about while researching diatoms:
Are diatoms food?
Are diatoms all good and wonderful? Do they have a bad side?
What do diatoms and the Global Carbon Cycle have in common?
…………………………………………………………………………………………………
(An updated version of the Glossary follows)
If you feel yourself becoming a “Diatomic Geek,” you may find interest in browsing the following Glossary of terms. If a term used within the text of my post is in bold font and italicized, it is (or will be) in the Glossary. (Fair warning: my Glossary continues to be a work-in-progress. Look for an updated version in Part 4 of this series on diatoms.)
Glossary
Allomixis – a specific type of sexual reproduction found in diatoms, representing a mechanism for genetic exchange (cross fertilization). It is a form of oogamy, where small, motile male gametes (sperm) are produced by one cell and move to fertilize a larger, passive female gamete (egg cell) produced by another cell.
Amoeboid gametes – non-flagellated, naked (wall-less) isogamous reproductive cells that move by changing their shape and extending pseudopodium-like projections to locate a partner. They are primarily found in pennate diatoms, where sexual reproduction is typically isogamous (gametes are structurally similar).
Anisogamy – is a form of sexual reproduction in diatoms characterized by the fusion of two gametes that differ in size and/or form, specifically a smaller, usually motile, male gamete (sperm) and a larger, non-motile female gamete (macrogamete or egg). Compare to isogamy and oogamy.
Apomictic (Apogamous) Auxospore formation – In some species, the auxospore develops from a single cell, bypassing sexual fusion, allowing the restoration of cell size.
Apomictic Auxosporulation – Some diatoms produce an auxospore (a specialized enlarging cell) without fertilization or meiosis. This is considered a form of “asexual” sex, where the diploid state is maintained without gamete fusion.
Archaea(ns) – single-celled microorganisms similar in structure to bacteria, but evolutionarily distinct from bacteria and eukaryotes. They are obligate anaerobes living in low oxygen environments (e.g., water, soil), and form a commensal (symbiotic) relationship in ruminant and human intestines. When Archaea is the commensal, it benefits from the relationship with the host without causing harm, or may provide certain benefits to the host (i.e. the human intestines).
Archaeans may be the only organisms that live in some of the most extreme environments on the planet; habitats hostile to all other life forms. Some live near thermal rift vents in the deep sea at temperatures well over 100 degrees Centigrade. Others live in hot springs, or in extremely alkaline or acidic waters. They thrive inside the digestive tracts of cows, termites, and marine life where they produce methane. They live in the anoxic muds of marshes and at the bottom of the ocean, and even thrive in petroleum deposits deep underground. They survive the dessicating effects of extremely saline waters. However, archaeans are not restricted to extreme environments; they are also found, in abundance, in the plankton of the open sea.
Areolae – small, regularly repeated openings in diatom valves (frustule). See definition for pores.
Autotroph (aka Producers) – an organism that produces its own food using external energy sources like sunlight (through photosynthesis) or chemical compounds (through chemosynthesis).
Auxospore – a reproductive cell produced during sexual reproduction (meiosis) by a diatom that has reached the minimum size for its species. The auxospore expands to accommodate the formation of a new frustule, restoring the diatom to the maximum size for it’s species.
Biogenic silica (bSi) – is amorphous, opal-like hydrated silica (SiO2 · nH2O) produced by living organisms, forming structures like diatom shells (frustules), sponge spicules, and plant phytoliths, playing roles in structural support and defense against stress. It’s a key component in marine and terrestrial ecosystems, with significant deposits like diatomaceous earth (DE) from fossilized diatoms.
Biosilicification – the biological process where living organisms take up soluble inorganic silicon (silicic acid, Si(OH)4) from their environment and convert it into solid, polymerized, insoluble silicon dioxide (SiO2) to form hard structures like shells, skeletons, or cell walls, crucial for diatoms, sponges, and plants, and even occurring in some bacteria and mammals. This process is a form of biomineralization, where organic molecules are used to control the precise formation of these silica materials.
How it works –1) the organism must uptake (absorb) silicic acid; 2) then polymerization takes place, where inside or outside the cell, the silicic acid condenses, forming chains of silica with the removal of water; and 3) specialized proteins and other macromolecules guide (control) this process, creating complex, often intricate silica structures (biogenic silica) like those found in diatom frustules.
Bisecting valvar plane – the imaginary plane that lies parallel to the valve face, separating the diatom into an epitheca and a hypotheca.
Blooms – rapid, seasonal increases in the population density of photosynthetic, silica-encased algae (diatoms) in aquatic environments, typically by high nutrient levels and increased light in spring. Diatomaceous blooms play a crucial role in marine food webs and carbon sequestration.
Carbon fixation – diatoms “fix” carbon by removing inorganic carbon dioxide (CO2) from the atmosphere and converting it into organic carbon in the form of glucose (sugar). During this process, oxygen (O2) is released back into the environment, producing 20-50% of the air we breathe.
Catalog of Life – the 1998 Kingdoms of Life were replaced in 2015 with today’s adopted Catalog of Life: At the top most tier or classification rank are two Super Kingdoms, Prokaryota and Eukaryota. The next descending rank includes seven Kingdoms; under Prokaryota are two Kingdoms – Bacteria and Archaea; under Eukaryota are five Kingdoms – Protozoa, Chromista, Plantae, Fungi, Animalia).
Centric – a diatom with valves (frustule) that are radially symmetrical.
Chimeric – (or chimerism) in diatoms refers to the unique, mosaic nature of their genomes and cellular makeup that resulted from their complex evolutionary history, specifically multiple endosymbiotic events. Diatoms possess a mix of genetic material derived from different ancestors, including an ancient heterotrophic host, red and green algal endosymbionts, and bacteria. They arose from two successive endosymbiotic events, when more than 300 million years ago a heterotrophic host engulfed a red alga, which itself contained a cyanobacterial endosymbiont, leading to a complex chimeric genome. The ancestral heterotrophic host provided essential metabolic components, including a complete urea cycle—which is more typically found in animals—enabling diatoms to recover quickly from nitrogen limitation. This genetic mixing is thought to have contributed to their success in diverse, often unstable, aquatic environments.
Chlorophyll – specialized photosynthetic pigments located in a diatom’s chloroplast (plastic). Primarily chlorophyll a and c are the pigments that capture blue-green light energy for photosynthesis. Unlike land plants, diatoms use Chlorophyll c, which combined with fucoxanthin, allows them to efficiently thrive in aquatic environments.
Chloroplast – also called a plastid, a chloroplast is a photosynthetic organelle that absorbs light molecules (sun’s energy) through chlorophyll a & c, turning it into chemical energy by way of photosynthesis.
Chromosomes – thread-like, membrane-bound structures within the nucleus that contain the genetic material (DNA) of diatoms. They are typically organized as diploid (2n) in vegetative cells, and they exhibit unique, highly chimeric genomic features arising from complex, evolutionarily distant origins.
Cleavage furrow – an invagination of the plasma membrane that facilitates cytokinesis following mitosis, pinching the cytoplasm to separate two daughter protoplasts within the parent frustule. Unlike land plants that use cell plates, diatoms utilize this furrowing mechanism, often coupled with chloroplast division, to ensure proper distribution of organelles before new valve synthesis.
Copulation envelope – a temporary, protective mucilage sheath or capsule that surrounds two opposing sexualized pennate diatom cells (gametangia). This envelope is formed to facilitate the sexual reproduction process (meiosis) by keeping the gametangia in close, fixed contact during the pairing and fertilization process.
Cytokinesis – the final step of asexual reproduction (mitosis) where the cytoplasm of a single parent cell is separated to form two distinct daughter cells. Because diatoms are enclosed in a rigid silica cell wall (frustule), their cytokinesis is unique, combining animal-like cleavage with plant-like cell wall construction.
Cytoplasm – the living material inside the silica cell wall (frustule), forming a thin layer around a large central vacuole, containing organelles like chloroplasts, nucleus, mitochondria, and oil (lipid) bodies, often organized in strands, playing key roles in photosynthesis, nutrient storage (lipids/carbohydrates), and locomotion via cytoplasmic streaming, especially in motile (pennate) diatoms.
Daughter cells – the two genetically identical, yet structurally unequal, cells produced during asexual reproduction (mitosis).
Diatom – a microalgae that forms a significant part of the food chain in moist soils and aquatic (marine and freshwater) ecosystems. They form long-chain fatty acids that are an important source of energy-rich molecules and provide a critical food source for the entire food chain, from tiny zooplankton to fish to whales. So it can be said that diatoms feed oceans, lakes, streams, rivers and associated wetlands and riparian areas.
“Diatom” (the etymology) – The word “Diatom” comes from a Greek word ‘diatomos‘ meaning cut into two.
Diatomaceous earth (DE) – a natural, powdery substance composed of the fossilized, siliceous remains of diatoms which lived in water bodies millions of years ago. The silica skeletons these diatoms created accumulated into often vast deposits of chalky, porous sedimentary rock that’s been actively mined since their discovery in 1836 in northern Germany.
Dinoflagellates – single-celled microscopic organisms with two whip-like tails (flagella), making them motile. They are found drifting in large numbers in marine plankton, specifically phytoplankton; also found in fresh water. Some produce toxins that can accumulate in shellfish that, when eaten, results in poisoning. Dinoflagellates form crucial part of the ocean’s food web, producing a significant portion of the world’s oxygen, dinoflagellates are known for causing red tides and bioluminescence.
Diploid (2𝑛) – the life stage of the diatom where its cell contains two sets of chromosomes (2𝑛), forming the dominant, actively growing stage, which produces haploid (𝑛) gametes through meiosis, that fuse to restart the cycle by restoring two sets of chromosomes (2𝑛) and maximum cell size after sexual reproduction. Compare with haploid.
Endoplasmic reticulum (ER) – the “workhorse” of the diatom, responsible for producing, modifying, and transporting proteins and lipids while supporting the complex, four membrane-bound chloroplast structure.
Endosymbiont – an organism that lives inside another organism (its host), forming a symbiotic relationship which is often mutually beneficial (but sometimes one benefits at the other’s expense).
Ephemeral – something that lasts for a very short time.
Epitheca – the larger, outer, and older half of a diatom‘s silica cell wall (frustule). It acts as the lid, overlapping the smaller inner half, known as the hypotheca. Composed of a valve and girdle bands.
Eukaryotes – organisms characterized by complex cells; a membrane-bound nucleus that contains DNA, and other membrane-bound organelles like mitochondria. Eukaryotes can be unicellular or multicellular, fall within the Super Kingdom Eukaryota that includes animals, plants, fungi, and protists (such as algae [like diatoms and seaweed], amoebas, slime molds) The Eukaryotes represent a major group of life on Earth.
Eutrophication – nutrient over-enrichment of water, primarily due to an overabundance of nitrogen and phosphorus, that causes the excessive growth of algae (i.e. diatoms) and other aquatic plants, altering water quality and the ecosystem. This process also alters the transport of silicon dioxide to the ocean. Farming, factories, and people living in cities release a lot of nitrogen and phosphorus into rivers, lakes, and reservoirs. The increased nutrients can cause an overgrowth of algae in those waters and use up a lot of the dissolved silicon dioxide in the water, preventing it from reaching the ocean. The combination of inland eutrophication and damming decrease the total global movement of dissolved silicon dioxide to the ocean by nearly 30%.
Flagella – an appendage that provides motility.
Foraminifera (forams) – a single-celled animal with a perforated chalky, calcium carbonate shell, through which extend slender protrusions of protoplasm. Most forams are marine species – some float in the water column in the photic zone (planktonic); most live on the sea floor (benthic). When benthic forams die, their shells form thick ocean-floor sediments.
Frustule – the external, silica cell wall of a diatom. The frustule is composed of two valves (theca) and the girdle bands. The upper valve (epitheca) is slightly larger than the lower valve (hypotheca). The epitheca overlaps the hypotheca similar to the halves of a pill box or a Petri dish. In diatoms, frustules are not made of pure silica; they also have an organic layer. Its primary component is referred to as biogenic silica. (Read more about the make up of biogenic silica under the definition for silica.)
Fucoxanthin – in diatoms, fucoxanthin is a major golden-brown, light-harvesting carotenoid pigment found in the chlorophyll a/c-binding protein complex, enabling efficient photosynthesis in blue-green light. It’s a crucial accessory pigment allowing diatoms to thrive in marine environments by expanding light absorption to the 390–580 nm range. Fucoxanthin also gives diatoms their distinct golden-brown color, cancelling out the green color from chlorophyll a/c.
Gametangia – specialized, sexually induced vegetative cells that produce haploid (n) gametes. These cells are formed during sexual reproduction (meiosis) when vegetative cells have become too small and must restore their maximum size, a process often triggered by specific environmental cues like light and nutrients. Gametangia are the “sexualized” version of the vegetative cell, transforming from a simple, asexual, dividing cell into a structure focused on producing the next, larger generation.
Gamete – a haploid (n) reproductive cell (sperm or egg) produced during sexual reproduction (meiosis). Gametes (motile, flagellated sperm and immobile eggs) fuse to form a zygote that develops into a large auxospore, restoring the diatom to the maximum species size.
Girdle bands – the bands (aka cingulum) that connect the two valves (epitheca and hypotheca). The girdle bands are visible when viewing a diatom in profile. (Girdle = Copulae)
Girdle view – the profile view of a diatom; view appears rectangular in both centric and pennate diatoms.
Golgi bodies – essential, membrane-bound diatom organelles responsible for trafficking, modifying, and packaging proteins and lipids, particularly for the construction of their silica cell walls (frustules) and the secretion of mucilage.
Glycolysis – is an ancient metabolic process that converts a glucose molecule into two molecules of pyruvate, generating a net gain of 2 ATP and 2 NADH molecules. This series of ten enzyme-catalyzed reactions generally occurs in the cytosol of the cell and can proceed in the presence or absence of oxygen.
Haploid (𝑛) – refers to the stage in a diatom’s life cycle where cells contain a single set of chromosomes, specifically representing the gametes produced during sexual reproduction (meiosis). While the diatom’s vegetative cell (actively growing) is typically diploid (2𝑛), the haploid stage is temporary, brief, and occurs during sexual reproduction to restore cell size and genetic diversity. Compare with diploid.
Heterotrophic – organisms that cannot make their own food and must consume other organisms (plants, animals, or organic matter) for energy and nutrients. Heterotrophs are considered “consumers” in the ecosystem, unlike “producers” (autotrophs) such as diatoms and plants which make their own food. The term comes from Greek words meaning “other” (hetero) and “nourishment” (troph), meaning they rely on external sources for sustenance, such as fungi, humans and most other animals.
Hypotheca – the smaller, inner portion of a diatom’s cell wall (frustule), which acts as the bottom half of a petri dish-like structure, covered by the larger epitheca. During asexual reproduction, each daughter cell receives one parent valve and forms a new, smaller hypotheca.
Initial Cell – the new, full-sized cell formed during sexual reproduction (meiosis) within the auxospore. The initial cell restores the diatom to its maximum size for the species.
Isogamous meiosis – a form of sexual reproduction where diploid (2n) vegetative cells of pennate diatoms undergo meiosis to produce haploid (n) gametes that are morphologically identical in size and structure. Unlike centric diatoms (which are oogamous), pennate diatoms do not produce separate large eggs and small sperm; instead, they produce similar amoeboidgametes.
Isogamy – a form of sexual reproduction found primarily in pennate diatoms, where the fusing gametes are morphologically similar in size and shape. Unlike oogamous reproduction in centric diatoms (which involves large eggs and small sperm), isogamous pennate diatoms produce gametes that are not flagellated and appear alike. Compare to anisogamy and oogamy.
Kingdoms of Life – in 1969, the five major groups of life – aka Kingdoms of Life – were classified as: 1) Fungi, 2) Animalia, 3) Plantae, 4) Protista (the water molds, brown algae and diatoms); and 5) Monera (the bacteria and archaea). In 1990, there were three Domains: 1) Eucarya (including diatoms), 2) Bacteria, and 3) Archaea. Another change was made in 1998, now with two Empires (Prokaryota and Eukaryota) that ranked over six Kingdoms (Prokaryota ranked over one Kingdom, Bacteria; Eukaryota ranked over five Kingdoms: 1) Protozoa, 2) Chromista, 3) Plantae, 4) Fungi, and 5) Animalia.)
Krill – a small marine crustacean living in the world’s oceans. As a keystone species in marine food webs that eat phytoplankton (primary producers like diatoms), they are the main food source for larger animals like whales, seals, penguins, fish and squid, making them vital for the entire ecosystem’s health and energy flow. They also play a significant role in the ocean’s biological pump, transporting carbon from surface waters to the deep ocean through their feeding and waste, helping regulate climate. Krill are plankton but not all plankton are krill.
Lipids – (see oil body)
Marine snow – a sticky, nutrient-rich continuous “snowfall” of aggregates composed mostly of organic detritus—including dead phytoplankton (i.e.diatoms), plankton, plants, animals, fecal matter, mucus, sand and soot — that falls from the upper, sunlit waters to the deep ocean floor. Diatomaceous marine snow forms large (several centimeters diameter) fluffy white and flaky particles in the upper ocean before drifting over weeks to the seabed, transporting and sequestering carbon from the surface and becoming an essential food source for deep-ocean organisms. A similar phenomenon called “lake snow” or lacustrine snow exists in freshwater bodies like lakes and reservoirs.
Meiosis – the sexual reproduction phase of diatoms’ life cycle that converts diploid (2n) vegetative cells into haploid (n) gametes. Meiosis restores maximum cell size through the formation of an auxospore. In centric diatoms, meiosis is oogamous, producing large non-motile egg cells and small motile sperm. In pennate diatoms, meiosis is isogamous (or anisogamous), typically involving the formation of non-flagellated, amoeboid gametes within a mucilage casing.
Metaphase – a stage of asexual reproduction (mitosis) where the cell’s chromosomes condense and arrange themselves in a unique ring or “donut” shape around the equator of a central, cylindrical mitotic spindle. Unlike in most eukaryotes, diatoms undergo “closed” mitosis, meaning the nuclear envelope does not completely break down; instead, the spindle forms within the nucleus, and chromosomes align on this structure.
Microspores – (see sperm mother cells)
Microtubules – hollow, rigid rods that play a critical role in controlling cell shape of a diatom’s cell walls (frustules).
Mitochondria – the energy-producing organelles in diatoms, vital for their survival related to cellular metabolism, including respiration and its link with photosynthesis and carbon fixation, and interactions with the climate system.
Mitosis – is an asexual, closed, and centric process where the nucleus divides within the intact cell wall (frustule), resulting in two genetically identical daughter cells. This division is unique because new valves are synthesized inside existing ones, leading to a reduction in size for one of the daughter cells.
Mucilage – a complex, adhesive, gelatinous substance secreted by diatoms that allows them to stick to surfaces, glide, form colonies, and interact with their environment. Mucilage consists of intricate protein nanofibers and other biopolymers that create strong, extendible attachments, crucial for their motility and survival, often forming visible trails or large-scale gelatinous masses (marine snow) during blooms.
Mucilage during sexual reproduction (meiosis) – a protective, adhesive substance secreted by pennate diatoms to embed and pair compatible gametangial cells. This mucilage serves as a copulation envelope that enables gametes to move toward each other and fuse, facilitating the formation of auxospores.
Oogamous meiosis – a type of sexual reproduction, primarily occurring in centric diatoms, where gametes are highly differentiated by size and motility. It is characterized by the production of a few large, non-motile eggs (female gametes) and numerous small, flagellated sperm (male microspores).
Oil bodies – specialized organelles in diatom cells that serves as primary storage sites for neutral lipids. These organelles, also referred to as lipid droplets or oil droplets, accumulate in response to environmental stress, particularly nutrient and/or mineral deprivation (nitrogen, phosphorus, silicon), and act as energy reservoirs and a carbon sink. Oil bodies are not only inert storage, they are dynamic structures involved in metabolic homeostasis, allowing cells to cope with environmental fluctuations and aiding in buoyancy regulation. Because they are rich in fatty acids, diatom oil bodies are of particular interest for biofuel production.
Nucleus – the membrane-bound genetic center within a diatom cell, usually centrally located or within a cytoplasmic bridge. The nucleus manages cell functions and heredity, and plays a key role in cell division during both asexual and sexual reproduction (mitosis/meiosis). Its DNA is organized into numerous small chromosomes that become visible during division. The nucleus moves to specific sites for cell division (mitosis) and during meiosis, forming daughter nuclei for sexual reproduction.
Oogamy – a form of sexual reproduction (meiosis), specifically found in centric diatoms, characterized by the fusion of two markedly different gametes: a large, non-motile female gamete (egg) and a small, motile male gamete (sperm). This process occurs when vegetative cells have reduced in size below a critical threshold, with the resulting fertilization producing an auxosporethatrestores the species to its maximum size. Compare to isogamy and anisogamy.
Oogonium – a specialized female vegetative cell that undergoes meiosis to produce one or more large, non-motile eggs (gametes) for sexual reproduction. This process is part of oogamy sexual reproduction, primarily found in centricdiatoms.
Organelles – specialized, membrane-bound subcellular structures in the diatom’s cell that evolved primarily through secondary endosymbiosis, resulting in a unique, complex, and highly metabolic cell structure. They’re responsible for compartmentalizing cell functions, including, but not limited to, photosynthesis, energy production, and, notably, silica deposition for their frustules. Key organelles include the chloroplasts (plastids), pyrenoids, silica deposition vesicles, oil bodies (lipid droplets), mitochondria, nucleus, and girdle lamella.
Parent cell – the rigid, silica-shelled organism that divides via asexual reproduction (mitosis), acting as a template for offspring while undergoing size reduction. The parent cell’s two halves (valves) are separated and distributed to the daughter cells, which then form new, smaller valves inside the old ones.
Pennate – a diatom with valves (frustule) that are bilaterally symmetrical.
Phytoplankton – the autotrophic (self-feeding) components of the plankton community. They are photosynthesizing microscopic unicellular organisms, the protists (most notably diatoms) and bacteria (like cyanobacteria), that primarily inhabit the upper sunlit layer of ocean and freshwater bodies. Phytoplankton form the base of those ecosystems’ food web and are significant players in the global carbon cycle.
Plankton – any small freshwater or marine organism that due to its size, immobility, or weakness cannot swim against the current, and exist in a state of drift.
Plastid – a photosynthetic organelle (aka chloroplast) that absorbs light molecules (sun’s energy) through chlorophyll, turning it into chemical energy by way of photosynthesis.
Photosynthesis – the chemical process where plants and some other organisms with chlorophyll, through the use sunlight, combine inorganic carbon dioxide with water to form carbohydrates (glucose/sugars), releasing oxygen as a byproduct.
Pores (areolae) – microscopic openings in the cell walls (frustules) of diatoms that facilitate essential functions like nutrient uptake, waste removal, gas exchange, and mucilage secretion, allowing movement and substrate attachment. The varied sizes and patterns of diatom pores are crucial for taxonomy and optical properties.
Prokaryotes – a microscopic single-celled organism without organized internal structures; they lack a distinct membrane-enclosed nucleus and other specialized organelles. Prokaryotes include the bacteria and cyanobacteria.
Protists – a diverse group of complex Eukaryotes (organisms with a nucleus and organelles) that don’t fit into the categories of animals, plants or fungi. Protists are diverse life forms, mostly single-celled but sometimes colonial or simple multicellular forms, found in aquatic environments. They are incredibly varied, acting like animals (amoebas), plants (algae), animals and plants (diatoms), or fungi (slime molds), and play vital roles in ecosystems as producers and decomposers. Protists are split into two Kingdoms, Protozoa and Chromista, under the Super Kingdom Eukaryota. Diatoms fall under the Kingdom Chromista as described in the Catalog of Life.
Protoplast – refers to the living cell contents of diatoms, including the cytoplasm, nucleus, silica deposition vesicles, oil droplets (lipids), and other organelles, and is contained inside of the rigid silica frustule. The protoplast is the part of the diatom that grows and divides. During vegetative cell division (mitosis) the protoplast duplicates, splitting into two complete daughter cells. But unlike typical plant cells, before the daughter cells separate into two complete diatoms, a new smaller silica valve is formed for each daughter protoplast to pair with their acquired larger parent cell’s valve. Protoplast and protoplasma are used interchangeably.
Pyruvate – a three-carbon organic molecule that functions as a key intermediate in the central carbon metabolism of diatoms, linking various essential metabolic pathways such as glycolysis, gluconeogenesis, respiration, and lipid synthesis.
Raphe – a slit or groove opening in the silica cell wall (frustule) of a pennate diatom to allow it gliding motility and attachment to a substrate by secreting sticky mucilage, allowing these diatoms to move along surfaces and find nutrients.
Red tides – more appropriately described as Harmful Algal Blooms (HABs), occur when colonies of algae—organisms, such as diatoms and dinoflagellates, that live in the sea and freshwater—grow out of control while producing toxic or harmful effects to people, fish, shellfish, marine mammals, and birds. The toxins may also make the surrounding air difficult to breathe. As the name suggests, the algae bloom often turns the water red. One of the best known HABs in the U.S. occurs nearly every summer along Florida’s Gulf Coast. This bloom is caused by a dinoflagellate species producing toxins that kill fish and make shellfish dangerous to eat.
Respiration – a vital metabolic process allowing diatoms to break down organic matter (glucose from photosynthesis) using oxygen (aerobic respiration) or alternative electron acceptors like nitrate (anaerobic respiration, especially in dark/low-oxygen conditions) to generate energy (ATP) for survival, growth, and cell maintenance. Respiration involves pathways like the TCA cycle and glycolysis to balance oxygen production with cellular needs.
Resting spores – specialized, dormant cells designed to survive adverse environmental conditions, such as nutrient depletion or unfavorable light and temperature. Typically asexual, they are a survival mechanism characterized by a thick, heavily silicified cell wall (frustule) and significantly reduced metabolic activity, allowing them to survive for months, years, or even millennia in sediments.
Silica – a mineral, specifically a compound of silicon and oxygen, called silicon dioxide (SiO₂), is one of the most abundant minerals in the Earth’s crust. Silica is most commonly found as quartz, but also in other solid forms like cristobalite, tridymite, and opal.
In diatoms, the living frustules are not made of pure silica. They also have an organic layer. Their primary component is referred to as biogenic silica, a hydrated and polymerized silicic acid compound, similar to the gemstone opal. The biogenic silica is formed within a diatom cell in a specialized structure called the Silica Deposition Vesicle, associated with several organic molecules such as proteins, long-chain polyamines, carbohydrates, and glycoproteins.
Silica Deposition Vesicle – a specialized internal structure of a diatom, where its silica shell (frustule) is built (synthesized) before being exported.
Sperm mother cells – microsporesproduced when the diploid (2n) vegetative cells of centric diatoms undergo meiosis that become the flagellated, motile male gametes (sperm).
Stramenopiles – a phylum (also referred to as a clade) synonymous with the phylum Gyrista
within the Protista Kingdom. The Stramenopiles (aka Heterokonts) include water molds, brown algae (Sargassum species, Fucus species, and Kelps), and diatoms (centric and pennate forms).
Striae – distinctive, parallel lines or grooves on a diatom’s silica shell (frustule), formed by rows of pores (areolae or alveoli). Striae are crucial for diatom identification (taxonomy) and classification, varying in density (counting the number per 10 µm), orientation (radiating, parallel, convergent), and structure (chambered/unchambered). Striae is the plural of Stria.
Theca – one-half of the diatom silica cell wall (frustule), consisting of a valve and its associated girdle bands. The diatom cell is enclosed by two overlapping thecae: the larger, outer epitheca and the smaller, inner hypotheca, which fit together like a petri dish to provide structural protection.
Vacuole – a large, central, fluid-filled sac within the diatom cell, often occupying most of the cell’s interior and is surrounded by the cell’s cytoplasm. The vacuole acts as a storage organelle for nutrients and contributes to buoyancy and cell volume regulation.
Valves – the cell walls of diatoms are made up of two valves; top (epitheca) and bottom (hypotheca). The top valve is slightly larger so it overlaps the bottom one like a pill box or Petri dish.
Valve view – the view of a diatom when looking face-on at one of the two valves.
Vegetative cell – a diatom cell that reproduces asexually through mitosis, dividing its protoplast (cell contents) to form two new cells, each inheriting half of the parent’s silica shell (frustule) and building (synthesizing) the other smaller half, resulting in smaller daughter cells. These photosynthetic, unicellular diatoms are crucial in aquatic ecosystems by fixing carbon and producing oxygen.
Vegetative Cell Enlargement (VCE) – In certain species, cells can partially or completely remove their cytoplasm from the restrictive silica frustule, expand in size, and secrete a new, larger shell.
Vegetative stage – the diploid (2n) asexual, photosynthetic, and metabolically active cell that make up the vast majority of the diatom life cycle.
Zygote – a diploid (2𝑛) cell formed after sexual fusion (fertilization) of two haploid (n) gametes which typically occurs when vegetative cells have reduced in size below their critical threshold. The zygote immediately grows and matures into a large specialized cell called an auxospore.
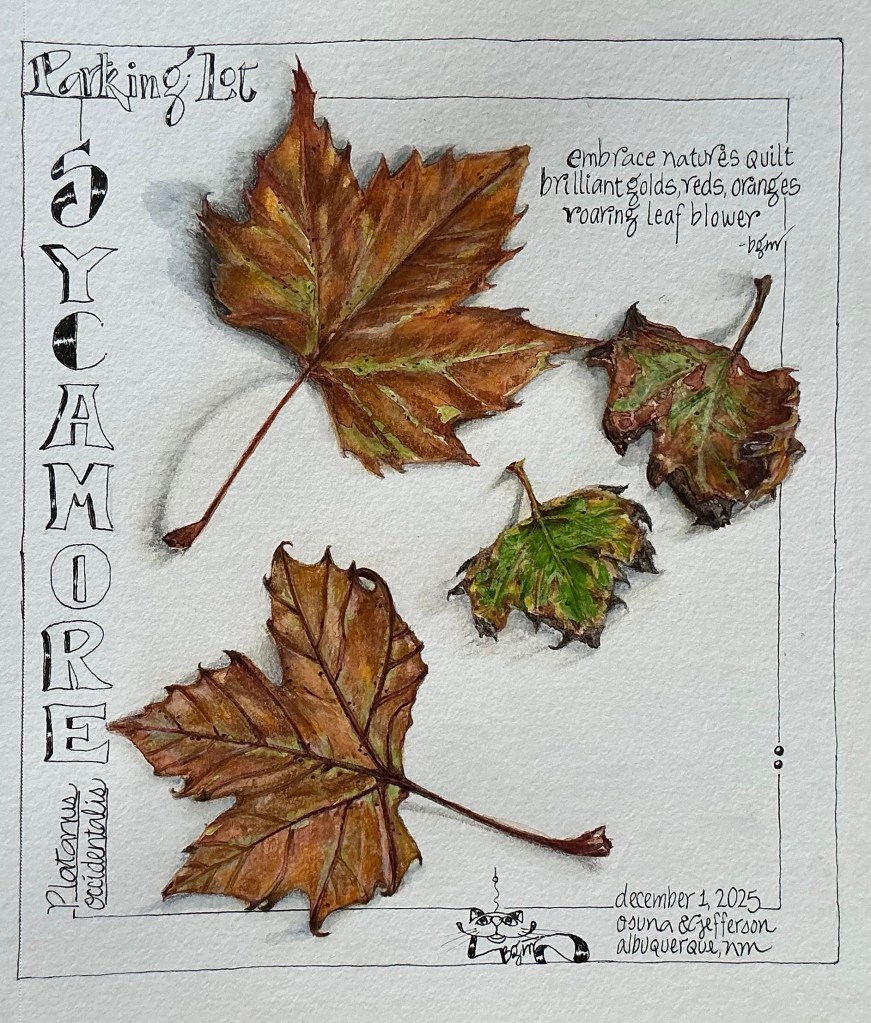
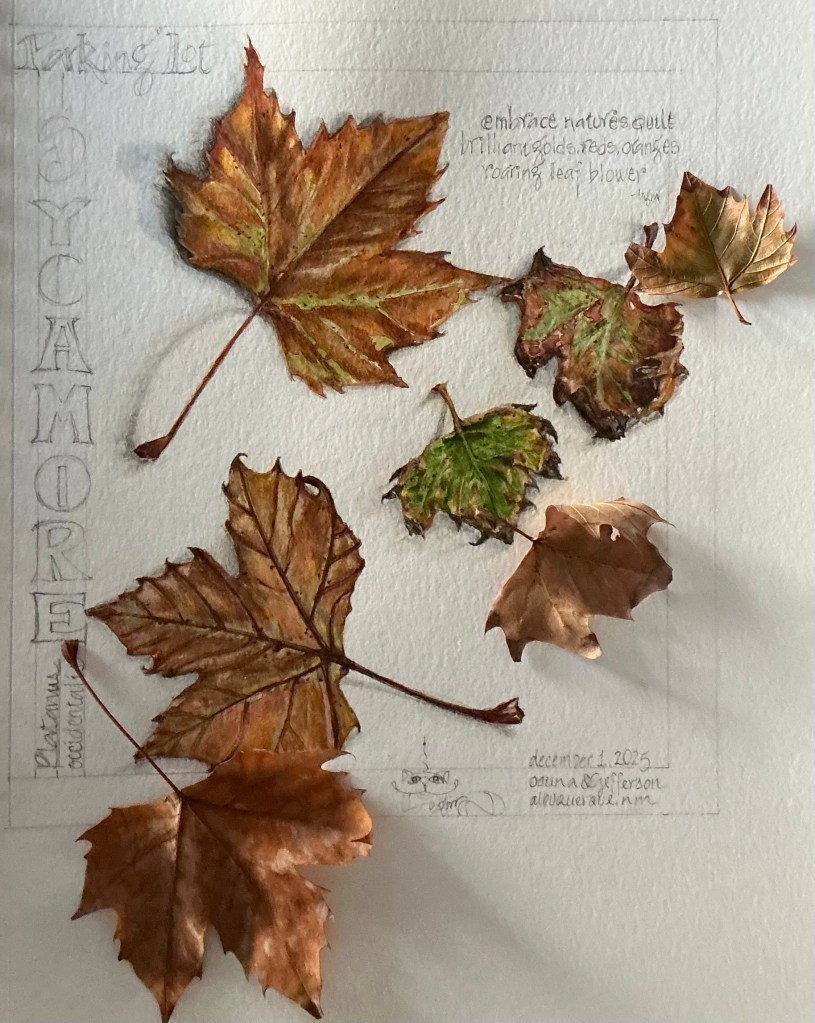
My search for still-beautiful Autumn leaves, half hanging, half fallen to the ground, took me to Albuquerque where temperatures hadn’t yet dipped below zero. Striking ‘gold’ in a large vacant parking lot next to a Disc Golf course, are at least 30 full-grown Sycamore trees with what looked to be full canopies of foliage still clinging tight. But for all the leaves yet to fall, there must’ve been 50x that number covering the ground. The morning breeze was causing the recently-fallen leaves to skid across the pavement in jerky movements, coming to rest in the parking lot’s gutters.
It was in these ankle deep gutter piles where the range of leaf sizes, colors and patterns were found. These 1” to 10” broad, palmately veined and ragged-toothed leaves appeared locked together like pieces from a newly-opened 5000 piece jigsaw puzzle. And, oh my! The lid to the box just blew away! Now I was faced with a dizzying jumble of multi-colored golden-yellows, burnt oranges, Ruddy duck rust, fading-to-spring greens and saddle browns. It was from these ankle deep gutter piles that I collected Autumn leaves for this project.
Lost in thought, I overlooked the white noise of the city ……. traffic mostly, constantly humming and impatiently honking ……. until a painful ringing in my ears invaded the relative calm of the morning. No longer able to think, I turned around and found an invasion of leaf blowers! Never was there a more loudly screaming, obnoxiously noxious sound. Coming closer and closer, louder and more insistent, their ear-muffled and gas-masked operators approached without hesitation, each blowing away (to where?) every bit of the “unsightly and offending” leaf-litter in their path.
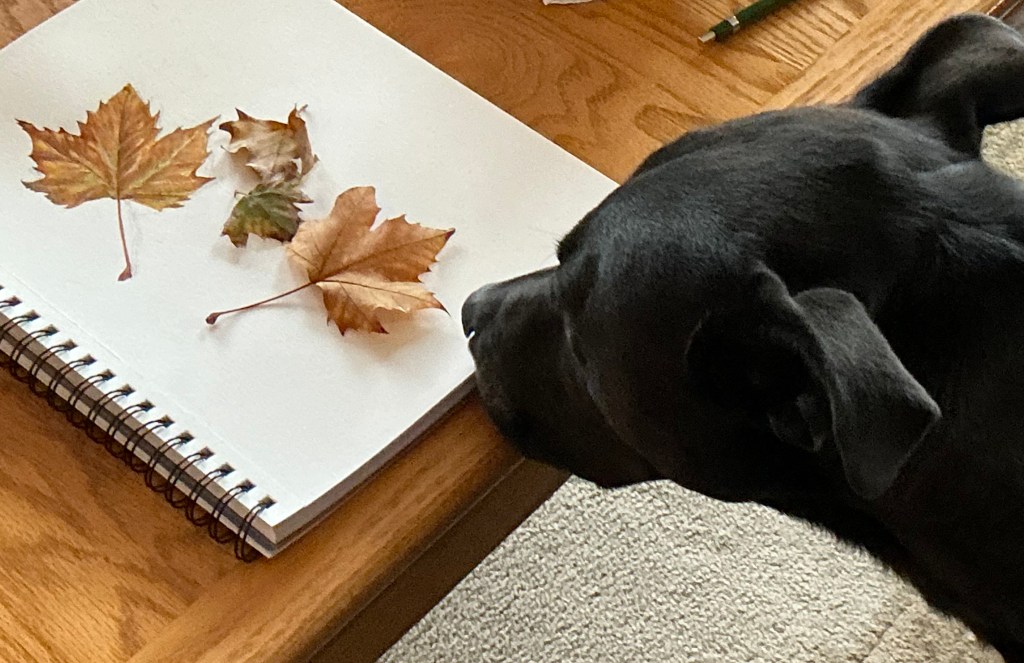
Luna approving of my Sycamore leaf selection
Dang-blasted!
It finally dawned on me this Friday morning that the vacant parking lot only opened for use on Sunday’s. Not agreeable to working weekends, the leaf blower operators were determinedly cleaning up the “messy” lot for the regular Sunday crowd. I was in their way.
Saving as many fallen Sycamore leaves as my collection bags could hold, and silently wishing all remaining leaves a happy landing somewhere on a nutrient-needy plot of land, I ran for the quiet of my car.
My Fallen Leaf Project
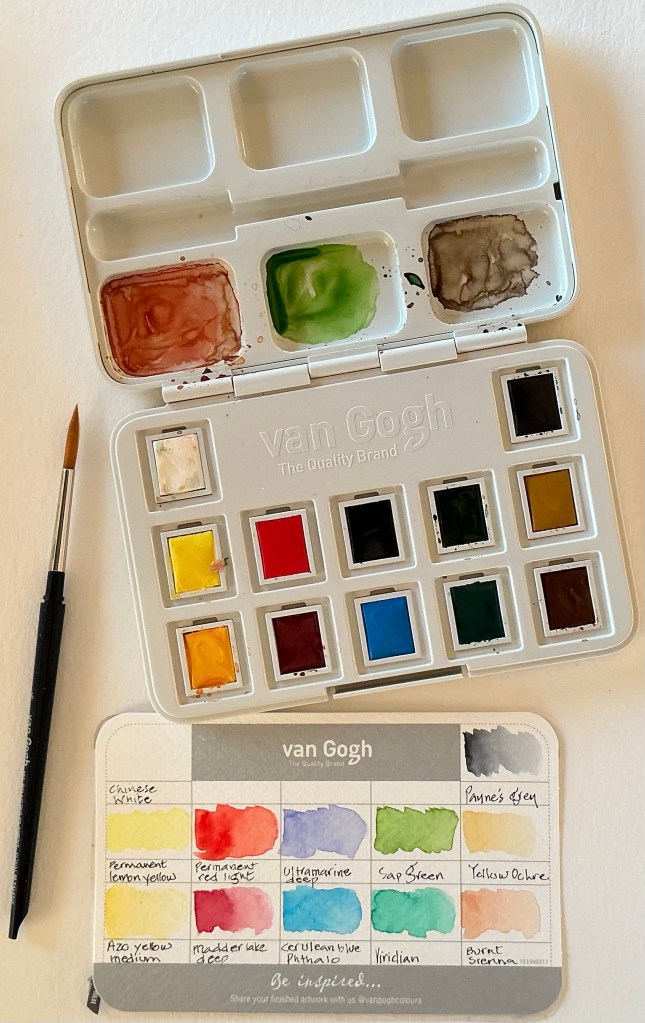
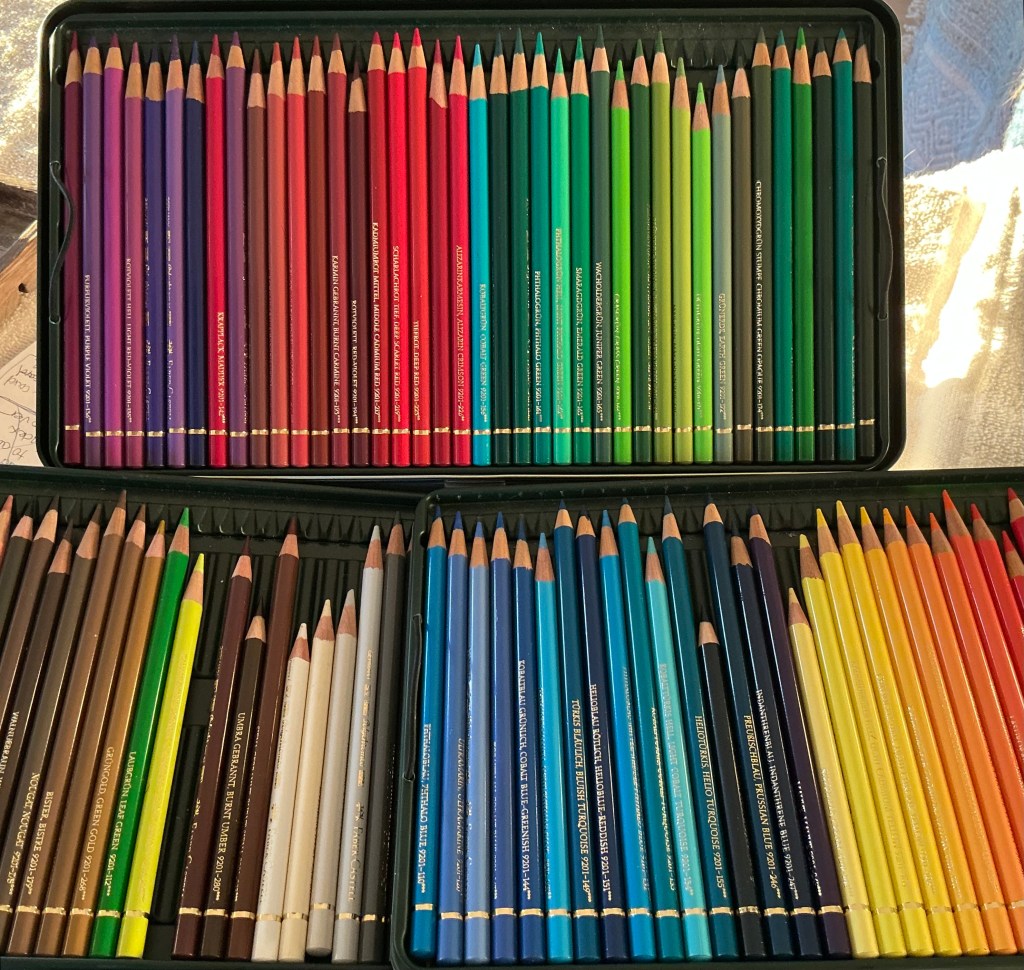
Using Sycamore leaves collected from that vacant Albuquerque parking lot, I tried my hand at a new technique; combining watercolor layers with layers of colored pencil. Using my new set of Van Gogh watercolors, I began each leaf with a layer of plain water followed by a light base layer, mixing Azo yellow medium with a touch of Yellow ochre. The bottom leaf (which was the underside of the top leaf) was duller and lighter in color, calling for a bit of Permanent lemon yellow. Allowing that layer to dry, I used various earthy colors from my set of Faber-Castell Polychromos colored pencils over the watercolor wash, mixing and matching the colors of my pencils with the actual leaf colors. This step tended to leave some areas uncolored with the pencils, so I applied another watercolor wash with Sap green, Burnt Sienna+Yellow ochre, and/or Madder lake deep+Azo yellow medium. I finished each leaf with a Dark sepia colored pencil outline, tipped the leaf margins with Dark sepia, and added shadowing first with Payne’s grey watercolor then Dark sepia colored pencil.
12 half-pan watercolor set and color swatch
The leaves were painted on 140# Canson XL Watercolor paper
Faber-Castell colored pencil set
If you have and questions or comments, please let me know. If you use this combined media technique, any tips you’d like to share would be greatly appreciated too.
…………………………………………………………………………………………
I’d like to send a shout-out and my deep gratitude to Wendy Hollender, botanical artist/illustrator/teacher extraordinaire, who announced in her newsletter free access for over a week to 19 of her bite-sized video lessons. Designed as companions to her book, The Joy of Botanical Drawing, each lesson focused on a different botanical subject and how to artistically render them using watercolor and colored pencil combined. I’ve always wanted to learn this technique and gave it a try with her leaf examples and then mine. Incorporating both media into the same painting was very challenging and way out of my comfort zone.
Thanks so much Wendy, for such wonderful lessons and your fabulous companion book! With lots more practice, my goal is that some day my botanical art looks as natural, skilled and professional as yours.
Were you ever so challenged by something so clever, while at the same time so frustrated with something so beautiful? No, no, wait….. that question may be more complicated than need be. Let me put it this way ……
Were you ever at your wit’s end finding a solution to a seemingly simple problem that you thought was obviously and repeatedly staring you right in the face?
My reply? Yes!
It’s All About the Genes
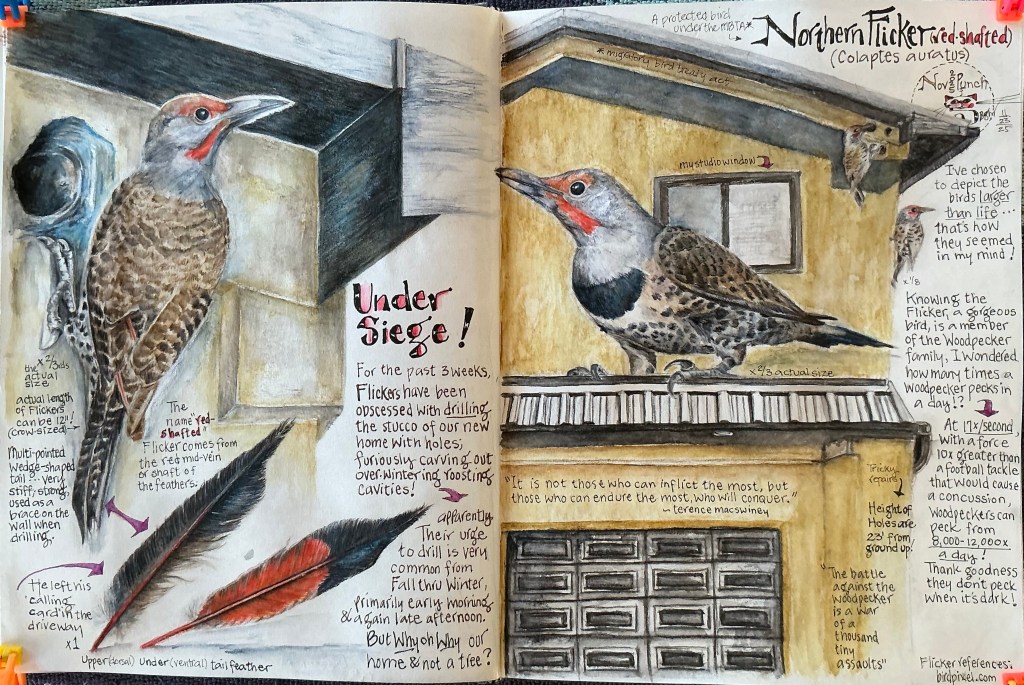
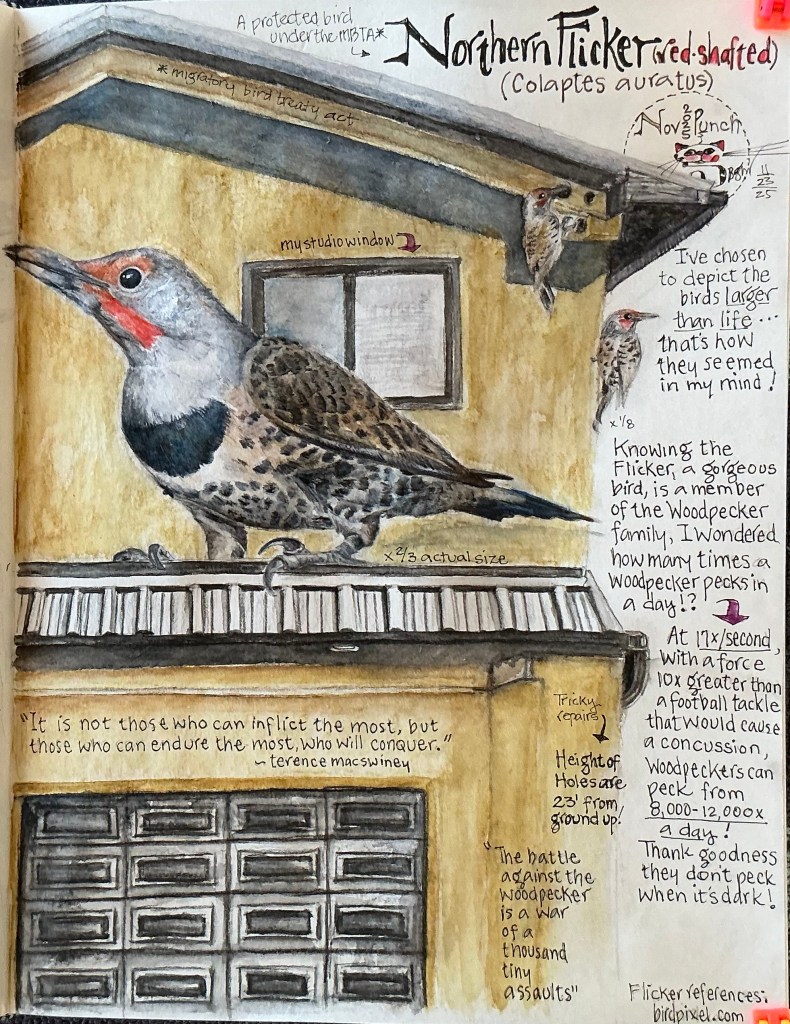
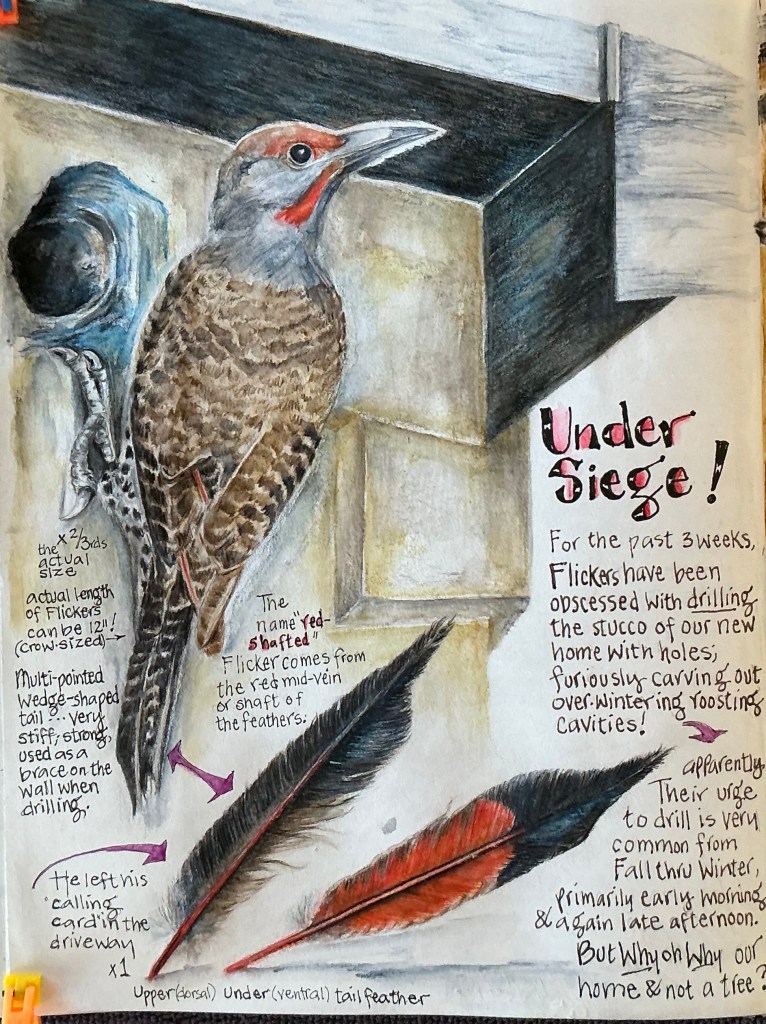
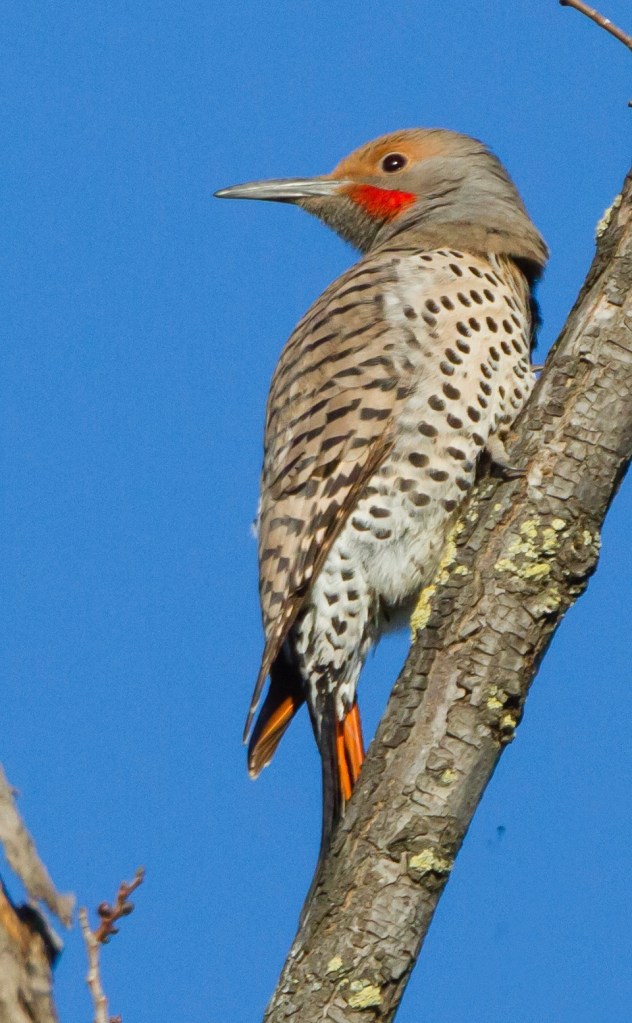
Meet the Northern Flicker (Colaptes auratus) … or more specifically, the Western red-shafted flicker (C. auratus ssp. cafer)*, a gorgeously flamboyant and noisy member of the Woodpecker family, that’s common throughout its western range.** And as woodpeckers do so well, they peck and peck and hammer and drill with the determination and force of a jackhammer*** on nearly any vertical (preferably wooden) surface. They’re single-minded, from start to finish, when it comes to creating a cozy nesting or roosting cavity, whether in a tree trunk or into your home. (More about that in a bit.)
Flicker ID – 101
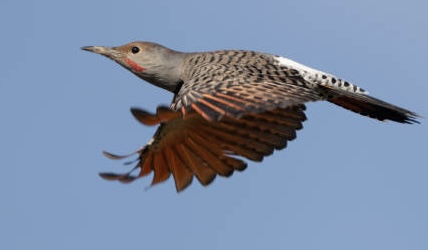
How do you know a Flicker has laid claim to your place? Well, he’s a big, heavy-bodied bird, and when flying overhead, your first thought might be “Crow!” At 12-14” long, with a wingspan of 18”-21”, the size is right. But as he flashes a large showy white rump patch bookended by reddish-orange underwings, you realize he’s not black. Anything but! As his flight slows and dips you notice his brown back is marked with narrow black bars. In preparation for landing, with wings open wide, he vertically aligns his body and feet with the wall, exposing a pale gray belly with bold black spots and a chest-wide black patch. Two strong clawed-toes up, two down (zygodactyl), and a stiff wedge-shaped tail adjusted as a brace, he taps out a few test spots, drawing your attention to his long and heavy bill, on a slate gray head broken by a buff-brown crown, a bright red whisker (male), and light gray cheeks.
Male Western red-shafted flicker in flight. Note white rump patch (unsplash.com)
On a crisp cool Autumn morning, as you watch in horror ……
Before you can declare, “It’s a Male Flicker!” ……
This bigger-than-life bird has landed, tested, and pecked away at his chosen spot 170 times in 10 seconds! He’s created an entry hole about 3” wide, right through the stucco and foam sub layer. This determined Flicker knows winter is coming and he intends to drill into our home, making a cozy roosting cavity in which to hunker down until Spring!
Oh no, No, NO!
We love Flickers and have no wish to harm this beautiful bird.**** But he’s already caused enough damage (23 feet high on the wall) that needs immediate repair. So I clap my hands and holler loudly (something unintelligible), and off he flys to a nearby snag to see how serious my noise-making was.
That’s the story of Flicker hole #1
Oh Not Again, and Again, and Again!
Since early November, our resident Flicker (I call him Jack), has continued to return many times, usually between sunrise and 10am. Sometimes he’ll make a fly-by before sunset. Often his quiet arrival escapes our notice; either we’ve been running errands, we’re out hiking with Luna, or enjoying a short roadtrip. These are the times he’s been able to drill six 3”-wide holes on the initial wall, and another 3”x6” hole just around the corner which was so deep, he almost penetrated the interior of Roy’s woodshop! This gives a whole new meaning to the term “Airbnb!”
After a few weeks up and down our fully-extended extension ladder to make a 2-step/2-day repair job/hole, we were making ZERO headway. Jack, unable to resist the need to drill him a roost cavity, was always one hole ahead of us. And because he didn’t hesitate to redrill newly repaired holes, was there something we were doing wrong?
All Flicker painting are larger than life, because that’s how they seemed to me!
It’s an Education in Biology and Patience
So we learned to listen for his noisy “kerrreee” scream-like call announcing his presence from one of Jack’s many favored perches around the house. Unless we missed it, his territorial call would put us on high alert, ready for action. We also listened for his series of warm-up test pecks that usually sounded inside the house. This “alarm” would catapult one or both of us from a comfy chair and run outside yelling and clapping our hands.
Between listening, running, clapping and yelling (and wondering what the neighbors might be thinking), I discovered a few interesting things on-line…..
Woodpeckers can’t resist drilling holes in synthetic stucco. This product provides the perfect surface for woodpeckers to hammer. When they begin tap pecking, it creates a hollow sound because the synthetic stucco includes a foam layer. The woodpeckers peck through the hard outer surface into the foam where it is easier to create a larger cavity to nest.
#1 …. Our entire home happens to be covered with synthetic stucco! While this might explain Jack’s insatiable desire to drill his roosting cavity into our home and not into one of the surrounding hardwood piñon pines, we’re not going to replace the stucco.
Basil, mint, cinnamon and/or lavender are suggested as natural, non-toxic deterrents for woodpeckers, who dislike strong aromas. The scent of basil, in particular, can be overwhelming and confusing to woodpeckers. Crushing one or a mix of these herbs with adding a bit of water, creates a green slurry that can be filtered and applied with a spray bottle to the affected area(s).
#2 …. This idea was worth a try, especially since there’s still have basil and mint growing in the garden. After collecting several handfuls of each, I popped the mix into the food processor with a bit of water and flipped the on switch. Gathering the resulting slurry, I filtered it through paper towels and collected the liquid for a spray bottle. That was several weeks ago, and with every hole repair, Roy’s been thoroughly soaking first the patch job then follow-up stucco coating with the basil/mint spray. It’s hard to know if it’s actually working, but the initial drilling sites haven’t been redrilled in the past week. It could also be that Jack is gone; pushed out with one of our heavy rainstorms. Or he’s begun drilling more recent holes over the RV garage door. With each repair, Roy continues to spray the basil/mint mix.
The Federal Migratory Bird Treaty Act*** provides protection for Flickers (and all woodpeckers), making it illegal to harm or kill them. But when warranted, migratory birds can be killed under a depredation permit issued by the Law Enforcement Division of the USDI-Fish and Wildlife Service (USFWS). Authorization by the relevant state wildlife agency also may be required before lethal control methods are initiated. Sound justification must be present for the issuance of depredation permits.
#3 …. Applying for a depredation permit may be our last resort, if Jack and his cohorts threaten to turn our brand new home into Swiss cheese.
AGAIN!
That’s the story, almost. This clear Conflict of Interest; an obvious Battle of Wits, continues. Just yesterday, one of the holes Roy patched above the RV garage door was redrilled this morning!
Oh Good Grief!
It’s already been repatched and resprayed, and while writing this story in my studio with window cracked and a clear view of the patched hole, I’m sure to hear and see that gorgeously determined Flicker if he returns to jackhammer away, once again, into a side of our home!
I’d love to know if you or anyone you know has a proven solution to this natural dilemma. Meanwhile …..
Thanks for stopping by, and Happy Thanksgiving!
……………………………………………………………………………………………………………
*Northern Flickers are divided into 2 subspecies, the Western red-shafted flicker (C. auratus ssp. cafer) and the Eastern yellow-shafted Flicker (C. auratus ssp. auratus). The red-shafted subspecies is found throughout Mexico, western and west-central U.S. (where it is common allyearlong), and British Columbia, Canada. The closely related yellow-shafted subspecies, which is highly migratory, is found in eastern and east-central U.S., the Canadian provinces and Territories (except B.C.), and far north into AK.
**Where the range for both subspecies overlaps (in the ‘lower 48’), a lot of hybridization occurs. It’s common to see a red-shafted flicker with more orange feather shafts and/or shades of yellow-orange on the underside of their flight feathers. The same holds true for the yellow-shafted hybrid. Otherwise, appearances differ notably between both subspecies of the Northern Flicker, primarily where the malar (mustache), nape pattern (back of the head below the crown), face color, and tail and flight feathers are concerned. See the table below for non-hybrid subspecies characteristics. For hybrids, any color and pattern variation(s) and combination(s) you can imagine have probably been found!
Northern Flicker subspecies
Red-shafted
Yellow-shafted
Face color
Gray
Buffy to warm, light brown
Malar color
Male: red Female: brown
Male: black Female: brown
Nape color & pattern
Gray, unpatterned
Male: Red crescent on gray Female: gray, unpatterned
Feather shaft/under flight feathers
Pinkish to reddish to red
Yellow
***A woodpecker can peck wood 17x/second, and from 8,000-12,000x/day! Really! And they can drill into wood at a force 10x greater than a football tackle that would cause a concussion. On the November 17, 2025 episode of the Science Friday (SciFri) podcast, biologist Nick Antonson stated that woodpeckers can peck 20-30x their body weight. Now that’s amazing for a Flicker that weighs about 6 ounces!
****Because we had no desire to harm the Flicker(s) drilling into our new home, even when we reached our point of extreme frustration, we wanted to ensure our deterrent efforts aligned with wildlife regulations; especially with the Federal Migratory Bird Treaty Act (Act). Flickers (and all woodpeckers) are considered a migratory non-game bird species, and protected under the Act. It’s illegal, punishable by fine and/or imprisonment, to harm or kill them.
Male Western red-shafted woodpecker with his tail braced against the branch(bird pixels.com)
EggTober 2025 has officially ended! And Wow … I’m so eggs-cited to share Submission Four, the finale, with all-y’all! The eggs showcased for Days 25-31 +1 (yes, another random bird flew in and laid a bonus clutch on the last page) are all snug in their New Mexico nests. Also, you’ll notice a bit more text surrounding those nests.
Following Submission Three, where my narrative focused on the different layers of the eggshell membrane, I was curious about how avian eggshells are constructed. Then I wanted to know more about the entire reproductive system of birds, from ovulation to fertilization, to egg laying. And Then I couldn’t rest without knowing about the embryo, the yolk, the egg white, and all the bits and pieces you see when cracking open an egg! I didn’t know any of this, and if you don’t know, you’re head is about to explode in wonder!
October 25 and 26
The Avian Oviduct and Egg Formation
It takes about one day to build an egg. But to prepare for the journey, about 7 to 9 days before the egg will be laid, the Yolk must be formed. Here’s the story of …..
The Yolk …..
….. formed in one of the many Follicles of the Ovary, the vitellus or Yolk begins as an immature Ovum that is stimulated to enlarge over several days by receiving deposits of yolk material. Once growth is initiated, over the next 7 to 9 days the Yolk’s formation intensifies as 99% of its nutrient-rich layers are deposited until it’s fully formed. Now mature, the Follicle ruptures and the Yolk is released in a process called Ovulation.
And this is where the Journey through the Oviduct begins! Over the next 24 hours, the developing embryo acquires the many layers it needs for nourishment, respiration, and protection until it’s formed into a perfect egg ready for laying. The entire journey takes place in the Oviduct …..
….. which can be divided into several regions: the Infundibulum, Magnum, Isthmus, Uterus, and Vagina. What happens in each of these regions is nothing short of fascinating!
The Regions of the avian oviduct
Infundibulum – After Ovulation, the Yolk immediately enters the funnel of the Infundibulum (the Ostium) where the Ovum is fertilized and the Chalazae is formed. With the help of ciliary action, it takes 30 minutes for the Ovum to move through this region of the Oviduct to the next, the Magnum.
Magnum– It’s this region where the Yolk, together with the now developing embryo and the Chalazae, gets a protective coating of protein-rich Albumen, a process that takes about 3 hours to complete, before moving along to the Isthmus.
Isthmus – The Inner and Outer Shell Membrane Layers and the NucleationSites are formed in this region of the Oviduct. This takes about an hour before the package is delivered to the Uterus.
Uterus– This is where five of the six layers of the outer Eggshell are formed. They are the Mammillary Layer and Mammillary Bodies, Organic Matrix Layer, Crystalline Palisade Layer, Vertical Crystal Layer, and Shell Pigment Layer. Also, as much as one-third of the protein in an egg is added while in the Uterus.
It takes about 20 hours for the egg to move through the Uterus while these layers are deposited. And as the egg moves, it twists and turns. When it’s time to add pigment, the rate of rotation adjusts to ‘paint’ the species-specific patterns we see on the eggshell, leaving a visual record of the egg’s movement in the Uterus. For example, if streaks or elongated tracks on the shell are required, movement is more rapid than when creating round spots, blotches, speckles, or bands. After pigment is added to the outer shell structure, the layers of background color and any markings are enclosed in calcite crystals.
Vagina – The last region of the Oviduct where the Cuticle (the Bloom) is added to the shell just before the egg is laid.
The egg is now complete. The entire process, beginning with the release of the mature Yolk and Ovum from its Follicle until the egg’s final touches, takes 24 hours! And the timing ensures the egg is always laid sometime during the day.
………………………………………………………………………………………………………………
Glossary and Other Interesting Things
Albumen – refers to the “white” of the egg. The Albumen is an effective barrier against microbes that might cross over and cause disease in the developing embryo. Albumen contains over a hundred antimicrobial proteins.
October 27 and 28
Chalazae – two spiral bands of white, stringy tissue that suspend and hold the Yolk in the center of the Albumen.
Crystalline Palisade Layer – A tough, mineralized structure of calcium carbonate crystals that grow into dense columnar units above the MammillaryBodies (the mineralized base of the crystalline eggshell). The amount of shell deposited is determined by the time spent in the Uterus.
Eggshell – Depending on species, the eggshell represents from 9-15% of the total weight of the egg.
Eggshell Formation – The Crystalline Palisade Layer is essential to the process of eggshell formation which takes place in the Uterus.
Nucleation: The process begins at the Nucleation Sites, located on the External Shell Membrane, which are the specific places where the mineralization of calcium carbonate begins.
Initial growth: As calcium salts are deposited and crystallize, inorganic calcium carbonate crystals grow around and outward from the Nucleation Sites, forming the cone-shaped Mammillary Bodies; the first, innermost calcified layer of the eggshell, anchored to the External Shell Membrane. This base of mineralized shell provides mechanical strength, and serves as the main source of calcium for the developing embryo’s skeleton.
Maturation – The calcium carbonate crystals continue to grow into the dense columnar units that form the Crystalline Palisade Layer, creating a tough, mineralized structure that protects the embryo. The amount of shell deposited is determined by the time spent in the Uterus.
Follicle – an enclosed cavity in the Ovary
Labile Medullary Bone– a temporary, highly porous, and woven bone tissue that forms, driven by hormonal changes in female birds, in her medullary (marrow) cavities in the period leading up to and during egg-laying. As a highly porous, woven bone, medullary bone has no significant mechanical function or structural strength. Its role is strictly metabolic.
The word labile means the bone is unstable and readily undergoes rapid and frequent change. Once the egg-laying period is complete, hormones change and medullary bone is reabsorbed.
Labile Medullary Bone Formation and Calcium Requirements – It’s interesting to note that an egg-laying hen requires 10% of her the total body calcium reserves during each 24-hour period she is producing eggs. To meet this calcium requirement, primarily for eggshell formation, it’s necessary that her plasma (blood) calcium levels triple during egg formation. This calcium is mainly obtained from increased intestinal absorption and a highly labile reservoir found in the medullary bone. In other words, to meet the calcium requirement, the hen’s body naturally produces it as medullary bone.
Eggshell Layers
Mammillary Bodies – The first, innermost calcified layer of the eggshell, anchored to the External Shell Membrane. These cone-shaped Mammillary Bodies form the base of mineralized calcium carbonate which provides mechanical strength to the shell, and serves as the main source of calcium for the developing embryo’s skeleton.
Nucleation Sites (aka Organic Cores) – form in the Isthmus region of the Oviduct, and are found on the External Shell Membrane. Composed primarily of organic material (proteins, proteoglycans, collagens), they are the specific locations where the mineralization of the calcium carbonate shell begins. In other words, the Nucleation Sites provide the initial template or “seed” for calcium carbonate crystals to start forming.
Oviduct – the tube that transports the developing egg with embryo from the Ovary to the Vagina.
Oviduct … Only One? – Yup! Most bird species have only one Ovary and adjoining Oviduct, the other having degenerated when the hen was, herself, a developing embryo. This evolutionary modification probably resulted because egg production from two ovaries would deplete the female’s body of calcium to excess. As has been demonstrated in chickens that are on a calcium deficient diet, egg production ceases.
Ovulation – The process in which the mature Yolk and Ovum is released from its Follicle in the Ovary and is received into the Oviduct through the Infundibulum.
Ovulation Rate – Within 1 hour after a hen has laid an egg, the next mature Follicle in the Ovary ruptures (aka ovulates), releasing the mature Yolk and Ovum.
Ovum – an unfertilized egg
October 29 and 30
Pigment or Not? – Whether an eggshell is white, or decorated with a background color and/or markings, it’s appearance is influenced first by the species of bird, then by lifestyle and nest location. The specific color of an egg is an adaptation to its environment. This is where camouflage and/or thermal regulation may be required.
Thermal regulation is still being studied, but where camouflage is beneficial, egg color depends strongly on nest locations:
White eggs – prevalent among birds like pigeons, doves, swans, many seabirds, etc. These birds often build concealed nests where camouflage isn’t necessary, or inconspicuous locations are chosen for nesting where white coloring helps camouflage the eggs, reducing the risk of drawing attention.
Blue or green eggs – Bluebirds, robins, sparrows, parrots and other birds that lay pale to bright blue, blue-green or green eggs blend in with the sky or the foliage of nesting sites, providing natural camouflage.
Brown or speckled eggs – Brown or highly marked eggs with speckles, spots, blotches, or scribbles provide excellent camouflage for ground-nesting birds like quail, avocets and killdeer. The mottled appearance of these eggs blend well against rock, sand, soil, foliage and branches. The eggs’ colorations are camouflaged well in nests woven from a variety of materials to nests that may be nothing more than a scrape or depression in the ground.
ShellPigment Layer – Pigment granules are deposited on the outer shell structure, forming color layers which are then enclosed in calcite crystals.
Sperm Storage – a female bird need mate only once for the sequential formation of her eggs to be fertilized. In other words, each newly ovulated egg that arrives at the Infundibulum, which occurs every 24 hours (more-or-less), becomes fertilized from a single mating. That’s because female birds can actually store sperm in Sperm Storage Tubules (SSTs). SSTS are tubular “invaginations” in the Infundibulum where sperm can be kept alive for 2 to 15 weeks (depending on the species), and can be released after Ovulation.
Uterus – the Shell Gland
Yolk – The nutrient-bearing portion of the egg containing most of its fat, minerals, and many of its proteins and blood vessels.
Yolk Behavior – The Yolk always rotates so the developing embryo floats to the top, regardless of the egg’s position
Zygote – the fertilized Ovum
Wow, gosh! I’m egg’s-hausted ….. how about you!?! But wasn’t that a fascinating journey through a bird’s oviduct? A literal look behind the scenes!
October 31 and November 1 (bonus)
And that concludes my Inktober/EggTober 2025. Researching so much information not only took me down some fascinating rabbit trails, but everything I learned in the month of October blew my mind! And everything I uncovered had to be shared with you all. The bounty was voluminous, resulting in each Submission eggs-panding to accommodate nearly everything. Yes, you read that right ….. I nearly got everything shared, and there’s still so much more to learn about past, present and future bird eggs and all eggs in general. Maybe once my notes are gather and organized, and I pursue answers to countless questions on the when’s, why’s and what-for’s, it will be time for EggTober 2026!
Did you participate in this year’s Inktober? Maybe my four submissions gave you ideas for Inktober 2026? Share your thoughts and ideas. Meanwhile ….. That’s all for now, yolks!
As always, thanks for stopping by!
P.S. in case you missed any of my previous EggTober 2025 Submissions, you can catch up with the following links: Submission One, Submission Two, and/or Submission Three! Enjoy!
EggTober progress continued, with zeal, as I worked my way through week two. See for yourself! Check out the bird eggs that randomly popped up from my list of nesting birds of New Mexico. As with Submission One, included are a few fascinating facts about the shape of bird eggs to go along with week two birds.
If you missed Submission One of my EggTober post and would like to catch up, click here.
Egg Shape
The typical oval-shaped bird egg isn’t coincidental. Evolution, influenced by factors such as bird genetics and environmental influences, produced a “smart egg;” a perfectly shaped package just right for survival ……..
October 9th and 10th
1. Structural Strength
The oval shape provides greater strength and resilience, reducing the likelihood of breakage during incubation. It withstands external pressure more effectively, minimizing deformation or fractures in the developing embryo.
October 11th and 12th
2. Optimal Space
The oval shape maximizes the volume available for the embryo, ensuring proper development and sufficient reserves of nutrients, including proteins.
October 13th and 14th
3. Temperature Distribution
The oval shape promotes the even distribution of heat. When a female bird incubates the egg, her body heat is utilized to maintain warmth. The egg’s oval shape aids in evenly disseminating her body heat, ensuring a consistent temperature for the embryo throughout the incubation process.
October 15th and 16th
4. Prevents Rolling
The blunt, flat end of the oval egg shape helps prevent rolling within the nest. This stability safeguards the eggs, preventing them from accidentally falling from the nest or assuming an improper position.
Summary
While most bird eggs exhibit an oval shape, slight variations in shape do occur among different species. These variations are influenced by the birds’ lifestyles and specific incubation requirements. Overall, the oval shape plays a vital role in the reproductive ecology and physiological adaptations of birds.
Hope you have enjoyed Submission Two of EggTober! If so, please leave me a comment. And as always, thanks for popping in!
p.s. Stay tuned for Submission Three, landing in your in-basket next week!
Having participated in the Inktober for years by creating a daily drawing or painting throughout the month of October, I’ve found the challenge fun, rewarding, and motivating. However, rarely sticking to “ink only” creations and/or following the official prompts, I’ve shamelessly adopted a variety of approaches shared by others, have different media, or made up my own prompts. For me, this has added an elevated level of complexity that’s so appealing and somewhat wild!
In the past, my “Inktober” art has been about themes, like using a new Zentangle pattern a day that has a name beginning with “Q” or “Z” or “M” ……. or picking different botanical patterns. I’ve played with mixed media, watercolor, watercolor pencils, colored pencils, graphite, and (yes) ink to create a flower a day, rocks, mushrooms, candy, modes of transportation, the alphabet, fonts, portraits of famous people, etc. I’ve found the challenge is a great way to loosen up and try subjects I’m not comfortable or familiar with, while not worry about silly mistakes.
So, each year I look forward to Inktober, and this year was no exception.
This year I went way “out on a limb” and switched it up a bit.
This year I’ve named my personal 31-day challenge EggTober! And in keeping true with my love of nature, nature journaling and curiosity, each morning I’ll be randomly pick from a list of birds that nest in my home state of New Mexico and will draw one or several of of their eggs. 🥚
Here’s my progress so far and a few fascinating facts about bird eggs. At the end of my post, you can read about my process and materials used.
Did you know that two pigments are responsible for most eggshell colors: biliverdins, which make blue-green hues; and, protoporphyrins, which make the background hues of rusty yellows, reds and browns.
Eggshells that have markings like spots, blotches, speckles, or lines, have more protoporphyrins. These markings help camouflage eggs, especially those laid by ground-nesting birds.
The largest known bird egg belonged to the extinct elephant bird. This flightless bird, which stood about 10 feet (3 meters) tall and lived in Madagascar until the 18th century, laid eggs about 11 inches (28 centimeters) long. That’s about the size of an American football!
Bird eggs can be oval, to round, to pear-shaped, depending on the species of bird laying the eggs and where. Many sea birds nesting on cliffs tend to lay more pear-shaped eggs which helps keep them from rolling off steep ledges. It’s said that pushing one of those eggs, because it’s so heavy at one end, will cause it to spin in a circle.
Eggshells are largely made of calcium carbonate, and if hatched without their final ‘spray-paint’ of color, will look pure white to the human eye. But some white eggshells contain ultraviolet colors visible to birds. (Wonder why?)
Process and Materials
Of course, given that it’s Autumn, and impossible to find any active bird nests housing unhatched eggs, I’ve formulated Plan B. For my references I’ll be relying on digital natural history museum egg collections, on-line bird identification resources, fascinating facts about bird eggs, several key references from my personal library, and other sources, to learn and satisfy my long held love of birds, their incredible eggs, and the egg-laying process.
Staying as true to real life as possible, approximate egg shapes will be colored with Derwent Inktense watercolor pencils. For consistency, basic information specific to each individual bird species’ typical egg (clutch size, length and width, background (ground) color(s) and marking color(s) and patterns) will be included. For future reference, I’ve handmade a small booklet that will hold two species’ eggs/page. At the end of October, I’ll then add a title page, table of contents, and a list of references.
And finally, for now, it’s entirely possible that my process and materials may be changed on a whim! So stay tuned as EggTober unfurls!
If you are an Inktober participant, or have never heard of this month-long creative event, please let me know!
If you’re a fan of weird twists in nature (like me), and enjoyed my November 25, 2024 post, “A Quirk of Nature: Fourwing Saltbush,” you may have lost many hours of sleep wondering how I could’ve missed such an obvious mistake! You know the one. The labeling error made when naming those cottonball-like insect galls hugging the Fourwing stems.
In my confusion (or wishing to cover all options?), I seemed to believe two different midge species were somehow responsible for the same gall.
Are they Rosette Bud Gall Midge galls or Fourwing Saltbush Wooly Gall Midge galls?
Decisions, decisions.
My Quandry quite clear, it was time to consult the experts.
A short 10 months later, confirmation arrived from the iNaturalist experts in all things “Fourwing.” All the puffy galls are none other than those made by Fourwing Saltbush Wooly Gall Midges!
And the answer to my question is well timed, as the stems of the female Fourwing shrubs are once again ‘heavy’ with Wooly Gall Midge galls. Now I know! Now you also know!
Enjoy this official correction, at long last, and wishing you sweet dreams.
As always, thanks for stopping by!
PS: My journal page was created by first sketching in graphite the two Fourwing stems, followed by outlining with loose ink lines from a Micron 005, adding a background of both soft and medium charcoal – blending with a stump, then using a Tombow Mono Zero eraser to clean up the ‘cottonballs,’ before adding watercolor pencil, color splatters, and eraser lines randomly placed through the charcoal background. A bit experimental, and lots of fun.
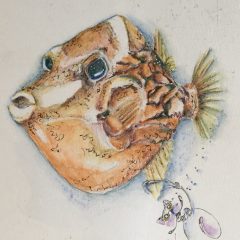
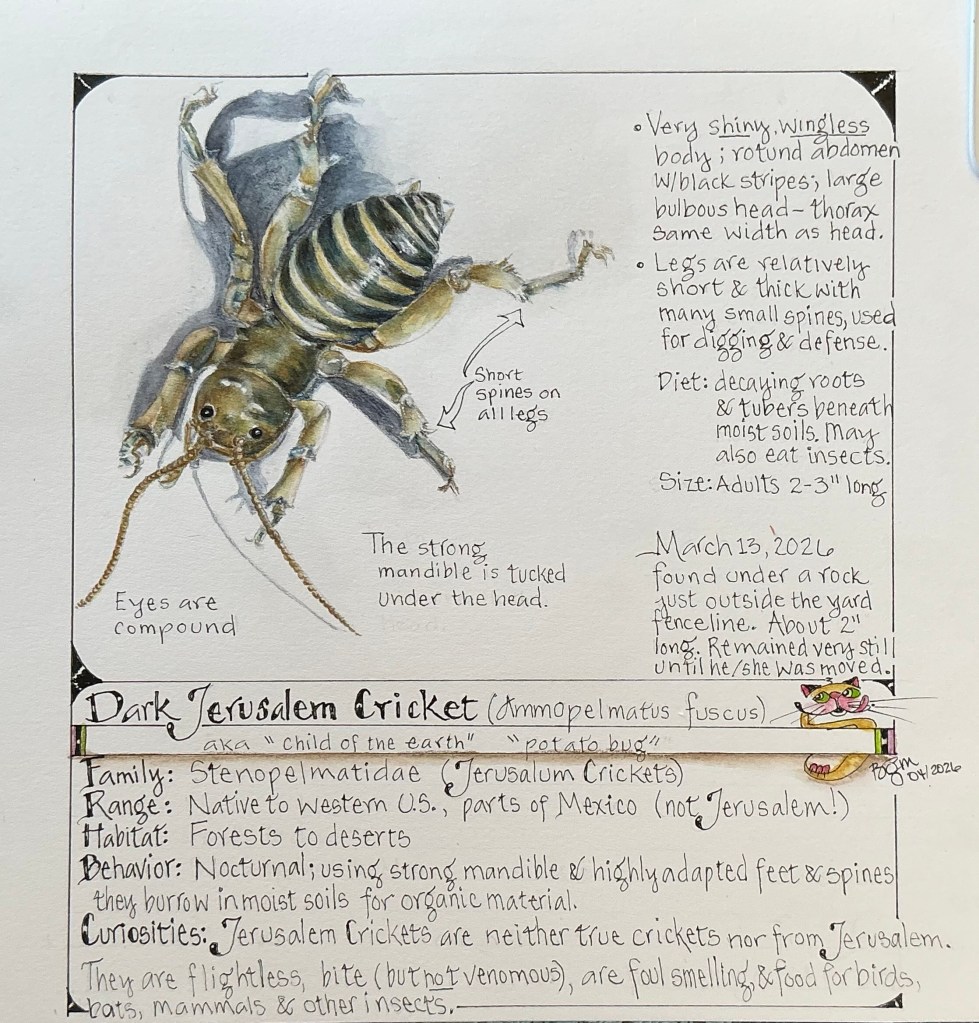
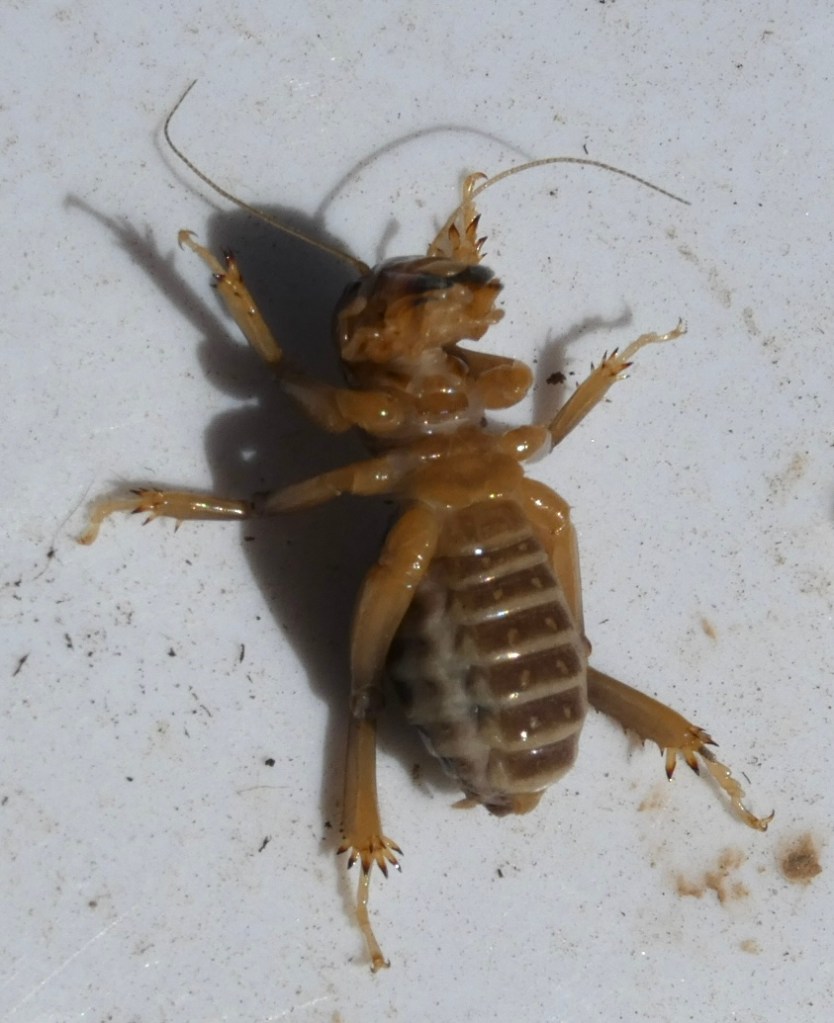
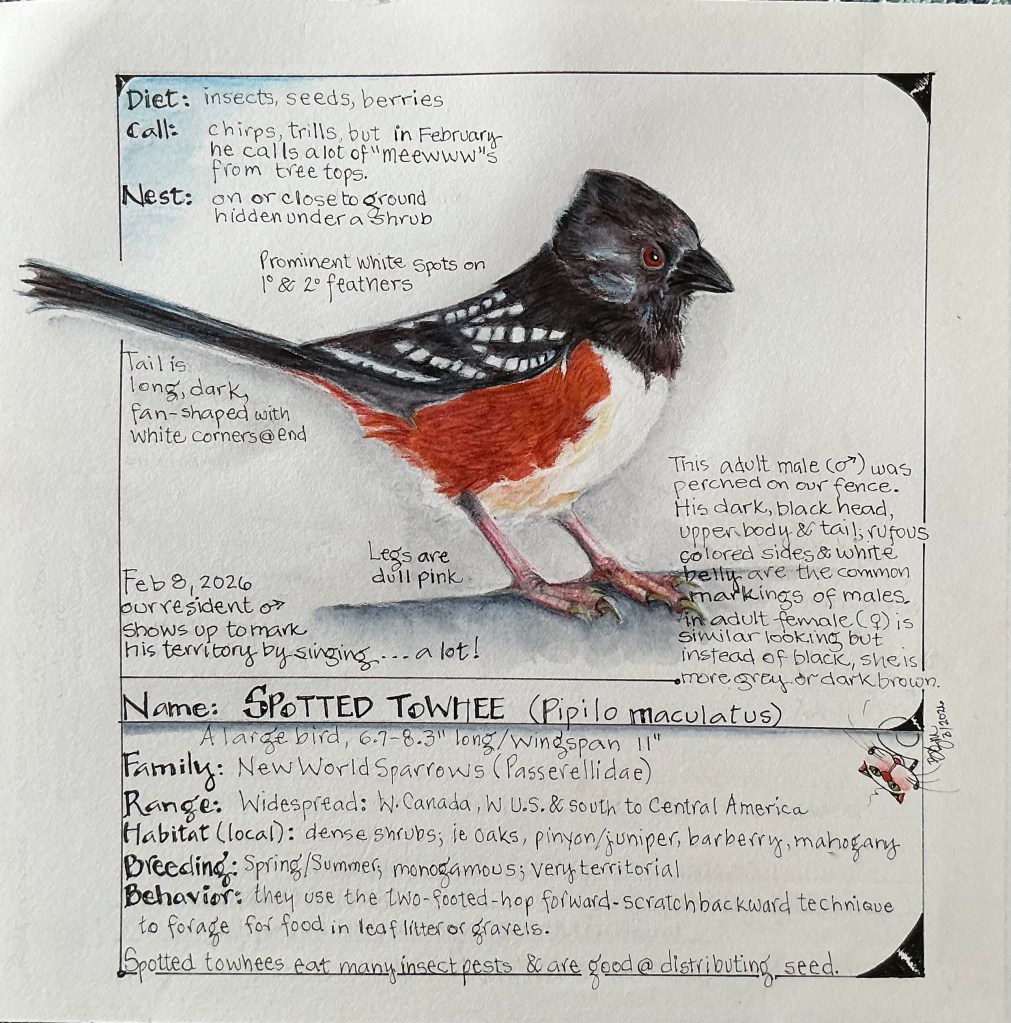
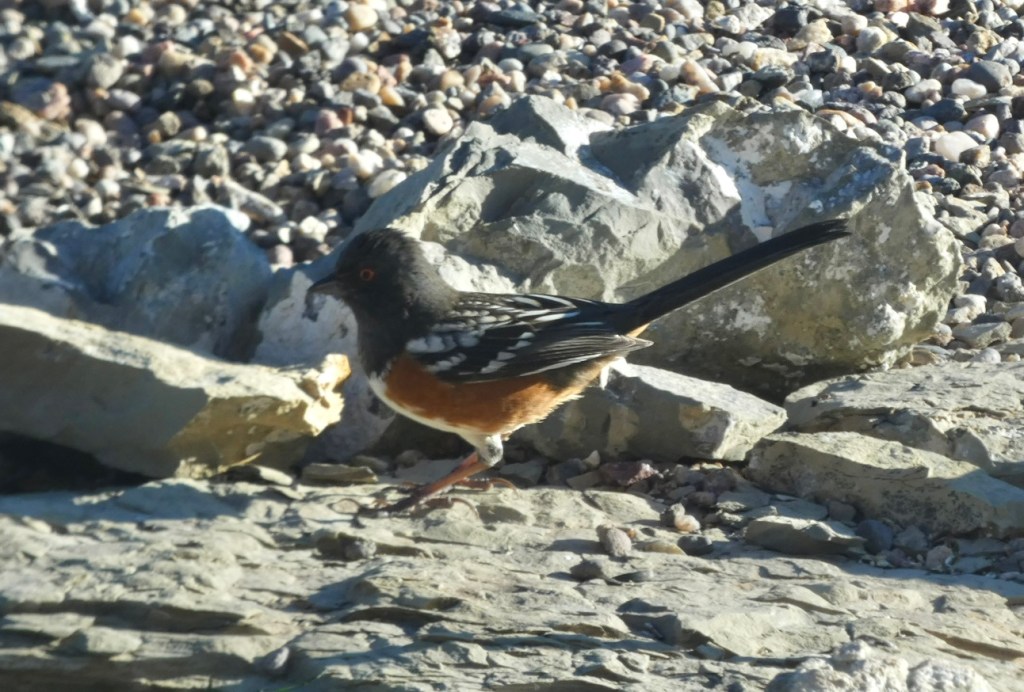
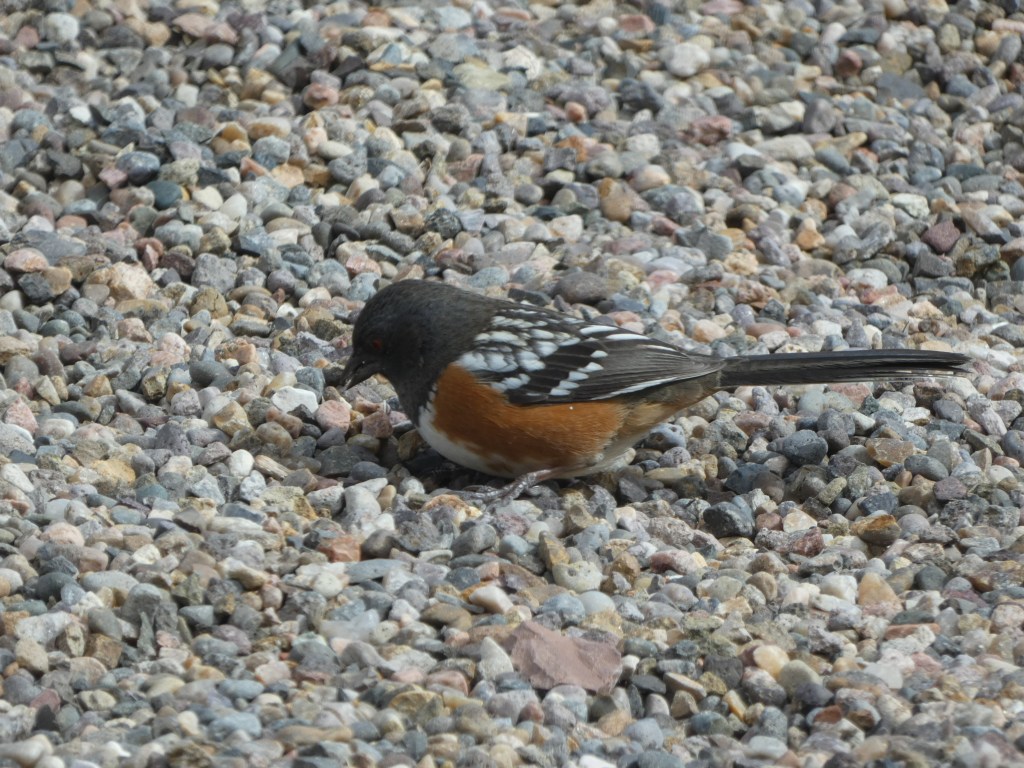
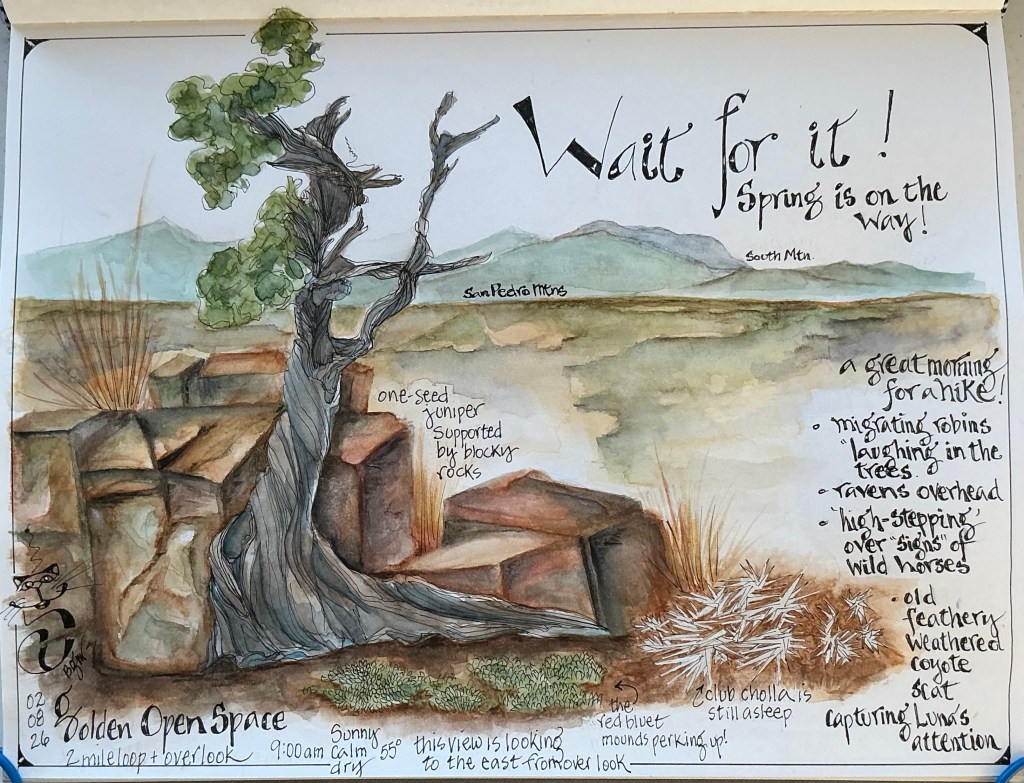
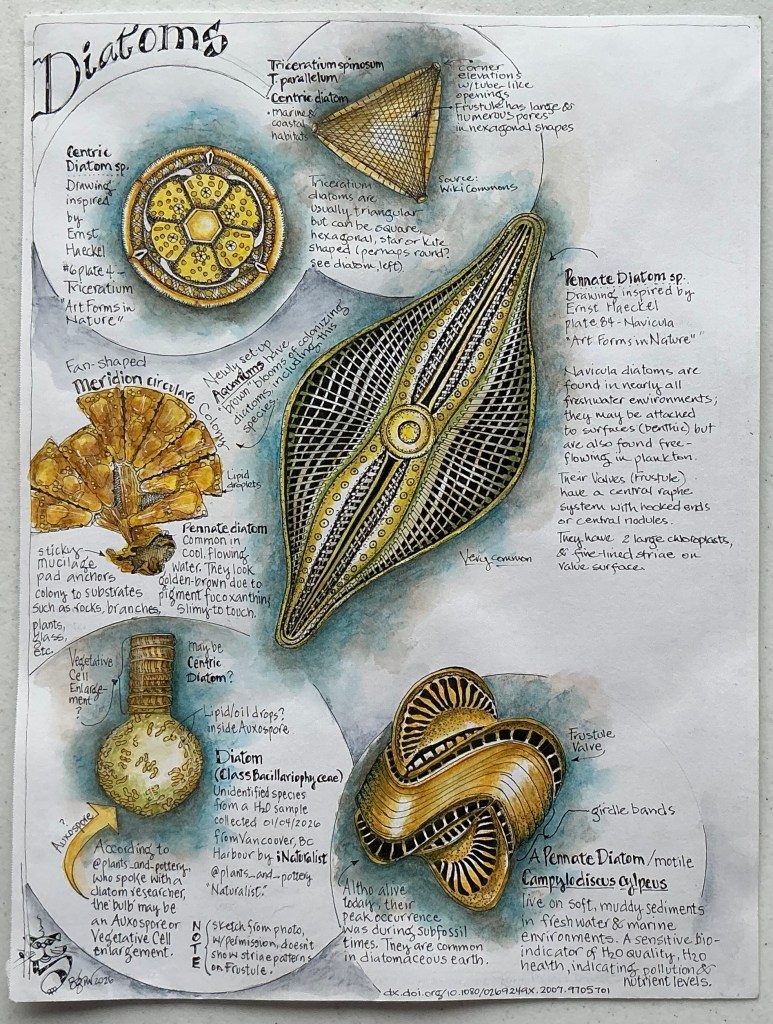
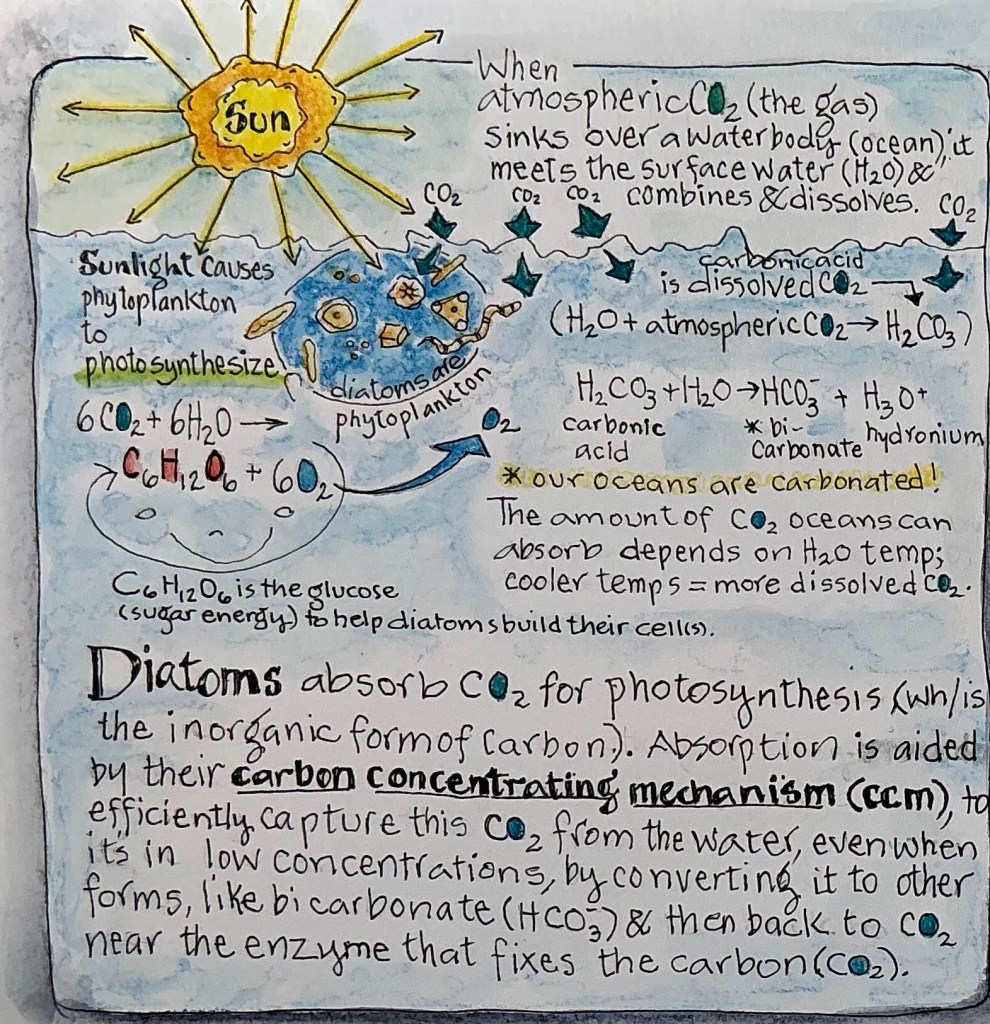
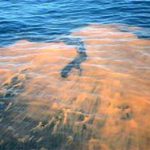
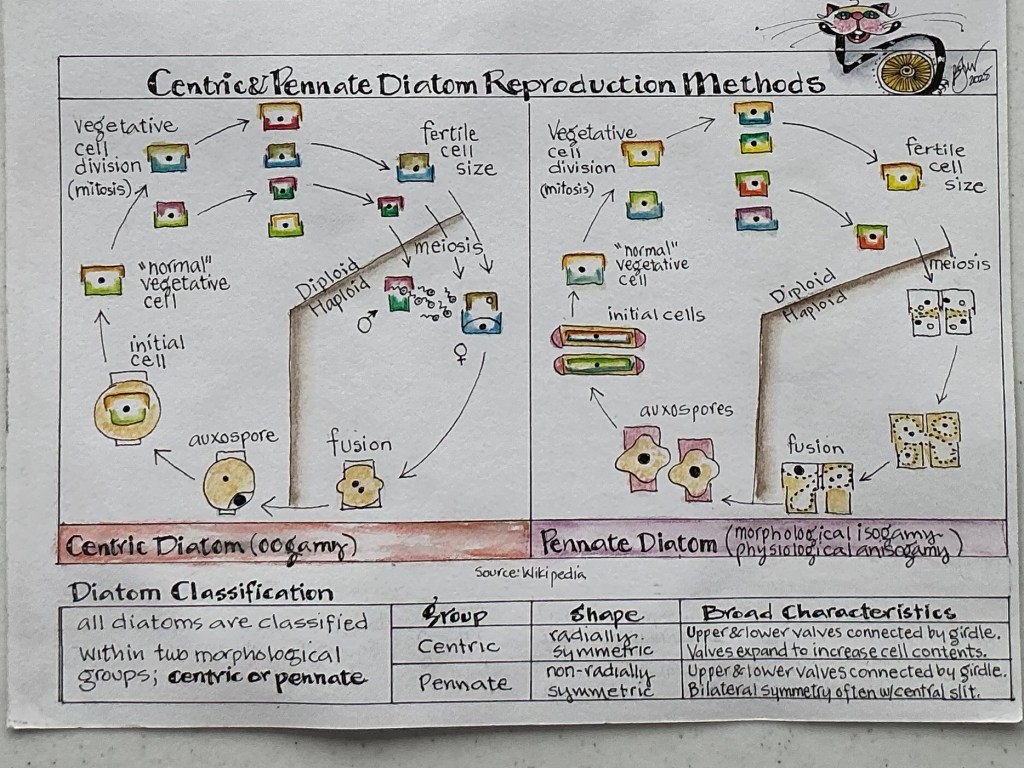
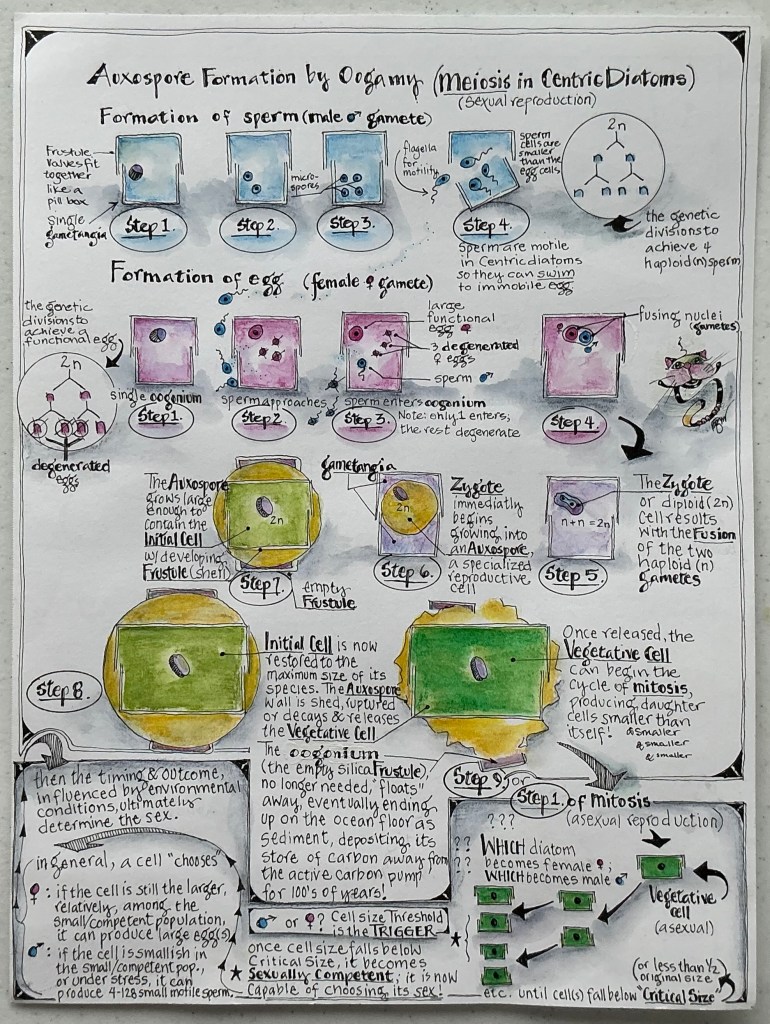
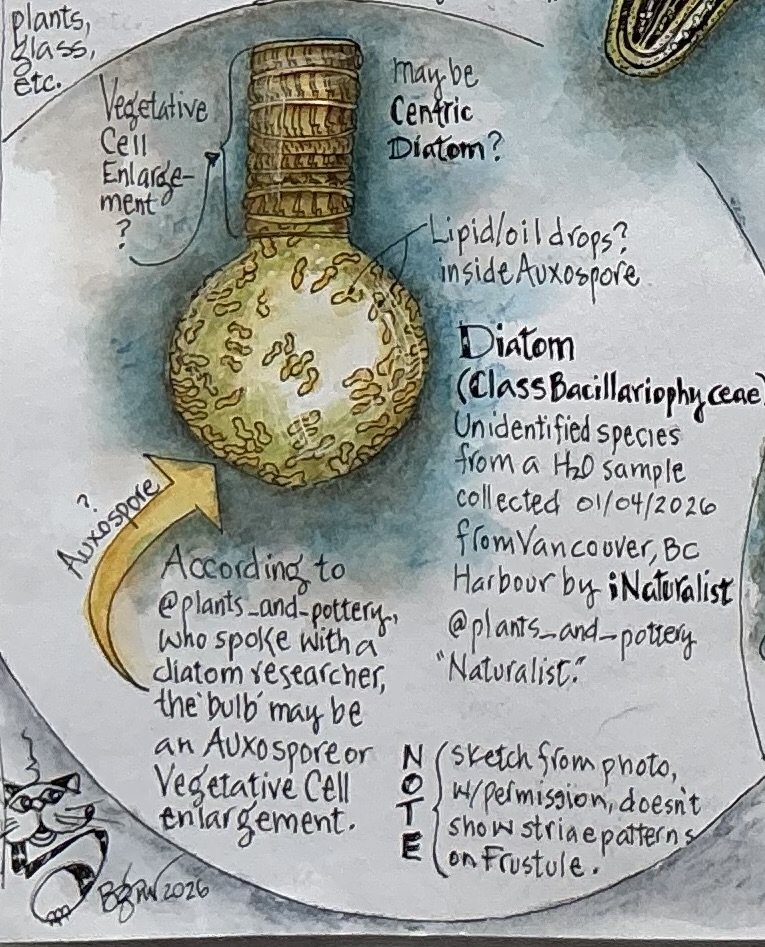
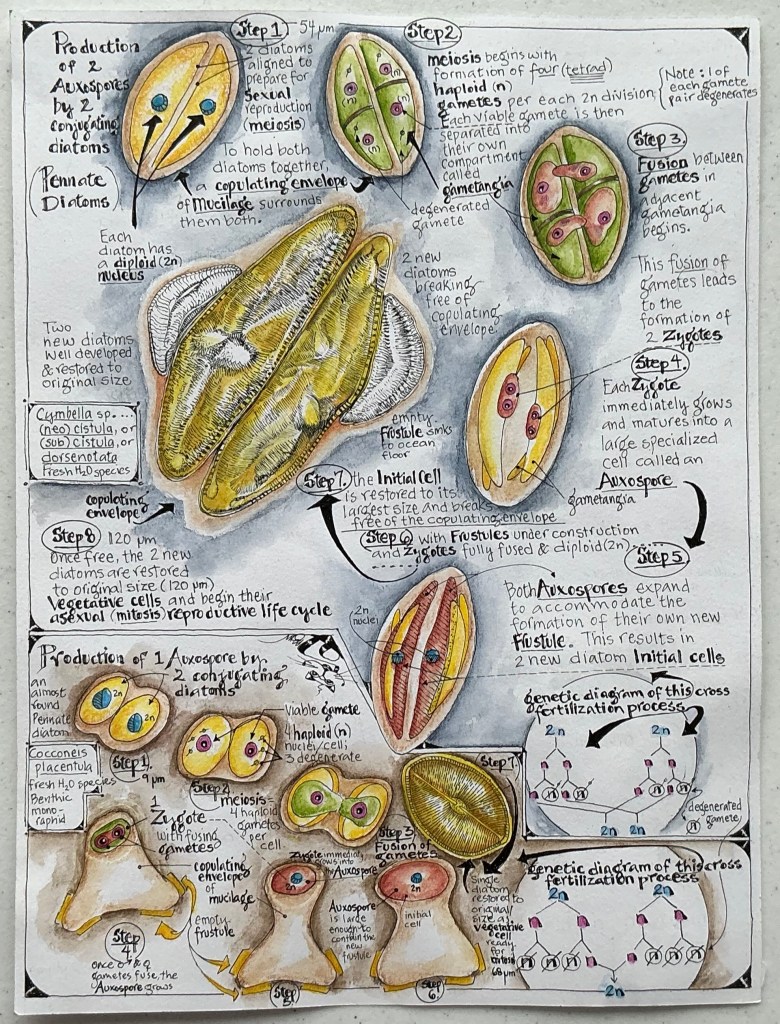

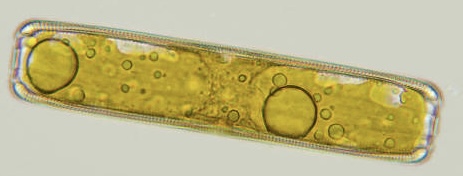
 2𝑛), forming the dominant, actively growing stage, which produces haploid (𝑛) gametes through meiosis, that fuse to restart the cycle by restoring two sets of chromosomes (