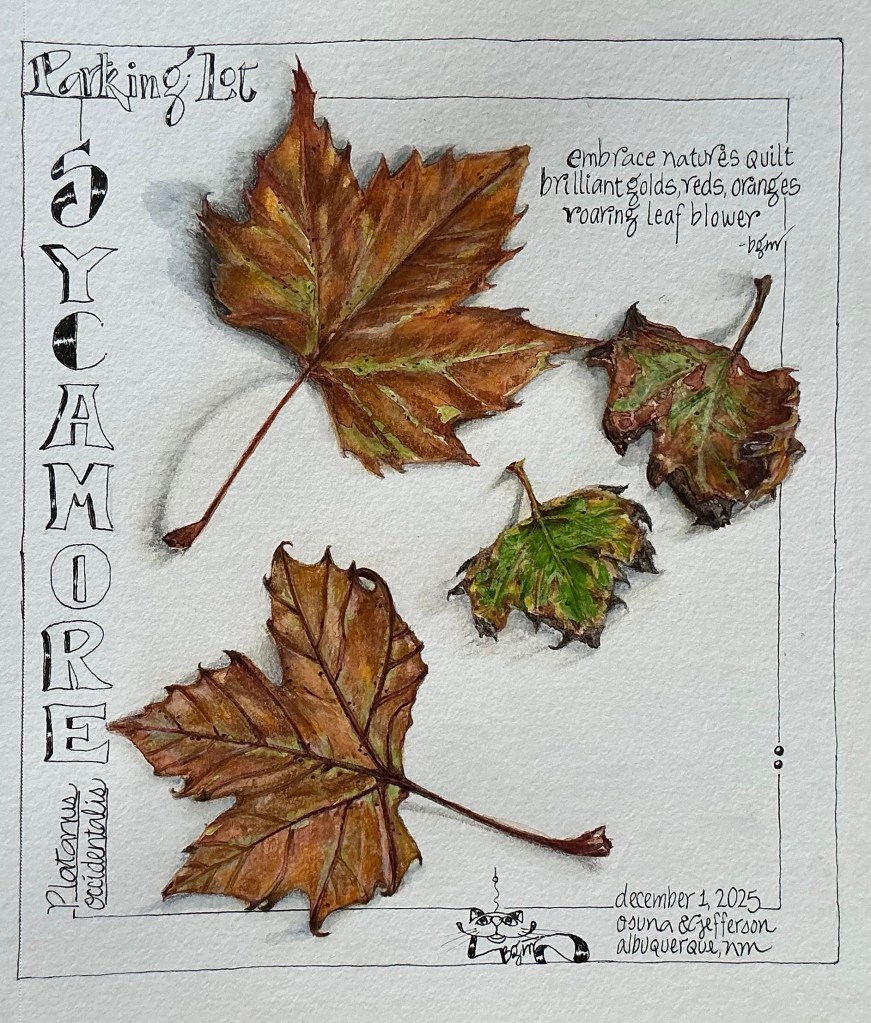
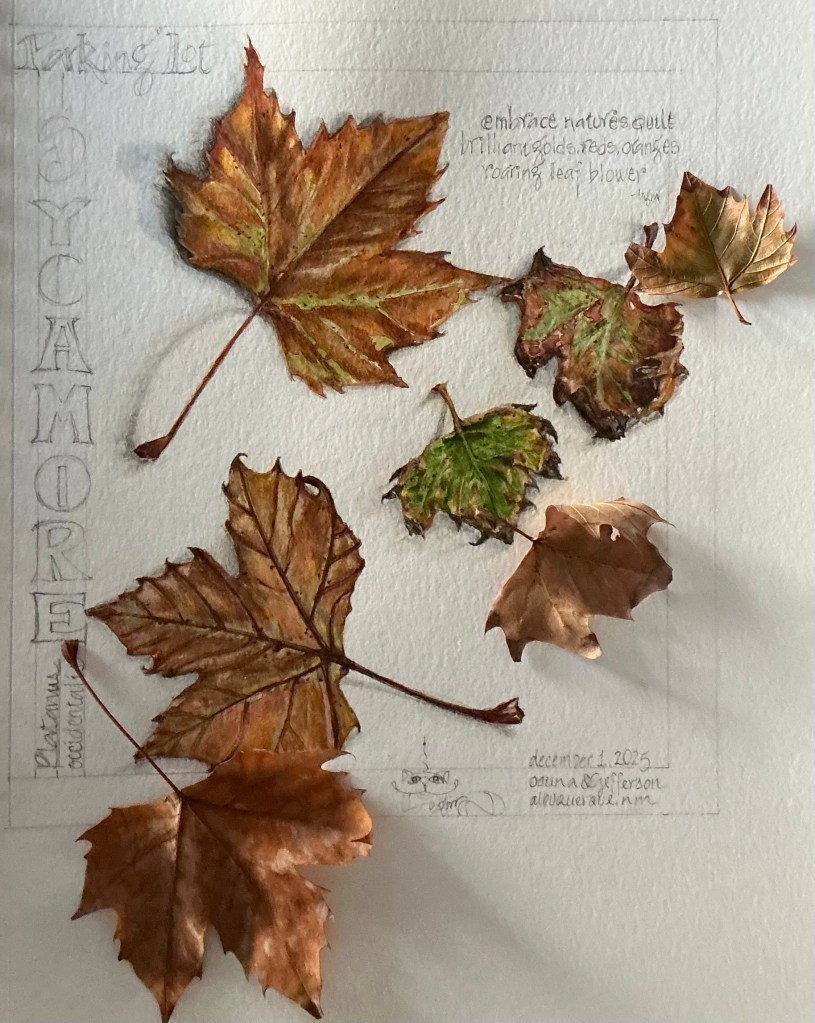
My search for still-beautiful Autumn leaves, half hanging, half fallen to the ground, took me to Albuquerque where temperatures hadn’t yet dipped below zero. Striking ‘gold’ in a large vacant parking lot next to a Disc Golf course, are at least 30 full-grown Sycamore trees with what looked to be full canopies of foliage still clinging tight. But for all the leaves yet to fall, there must’ve been 50x that number covering the ground. The morning breeze was causing the recently-fallen leaves to skid across the pavement in jerky movements, coming to rest in the parking lot’s gutters.
It was in these ankle deep gutter piles where the range of leaf sizes, colors and patterns were found. These 1” to 10” broad, palmately veined and ragged-toothed leaves appeared locked together like pieces from a newly-opened 5000 piece jigsaw puzzle. And, oh my! The lid to the box just blew away! Now I was faced with a dizzying jumble of multi-colored golden-yellows, burnt oranges, Ruddy duck rust, fading-to-spring greens and saddle browns. It was from these ankle deep gutter piles that I collected Autumn leaves for this project.
Lost in thought, I overlooked the white noise of the city ……. traffic mostly, constantly humming and impatiently honking ……. until a painful ringing in my ears invaded the relative calm of the morning. No longer able to think, I turned around and found an invasion of leaf blowers! Never was there a more loudly screaming, obnoxiously noxious sound. Coming closer and closer, louder and more insistent, their ear-muffled and gas-masked operators approached without hesitation, each blowing away (to where?) every bit of the “unsightly and offending” leaf-litter in their path.
Luna approving of my Sycamore leaf selection
Dang-blasted!
It finally dawned on me this Friday morning that the vacant parking lot only opened for use on Sunday’s. Not agreeable to working weekends, the leaf blower operators were determinedly cleaning up the “messy” lot for the regular Sunday crowd. I was in their way.
Saving as many fallen Sycamore leaves as my collection bags could hold, and silently wishing all remaining leaves a happy landing somewhere on a nutrient-needy plot of land, I ran for the quiet of my car.
My Fallen Leaf Project
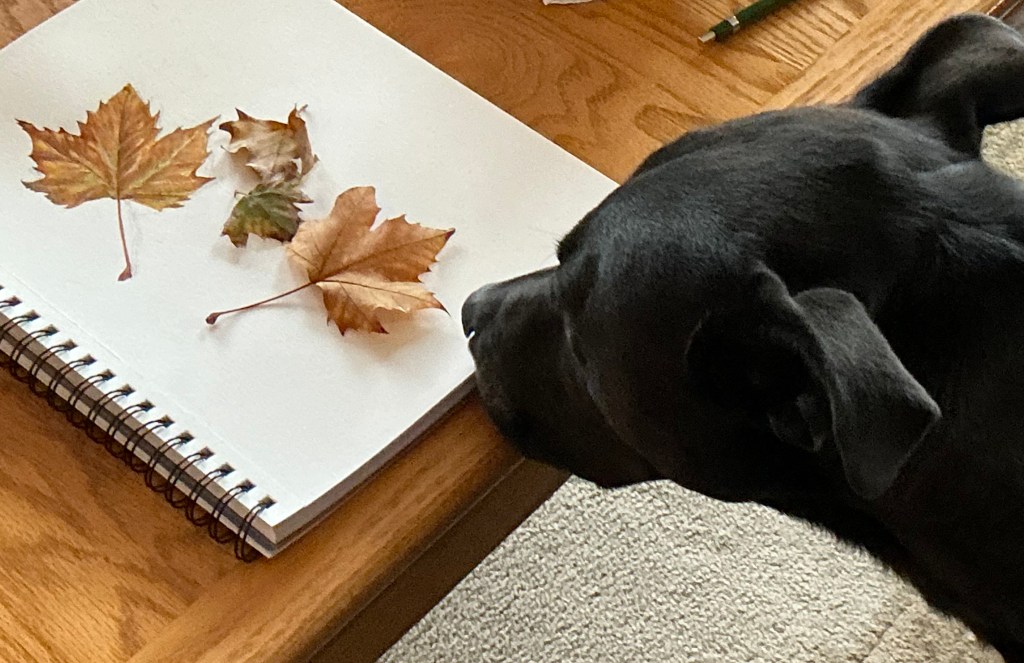
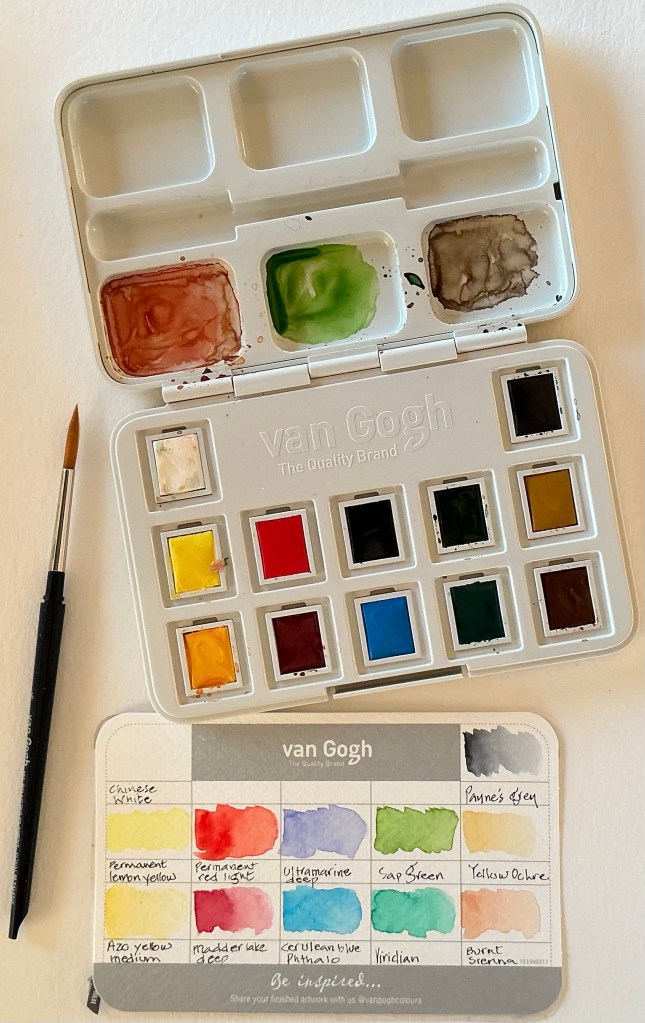
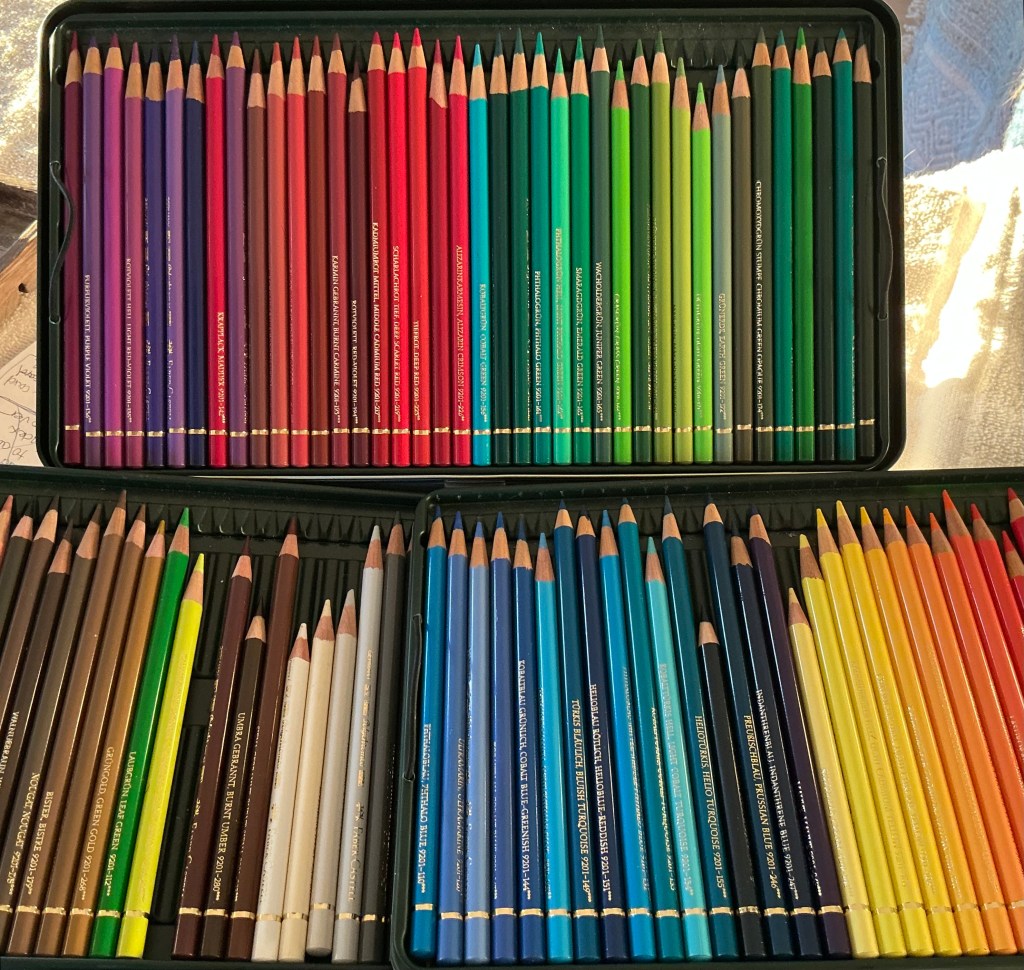
Using Sycamore leaves collected from that vacant Albuquerque parking lot, I tried my hand at a new technique; combining watercolor layers with layers of colored pencil. Using my new set of Van Gogh watercolors, I began each leaf with a layer of plain water followed by a light base layer, mixing Azo yellow medium with a touch of Yellow ochre. The bottom leaf (which was the underside of the top leaf) was duller and lighter in color, calling for a bit of Permanent lemon yellow. Allowing that layer to dry, I used various earthy colors from my set of Faber-Castell Polychromos colored pencils over the watercolor wash, mixing and matching the colors of my pencils with the actual leaf colors. This step tended to leave some areas uncolored with the pencils, so I applied another watercolor wash with Sap green, Burnt Sienna+Yellow ochre, and/or Madder lake deep+Azo yellow medium. I finished each leaf with a Dark sepia colored pencil outline, tipped the leaf margins with Dark sepia, and added shadowing first with Payne’s grey watercolor then Dark sepia colored pencil.
12 half-pan watercolor set and color swatch
The leaves were painted on 140# Canson XL Watercolor paper
Faber-Castell colored pencil set
If you have and questions or comments, please let me know. If you use this combined media technique, any tips you’d like to share would be greatly appreciated too.
…………………………………………………………………………………………
I’d like to send a shout-out and my deep gratitude to Wendy Hollender, botanical artist/illustrator/teacher extraordinaire, who announced in her newsletter free access for over a week to 19 of her bite-sized video lessons. Designed as companions to her book, The Joy of Botanical Drawing, each lesson focused on a different botanical subject and how to artistically render them using watercolor and colored pencil combined. I’ve always wanted to learn this technique and gave it a try with her leaf examples and then mine. Incorporating both media into the same painting was very challenging and way out of my comfort zone.
Thanks so much Wendy, for such wonderful lessons and your fabulous companion book! With lots more practice, my goal is that some day my botanical art looks as natural, skilled and professional as yours.
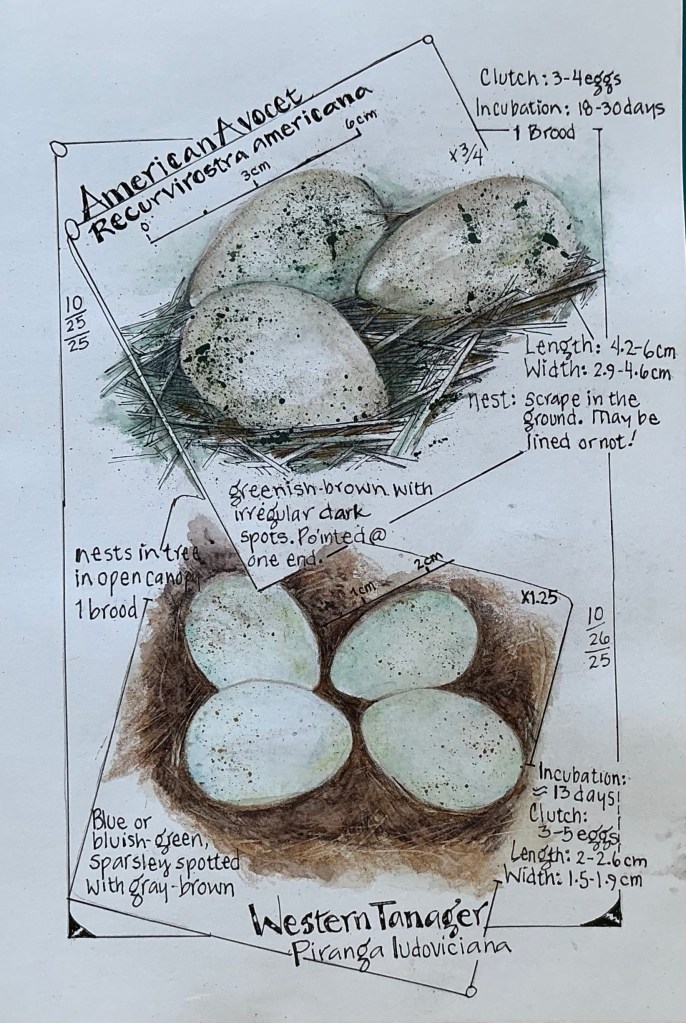
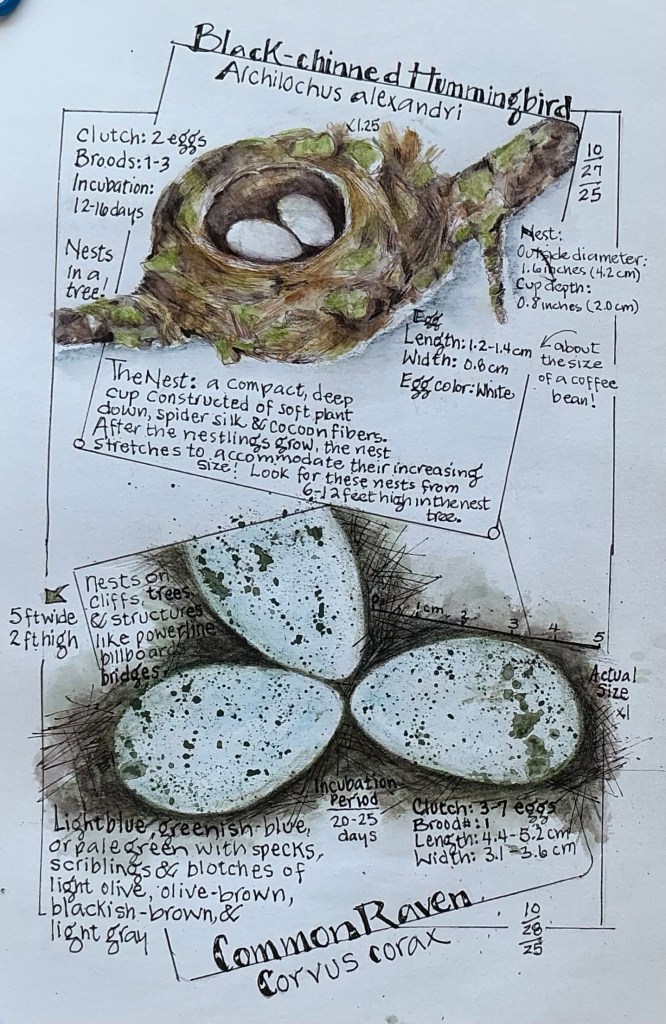
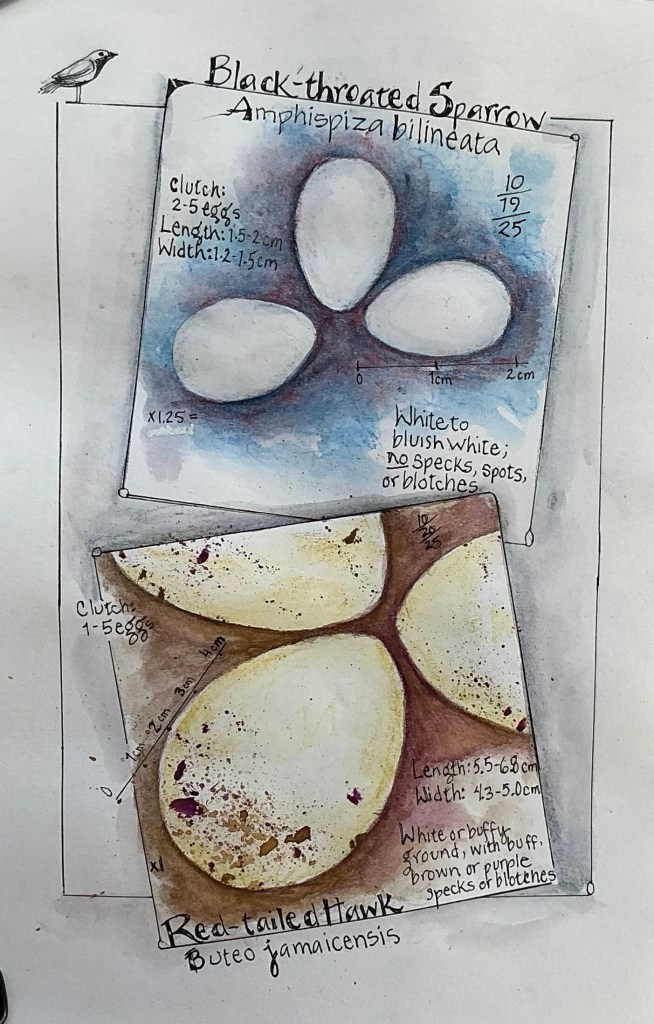
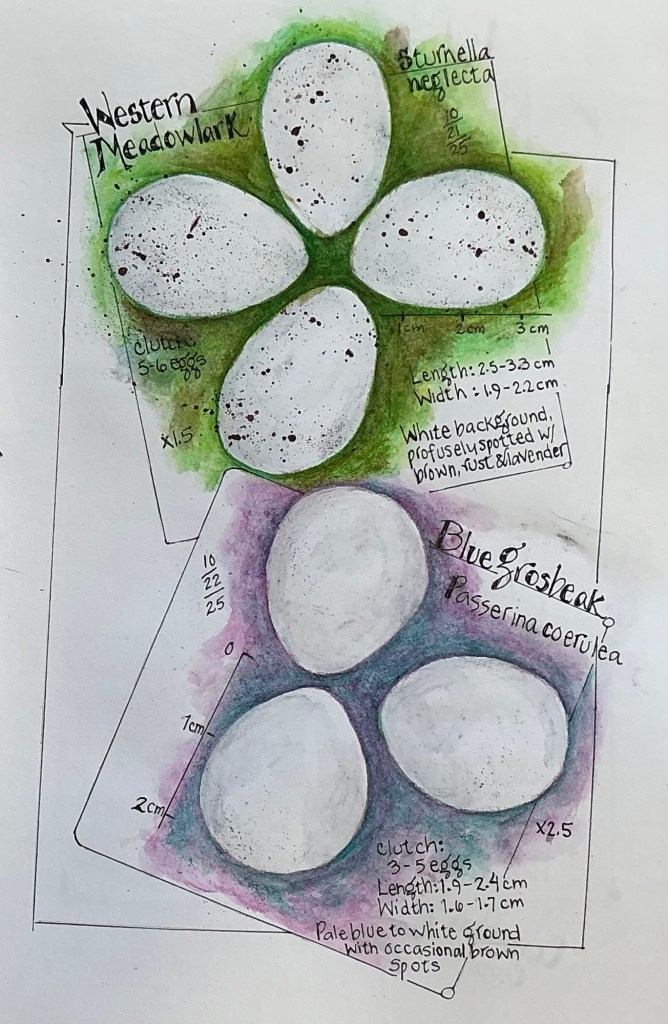
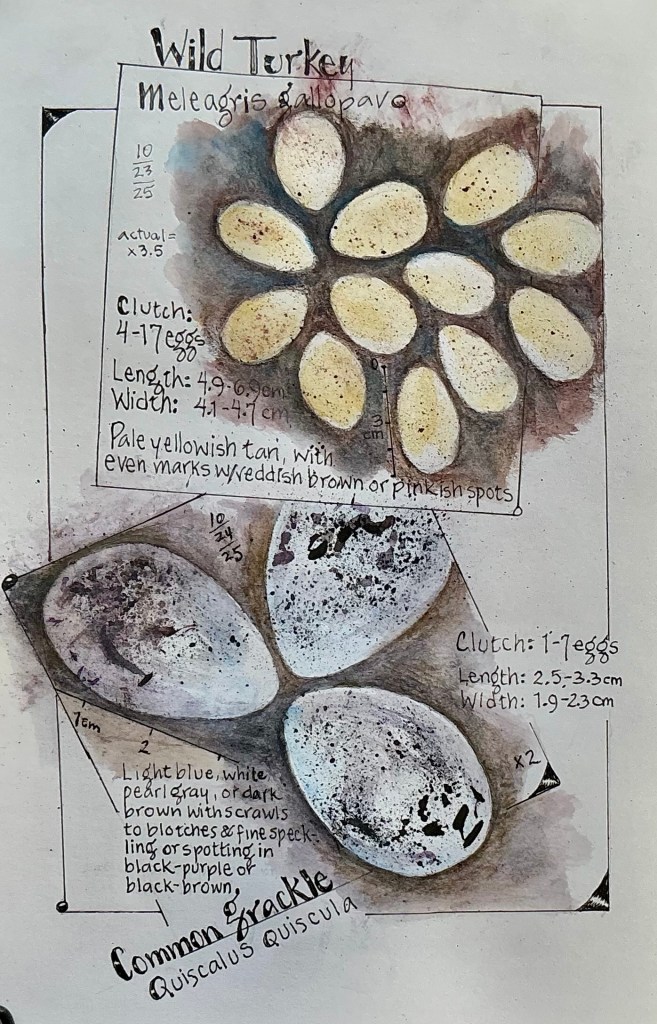
EggTober 2025 has officially ended! And Wow … I’m so eggs-cited to share Submission Four, the finale, with all-y’all! The eggs showcased for Days 25-31 +1 (yes, another random bird flew in and laid a bonus clutch on the last page) are all snug in their New Mexico nests. Also, you’ll notice a bit more text surrounding those nests.
Following Submission Three, where my narrative focused on the different layers of the eggshell membrane, I was curious about how avian eggshells are constructed. Then I wanted to know more about the entire reproductive system of birds, from ovulation to fertilization, to egg laying. And Then I couldn’t rest without knowing about the embryo, the yolk, the egg white, and all the bits and pieces you see when cracking open an egg! I didn’t know any of this, and if you don’t know, you’re head is about to explode in wonder!
October 25 and 26
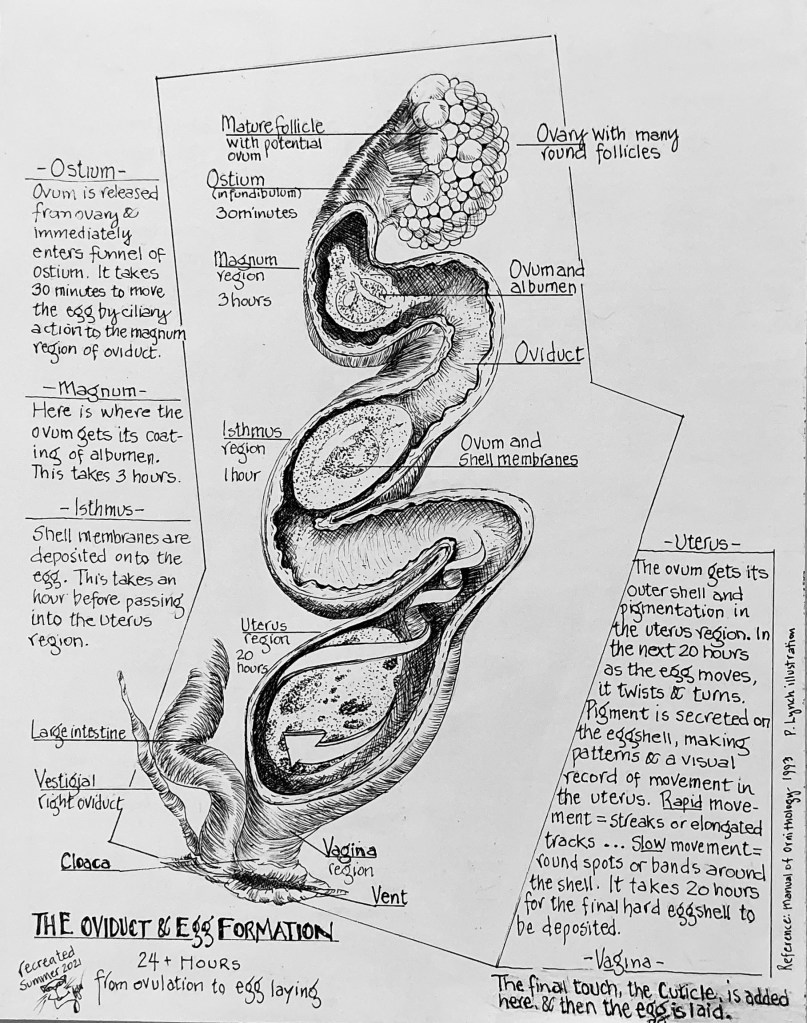
The Avian Oviduct and Egg Formation
It takes about one day to build an egg. But to prepare for the journey, about 7 to 9 days before the egg will be laid, the Yolk must be formed. Here’s the story of …..
The Yolk …..
….. formed in one of the many Follicles of the Ovary, the vitellus or Yolk begins as an immature Ovum that is stimulated to enlarge over several days by receiving deposits of yolk material. Once growth is initiated, over the next 7 to 9 days the Yolk’s formation intensifies as 99% of its nutrient-rich layers are deposited until it’s fully formed. Now mature, the Follicle ruptures and the Yolk is released in a process called Ovulation.
And this is where the Journey through the Oviduct begins! Over the next 24 hours, the developing embryo acquires the many layers it needs for nourishment, respiration, and protection until it’s formed into a perfect egg ready for laying. The entire journey takes place in the Oviduct …..
….. which can be divided into several regions: the Infundibulum, Magnum, Isthmus, Uterus, and Vagina. What happens in each of these regions is nothing short of fascinating!
The Regions of the avian oviduct
Infundibulum – After Ovulation, the Yolk immediately enters the funnel of the Infundibulum (the Ostium) where the Ovum is fertilized and the Chalazae is formed. With the help of ciliary action, it takes 30 minutes for the Ovum to move through this region of the Oviduct to the next, the Magnum.
Magnum– It’s this region where the Yolk, together with the now developing embryo and the Chalazae, gets a protective coating of protein-rich Albumen, a process that takes about 3 hours to complete, before moving along to the Isthmus.
Isthmus – The Inner and Outer Shell Membrane Layers and the NucleationSites are formed in this region of the Oviduct. This takes about an hour before the package is delivered to the Uterus.
Uterus– This is where five of the six layers of the outer Eggshell are formed. They are the Mammillary Layer and Mammillary Bodies, Organic Matrix Layer, Crystalline Palisade Layer, Vertical Crystal Layer, and Shell Pigment Layer. Also, as much as one-third of the protein in an egg is added while in the Uterus.
It takes about 20 hours for the egg to move through the Uterus while these layers are deposited. And as the egg moves, it twists and turns. When it’s time to add pigment, the rate of rotation adjusts to ‘paint’ the species-specific patterns we see on the eggshell, leaving a visual record of the egg’s movement in the Uterus. For example, if streaks or elongated tracks on the shell are required, movement is more rapid than when creating round spots, blotches, speckles, or bands. After pigment is added to the outer shell structure, the layers of background color and any markings are enclosed in calcite crystals.
Vagina – The last region of the Oviduct where the Cuticle (the Bloom) is added to the shell just before the egg is laid.
The egg is now complete. The entire process, beginning with the release of the mature Yolk and Ovum from its Follicle until the egg’s final touches, takes 24 hours! And the timing ensures the egg is always laid sometime during the day.
………………………………………………………………………………………………………………
Glossary and Other Interesting Things
Albumen – refers to the “white” of the egg. The Albumen is an effective barrier against microbes that might cross over and cause disease in the developing embryo. Albumen contains over a hundred antimicrobial proteins.
October 27 and 28
Chalazae – two spiral bands of white, stringy tissue that suspend and hold the Yolk in the center of the Albumen.
Crystalline Palisade Layer – A tough, mineralized structure of calcium carbonate crystals that grow into dense columnar units above the MammillaryBodies (the mineralized base of the crystalline eggshell). The amount of shell deposited is determined by the time spent in the Uterus.
Eggshell – Depending on species, the eggshell represents from 9-15% of the total weight of the egg.
Eggshell Formation – The Crystalline Palisade Layer is essential to the process of eggshell formation which takes place in the Uterus.
Nucleation: The process begins at the Nucleation Sites, located on the External Shell Membrane, which are the specific places where the mineralization of calcium carbonate begins.
Initial growth: As calcium salts are deposited and crystallize, inorganic calcium carbonate crystals grow around and outward from the Nucleation Sites, forming the cone-shaped Mammillary Bodies; the first, innermost calcified layer of the eggshell, anchored to the External Shell Membrane. This base of mineralized shell provides mechanical strength, and serves as the main source of calcium for the developing embryo’s skeleton.
Maturation – The calcium carbonate crystals continue to grow into the dense columnar units that form the Crystalline Palisade Layer, creating a tough, mineralized structure that protects the embryo. The amount of shell deposited is determined by the time spent in the Uterus.
Follicle – an enclosed cavity in the Ovary
Labile Medullary Bone– a temporary, highly porous, and woven bone tissue that forms, driven by hormonal changes in female birds, in her medullary (marrow) cavities in the period leading up to and during egg-laying. As a highly porous, woven bone, medullary bone has no significant mechanical function or structural strength. Its role is strictly metabolic.
The word labile means the bone is unstable and readily undergoes rapid and frequent change. Once the egg-laying period is complete, hormones change and medullary bone is reabsorbed.
Labile Medullary Bone Formation and Calcium Requirements – It’s interesting to note that an egg-laying hen requires 10% of her the total body calcium reserves during each 24-hour period she is producing eggs. To meet this calcium requirement, primarily for eggshell formation, it’s necessary that her plasma (blood) calcium levels triple during egg formation. This calcium is mainly obtained from increased intestinal absorption and a highly labile reservoir found in the medullary bone. In other words, to meet the calcium requirement, the hen’s body naturally produces it as medullary bone.
Eggshell Layers
Mammillary Bodies – The first, innermost calcified layer of the eggshell, anchored to the External Shell Membrane. These cone-shaped Mammillary Bodies form the base of mineralized calcium carbonate which provides mechanical strength to the shell, and serves as the main source of calcium for the developing embryo’s skeleton.
Nucleation Sites (aka Organic Cores) – form in the Isthmus region of the Oviduct, and are found on the External Shell Membrane. Composed primarily of organic material (proteins, proteoglycans, collagens), they are the specific locations where the mineralization of the calcium carbonate shell begins. In other words, the Nucleation Sites provide the initial template or “seed” for calcium carbonate crystals to start forming.
Oviduct – the tube that transports the developing egg with embryo from the Ovary to the Vagina.
Oviduct … Only One? – Yup! Most bird species have only one Ovary and adjoining Oviduct, the other having degenerated when the hen was, herself, a developing embryo. This evolutionary modification probably resulted because egg production from two ovaries would deplete the female’s body of calcium to excess. As has been demonstrated in chickens that are on a calcium deficient diet, egg production ceases.
Ovulation – The process in which the mature Yolk and Ovum is released from its Follicle in the Ovary and is received into the Oviduct through the Infundibulum.
Ovulation Rate – Within 1 hour after a hen has laid an egg, the next mature Follicle in the Ovary ruptures (aka ovulates), releasing the mature Yolk and Ovum.
Ovum – an unfertilized egg
October 29 and 30
Pigment or Not? – Whether an eggshell is white, or decorated with a background color and/or markings, it’s appearance is influenced first by the species of bird, then by lifestyle and nest location. The specific color of an egg is an adaptation to its environment. This is where camouflage and/or thermal regulation may be required.
Thermal regulation is still being studied, but where camouflage is beneficial, egg color depends strongly on nest locations:
White eggs – prevalent among birds like pigeons, doves, swans, many seabirds, etc. These birds often build concealed nests where camouflage isn’t necessary, or inconspicuous locations are chosen for nesting where white coloring helps camouflage the eggs, reducing the risk of drawing attention.
Blue or green eggs – Bluebirds, robins, sparrows, parrots and other birds that lay pale to bright blue, blue-green or green eggs blend in with the sky or the foliage of nesting sites, providing natural camouflage.
Brown or speckled eggs – Brown or highly marked eggs with speckles, spots, blotches, or scribbles provide excellent camouflage for ground-nesting birds like quail, avocets and killdeer. The mottled appearance of these eggs blend well against rock, sand, soil, foliage and branches. The eggs’ colorations are camouflaged well in nests woven from a variety of materials to nests that may be nothing more than a scrape or depression in the ground.
ShellPigment Layer – Pigment granules are deposited on the outer shell structure, forming color layers which are then enclosed in calcite crystals.
Sperm Storage – a female bird need mate only once for the sequential formation of her eggs to be fertilized. In other words, each newly ovulated egg that arrives at the Infundibulum, which occurs every 24 hours (more-or-less), becomes fertilized from a single mating. That’s because female birds can actually store sperm in Sperm Storage Tubules (SSTs). SSTS are tubular “invaginations” in the Infundibulum where sperm can be kept alive for 2 to 15 weeks (depending on the species), and can be released after Ovulation.
Uterus – the Shell Gland
Yolk – The nutrient-bearing portion of the egg containing most of its fat, minerals, and many of its proteins and blood vessels.
Yolk Behavior – The Yolk always rotates so the developing embryo floats to the top, regardless of the egg’s position
Zygote – the fertilized Ovum
Wow, gosh! I’m egg’s-hausted ….. how about you!?! But wasn’t that a fascinating journey through a bird’s oviduct? A literal look behind the scenes!
October 31 and November 1 (bonus)
And that concludes my Inktober/EggTober 2025. Researching so much information not only took me down some fascinating rabbit trails, but everything I learned in the month of October blew my mind! And everything I uncovered had to be shared with you all. The bounty was voluminous, resulting in each Submission eggs-panding to accommodate nearly everything. Yes, you read that right ….. I nearly got everything shared, and there’s still so much more to learn about past, present and future bird eggs and all eggs in general. Maybe once my notes are gather and organized, and I pursue answers to countless questions on the when’s, why’s and what-for’s, it will be time for EggTober 2026!
Did you participate in this year’s Inktober? Maybe my four submissions gave you ideas for Inktober 2026? Share your thoughts and ideas. Meanwhile ….. That’s all for now, yolks!
As always, thanks for stopping by!
P.S. in case you missed any of my previous EggTober 2025 Submissions, you can catch up with the following links: Submission One, Submission Two, and/or Submission Three! Enjoy!
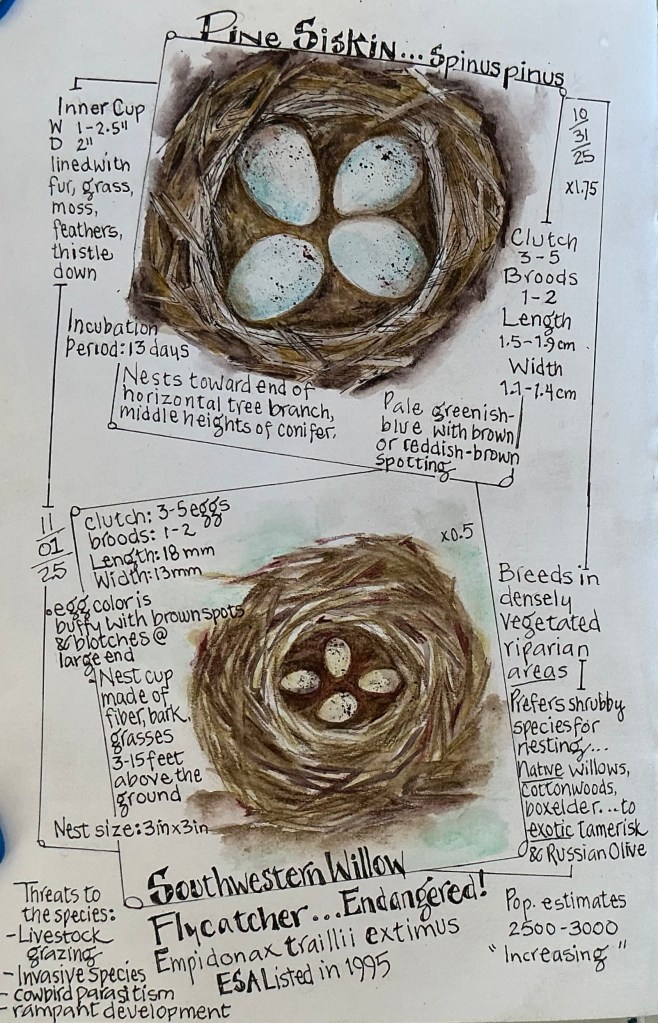
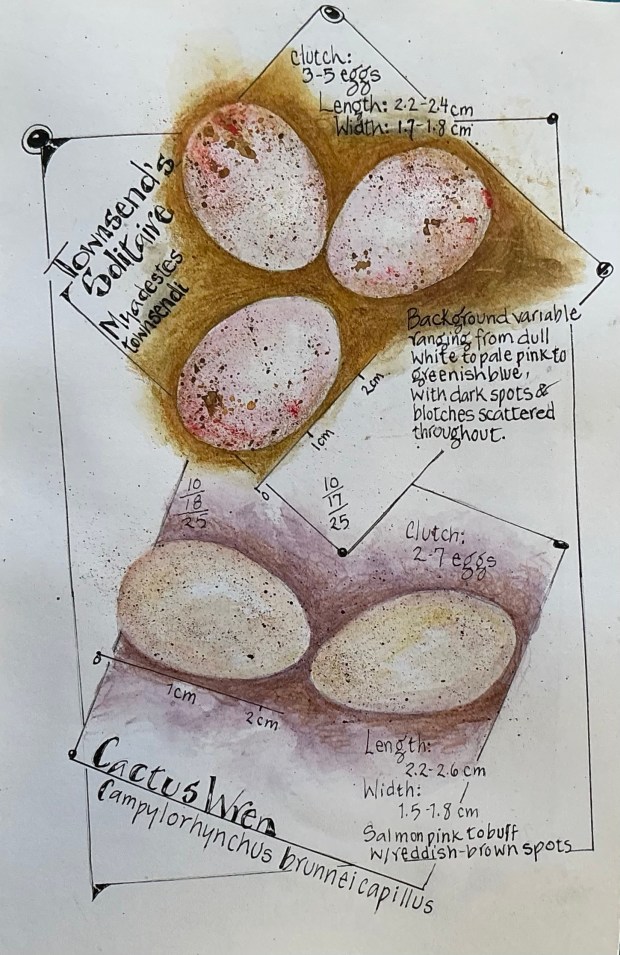
October is ‘flying” by! It seems amazing how quickly my Inktober 2025 sketchbook is filling up with daily EggTober watercolor paintings of bird eggs. Week three is now complete, and the eggs of eight more breeding birds of New Mexico can be viewed below. As with Submissions One and Two, included are a few fascinating facts about bird eggs, this time with a focus on the eggshell.
In case you missed my first and/or second EggTober posts, and would like to catch up, click the following link(s) to read Submission One, and/or SubmissionTwo.
October 17th & 18th
A Bird’s Eggshell
At first glance, you may think all bird eggs are covered in a hard, solid shell. You would be right about the shell being hard, but have you ever taken a close look at the shell surface? The outer shell appears to have dimples, a bit like a golf ball. Those dimples are pores in the eggshell. Bird eggs are considered “amniotic” which means their eggs not only have a hard shell; they have a porous membrane to allow for oxygen and carbon dioxide exchange. Also, an important characteristic of amniotic eggs is they resist dehydration, which is why birds can lay them on dry land. So, is the porous membrane sandwiched between the eggshell and the ‘egg white’ (albumen), and why?
In Submission Two, I noted that the typically oval-shaped bird egg is able to withstand the weight of the incubating parent(s); the shell having the strength and resilience to withstand external pressures which minimizes the chances of the developing embryo becoming deformed or suffering bone fractures. So, just how thick must an eggshell be, yet still allow the developing embryo to breathe?
What are the main functions of the eggshell?
The shell of an egg contributes to successful formation and development of the embryo, by providing protection, respiration and water exchange. The eggshell is also the major source of calcium for the development of high-calcium consuming organs, like the skeleton, muscles and brain.
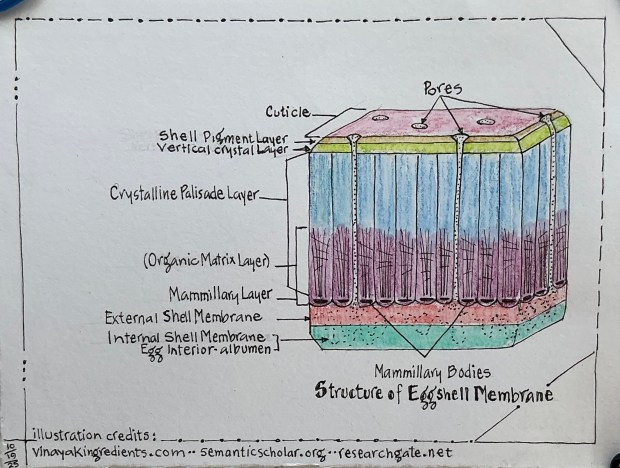
But what we think of as the eggshell, is actually Eight Separate Layers (!) that stack together from the outside of the egg to the inside where layer eight meets the albumen. It’s through these layers that the embryo breathes.
These layers, from the outside in, are the Cuticle layer with Pores, ShellPigment layer, VerticalCrystal layer, CrystallinePalisade layer, OrganicMatrix layer, Mammillary layer with MammillaryBodies, ExternalShellMembrane layer, and InternalShellMembrane layer. These will be summarized below. I’m also compiling a more complete description of each layer and detailing their importance, which should be complete and posted before the end of the month.
But before taking a brief ‘look’ at the eight eggshell layers, I wanted to share a snapshot about their thickness ….. because, quite frankly, I couldn’t imagine how all those eight layers manage to fit!
Eggshell Thickness
Most bird eggshells must be thin enough for the chick to peck through when it hatches, but at the same time it must be thick enough to bear the weight of the growing embryo inside, and the weight of the parents incubating it. The thickness of eggshells varies among species and individual birds, but also among individual eggs laid in a clutch. Eggshell thickness is also influenced by factors like the bird’s age, diet, and where the measurement is taken on the egg. In general, bird eggshells are usually 5% thicker at the mid-section of the egg (the area called the equator) than the ‘bottom’ (the sharp egg pole) and ‘top’ (the blunt egg pole) ends.
To ‘illustrate’ how thickness varies by a few species, the egg of a Blue-tailed Emerald (a species of hummingbird that lays an egg with one of the thinnest recorded eggshells among all bird species) has a shell that’s 0.029 mm (0.0011 inch) thick. Compare that with an Ostrich egg, the largest egg with the thickest eggshell in the world, measures in at 1.92 mm (0.08 inch) thick. For many common species, like the Mallard, shell thickness is around 0.337 mm (0.013 inch); a domestic chicken eggshell varies from 0.33 – 0.36 mm (0.013 – 0.014 inch) thick.
It may be helpful to relate these small sizes in eggshell thickness to an average human hair, which can be anywhere from 0.06 mm (0.0024 inch), to 0.10 mm (0.004 inch) thick. I’m still amazed how an eight-layered eggshell happens!
October 19th & 20th
Structure and function of eggshell layers: Cuticle layer and the Pores, Shell Pigment layer, Vertical Crystal layer, Crystalline Palisade layer
Cuticle (aka Bloom)
The Cuticle’s primary functions are to act as a physical and chemical barrier against invading microbes, protect the eggshell pores, and regulate the exchange of gas (Oxygen and Carbon Dioxide) and moisture (water vapor). The Cuticle also affects the egg’s wettability, which helps prevent water and bacteria from entering, and fine-tunes the eggshell’s appearance, including ultraviolet (UV) reflectance.
Eggshell Pores
The texture of the outer eggshell is due to the Pores that form openings in the Cuticle. Depending on species, there can be anywhere from 7,500 to 17,000 Pores covering an eggshell, most located at the blunt end of the egg (the top end where the air cell is located). Each Pore is connected to a Vertical Pore Canal that penetrates the next five eggshell layers, down to the External Shell Membrane. The shells of most bird eggs have simple, straight pore canals that widen slightly toward the openings through the Cuticle. The exceptions are found in swans and the ratites (the group with ostriches and emus), where their Vertical Pore Canals are highly branched. Covering the exterior opening of the Pores of all bird species (except pigeons and doves [hmmmm ….. wonder why]) are tiny plugs or caps, which may act as pressure-sensitive valves.
The Pores and their canals provide a critical passageway for gas and moisture exchange between the inside and outside world. This exchange allows the developing embryo to breathe by taking in oxygen and releasing carbon dioxide and water vapor.
Shell Pigment Layer
The Shell Pigment Layer serves multiple critical functions, including camouflage, thermoregulation, and protection for the developing embryo. The colors and patterns come from two main pigments, protoporphyrin (brown/red) and biliverdin (blue/green), and their function varies depending on the bird’s environment and nesting behavior.
Vertical Crystal Layer
The Vertical Crystal Layer provides mechanical strength and structural integrity. Its tightly packed, vertically oriented crystals form a dense, outer layer that protects the embryo from physical shocks, while also being integrated with the PalisadeLayer (below) to form a tough, ceramic-like structure. This outer layer’s density and arrangement make it resistant to impact.
Crystalline Palisade Layer
The Crystalline Palisade Layer serves two primary functions: providing mechanical strength and regulating gas exchange for the developing embryo. This is a thick, mineralized layer, that forms a dense matrix of calcium carbonate crystals, and is critical for protecting the egg’s contents while also aiding metabolic processes (i.e. all the chemical reactions within the embryo that are essential for life).
October 21st & 22nd
Structure and function of eggshell layers: Organic Matrix layer, Mammillary layer with Mammillary Bodies, External Shell Membrane layer, and Internal Shell Membrane layer
Organic Matrix Layer
The Organic Matrix Layer plays a crucial role in controlling biomineralization, forming the shell’s microstructure, and providing antimicrobial defense. Consisting of proteins, glycoproteins, and proteoglycans, this layer acts as a scaffold that controls the eggshell’s strength and protective properties.
Mammillary Layer and Mammillary Bodies
The Mammillary Layer and Mammillary Bodies form the foundation for the rest of the eggshell. Their primary function is to provide the calcium for the embryo’s skeletal development. This inner layer is composed of calcite microcrystals that dissolve easily, allowing the embryo to extract about 80% of its calcium needs before hatching.
This layer also helps during the “pipping” process because its globular texture makes it easy to crack and break through the shell from the inside. Pipping is the,process where the chick breaks through its eggshell to hatch. There are two phases during pipping: internal and external. Internal pipping is when the chick breaks through the InnerShell Membrane Layer (see below) to reach the air cell and take its first breath followed by chirping! This first phase not visible from the outside and can take 12-24 hours. External pipping is when the chick uses its egg tooth to peck a visible hole or holes in the eggshell, a process that can take a few hours to a few days, requiring the chick to rest frequently… those outer layers of shell are hard. The long time due to the chick needing to rest This can take anywhere from a few hours to a couple of days. The final step is “zipping,” where the chick turns in the egg, cracking the shell into two halves to fully hatch.
External Shell Membrane Layer
The External Shell Membrane Layer functions primarily as a barrier to protect the egg’s contents from bacterial invasion and to prevent moisture loss. This membrane is made of proteins and acts as the first line of defense after the Cuticle, preventing microorganisms from entering the egg.
Internal Shell Membrane Layer
The Internal Shell Membrane’s primary functions are to provide a barrier against bacterial invasion and to support the formation of the hard eggshell. It also helps prevent excessive moisture loss while allowing gases to pass through, a process that becomes more significant when the External and Internal Shell Membrane Layers separate to form an air cell.
October 23rd & 24th
Summary
Eggshells! I never knew they are such complex structures with many unique features. And eggshells are unfathomably critical to the development and survival of the embryo right up until the moment they “Pip” their way into the world. Without their bioceramic characteristics, microscopic pores, front-line bacterial defense systems, color patterns, and their surprising strength despite the shell’s thinness. birds might be something completely different or perhaps might not ‘be’ at all. Something worth pondering!
Hope you have enjoyed Submission Three of EggTober! If so, please leave me a comment. And as always, thanks for popping in!
p.s. Stay tuned for Submission Four, landing in your in-basket next week!
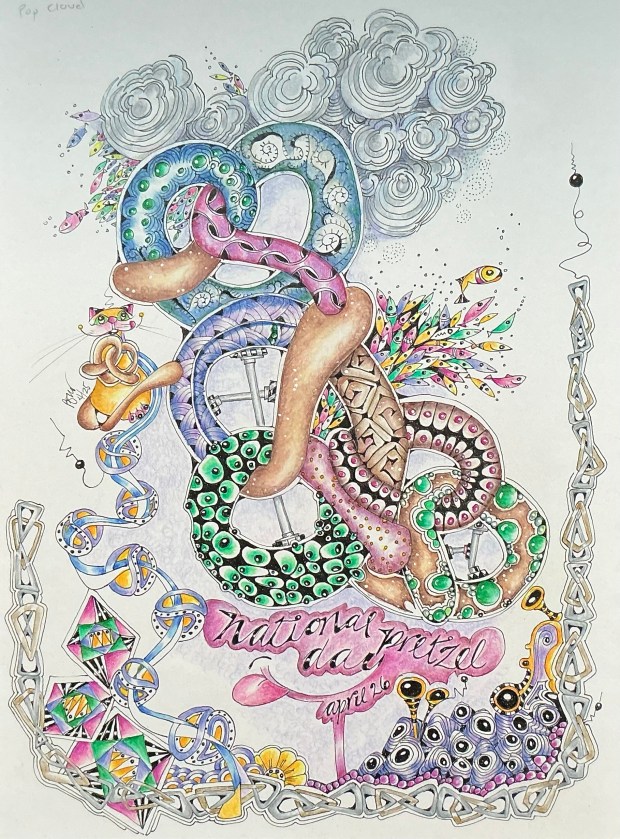
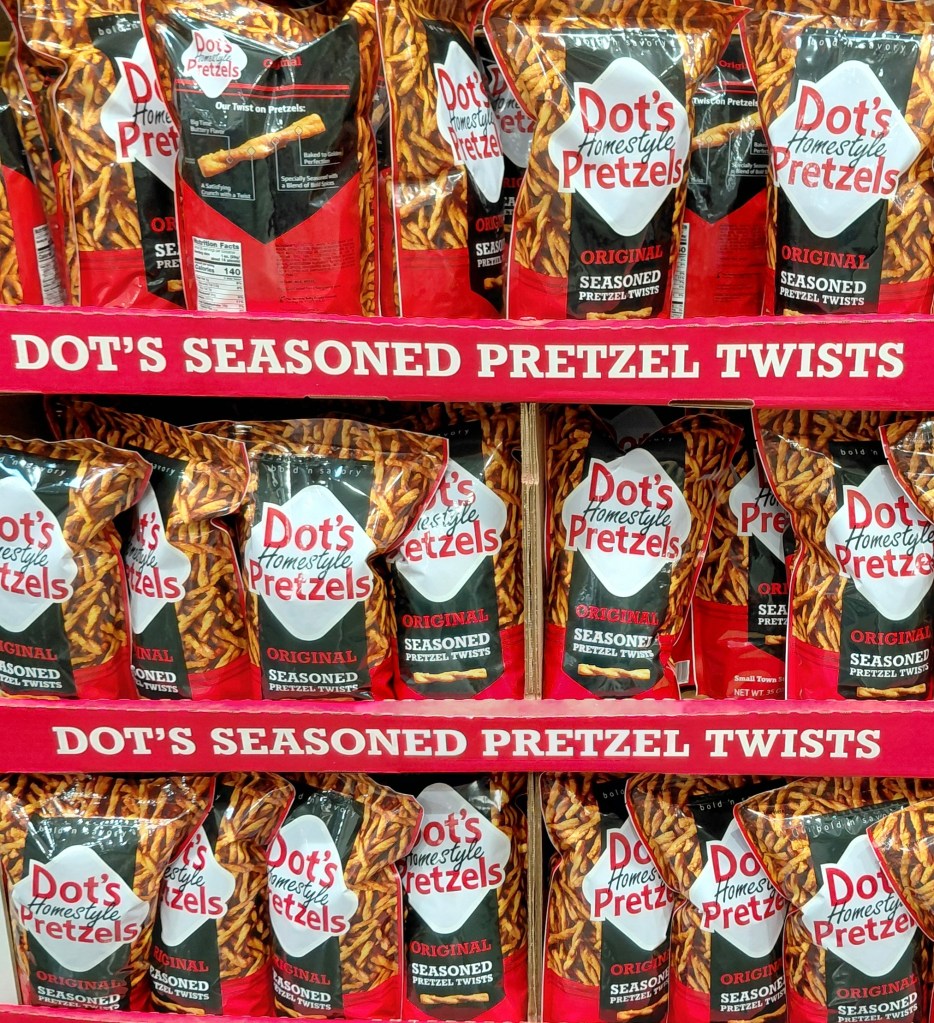
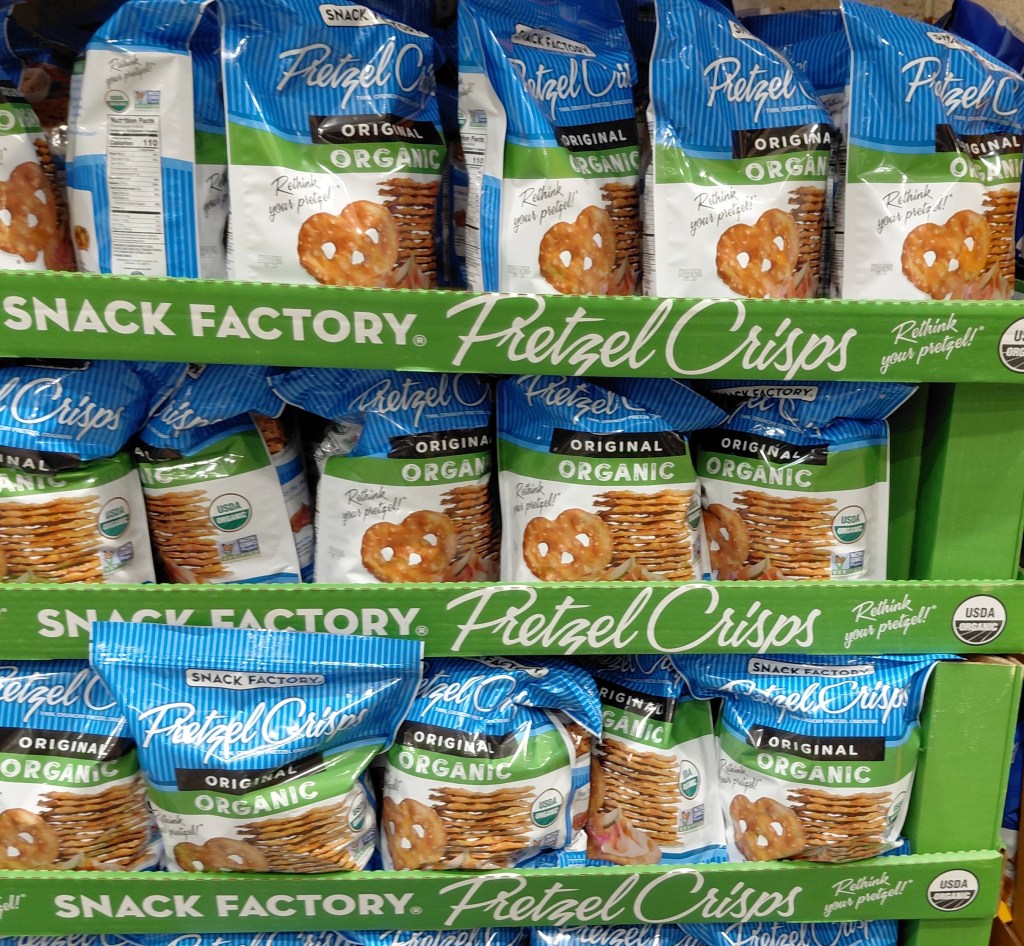
Put down that can of chips or box of square crackers and show your love for one of the most versatile snacks ever …… the Pretzel! Whether you like the snap of crispy twists or prefer them soft and chewy, grab your favorite and join the National Pretzel Day celebration today, April 26th.
Pretzel historians offer a few origin stories, but usually share the most likely and often told legend from the Roman Empire. Apparently in 610 A.D., an Italian monk wanted a way to reward his child students for memorizing their prayers. Instead of baking loaves of morning bread, the Monk twisted thin strips of the dough into symmetrical loops by intertwining or knotting the two ends before folding them back on each other (today’s familiar “pretzel loop”). The shape he made was said to resemble a child with his arms crossed in prayer. The Monk called his invention ‘pretiola’ meaning ‘little rewards’.
From then on, these soft ‘little rewards’ became popular in Austrian bakeries and in all of Germany, and so on throughout the world.
Not being satisfied with baking only soft pretzels, in 1850, Julius Sturgis bought a hard pretzel recipe from a local tramp (wonder why a tramp would have such a recipe? Thoughts?). After baking and baking, and perfecting the recipe, it was clear to Julius the hard pretzel was a success. The pretzel’s popularity quickly spread, inspiring many other bakers in central Pennsylvania to make their own versions of the hard pretzel. But the original ‘Sturgis’ hard pretzel was a keeper. In 1861, the Julius Sturgis Pretzel Bakery, located in Lititz, Pennsylvania in the heart of Pennsylvania Dutch Country, became the first commercial pretzel bakery in America.
Naturally, die-hard fans of the warm/soft pretzel weren’t won over by the overwhelming appeal of the hard/crispy version. With the soft pretzel market still alive and growing, by the 20th century soft pretzels became very popular not only in Philadelphia, but in Chicago and New York as well.
The Pretzel of Today
How many shapes and flavors of pretzels can you think of? Here’s my lists …….
Hard pretzel shapes: traditional loop, thick and thin; stick shapes, both thin and in thick rods; twisted, clockwise and counterclockwise; round rings with and without knots; thick stumpy bite-sized nuggets, filled and unfilled; chip shaped and waffle shaped.
Hard pretzel flavors: salted, cinnamon sugar, peanut butter, peanut butter and jelly, honey mustard, cheese, honey wheat, honey butter, ranch, ranch and jalapeño, garlic, sea salt caramel, sour cream and onion, and buffalo wing.
And for soft pretzels …… it’s all about the dipping sauces and coatings: Of course there’s yellow mustard, garlic mustard, melty cheese, melty beer cheese. But there’s also chocolate dipped, aioli, truffle hot sauce, buffalo ranch, cinnamon sugar, and marinara.
Can you add more?
Pretzel Fun Factz!
Pennsylvania is the center of American pretzel production for both hard and soft pretzels, producing 80% of the nation’s pretzels.
Today, the average Philadelphian consumes about twelve times as many pretzels as the national average.
Philadelphia opened a privately run “Pretzel Museum” in 1993.
The annual United States pretzel industry is worth over $550 million.
The average American consumes about 1.5 pounds of pretzels per year.
How will you celebrate National Pretzel Day 2025? Here’s a few ideas …..
Enjoy a bag of your favorite hard pretzels, and gift one to a friend.
Visit your local bakery or even the mall to sample their selection of warm soft pretzels.
Try a game of “Toss the Ring” with ring-shaped pretzels.
Go on a pretzel scavenger hunt.
Host a pretzel and beer party for your neighborhood.
Bake a batch of soft pretzels for the party and have everyone bring their favorite dipping sauce.
And now ………
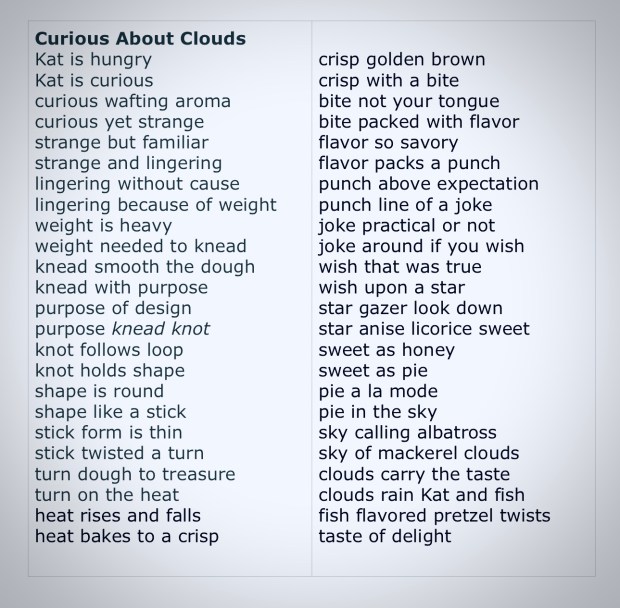
Curiously, Flambé has been following my post with fascination. Always hungry, could it be she’s developing pretzel cravings? What baker, in their right mind, would ever scent a batch with eau de fish? If a pretzel maker thought mackerel flavored twists would ever be popular, they might just be crazy (or not?). Becoming more famished by the minute, Kat insisted on explaining her ‘irrational’ excitement in a “Blitz” poem (a style created by Robert Keim.1). She felt this poem style not only suited all the twists and turns found in a properly-constructed pretzel loop, it best expressed the twisting and turning pathway her mind took to explain herself and help us “get it!” What do you think?
1 Shout out to Michele Lee, My Inspired Life blog post dated 04/05/2025, for sharing her amazing Blitz poem and providing the rules to create one too. Thanks Michele!
As always. Thanks for stopping by!
Here are the guidelines for the Blitz poem, created by Robert Keim:
Line 1 should be one short phrase or image (like “build a boat”)
Line 2 should be another short phrase or image using the same first word as the first word in Line 1 (something like “build a house”)
Lines 3 and 4 should be short phrases or images using the last word of Line 2 as their first words (so Line 3 might be “house for sale” and Line 4 might be “house for rent”)
Lines 5 and 6 should be short phrases or images using the last word of Line 4 as their first words, and so on until you’ve made it through 48 lines
Line 49 should be the last word of Line 48
Line 50 should be the last word of Line 47
The title of the poem should be three words long and follow this format: (first word of Line 3) (preposition or conjunction) (first word of line 47)
Many Hearty Thanks, Sharing Creative Ideas, Answering the ‘Kat’ Kwestion
April 1, 2025
Completing my 15th sketchbook, and beginning the next one is always cause for celebration! To do so, Kat and I thought it would be especially fitting to shout-from-the-treetops enthusiastically, THANK YOU! Thank you all, my loyal subscribers, for coming along on my interesting, hopefully educational, sometimes crazy, always curious nature journaling adventure.
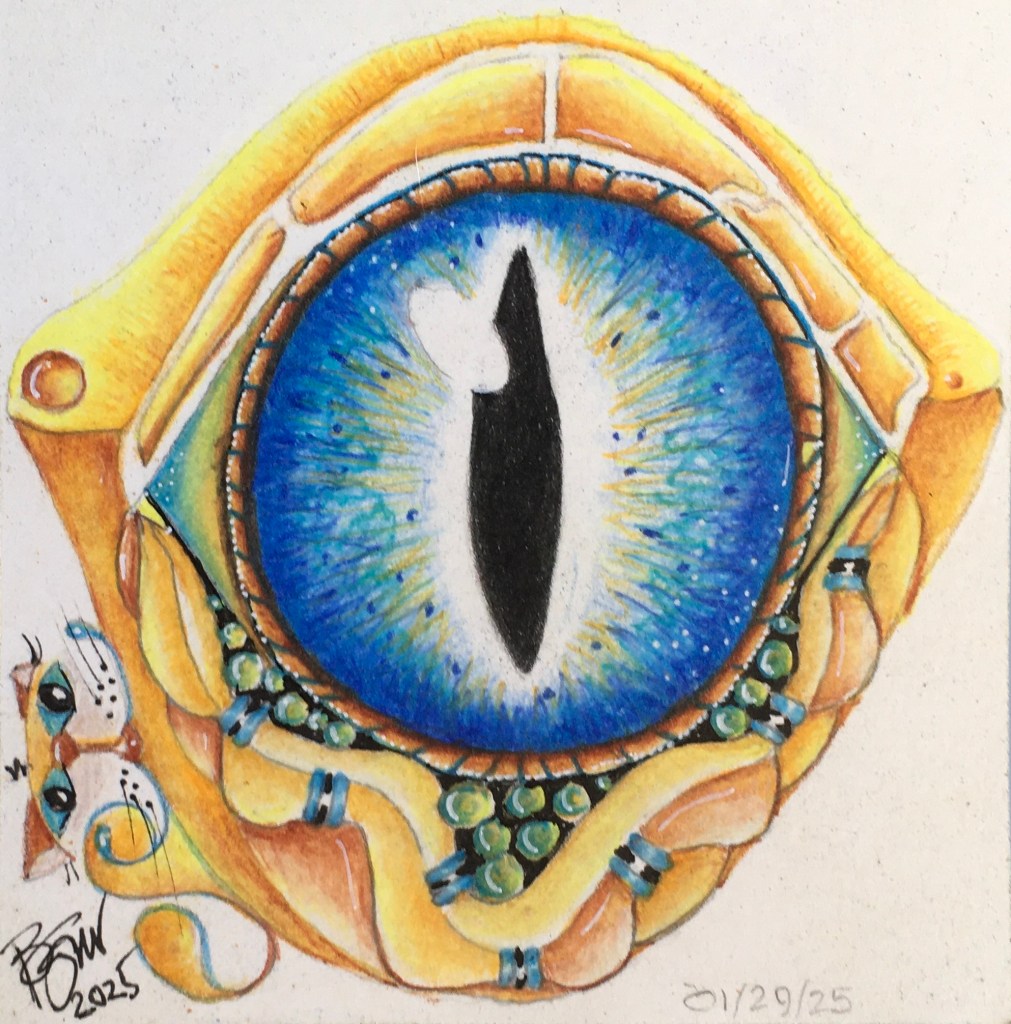
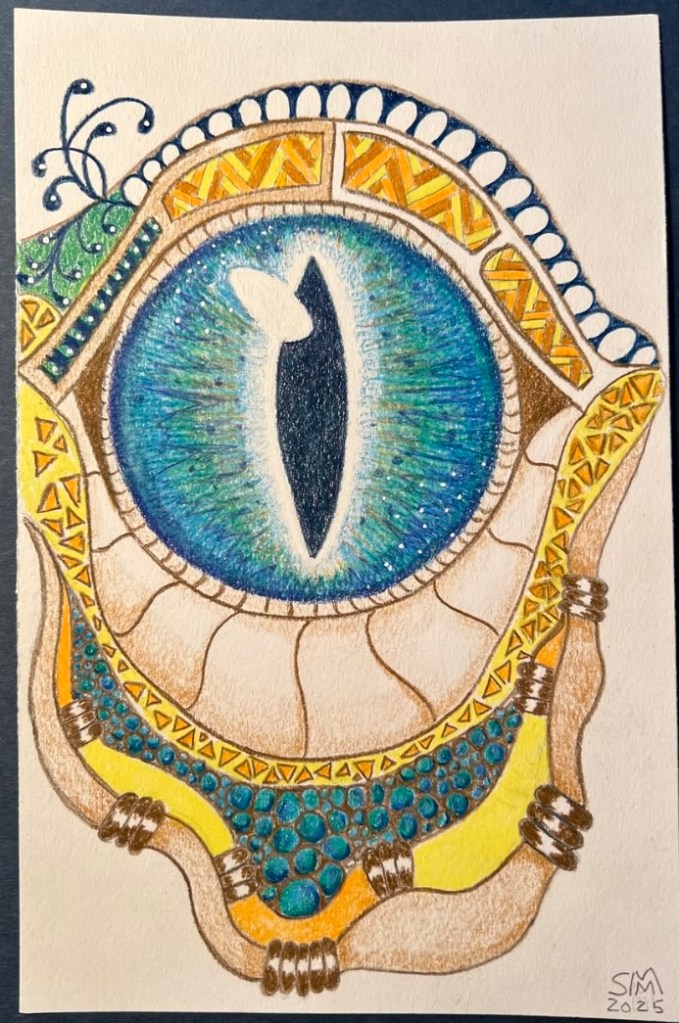
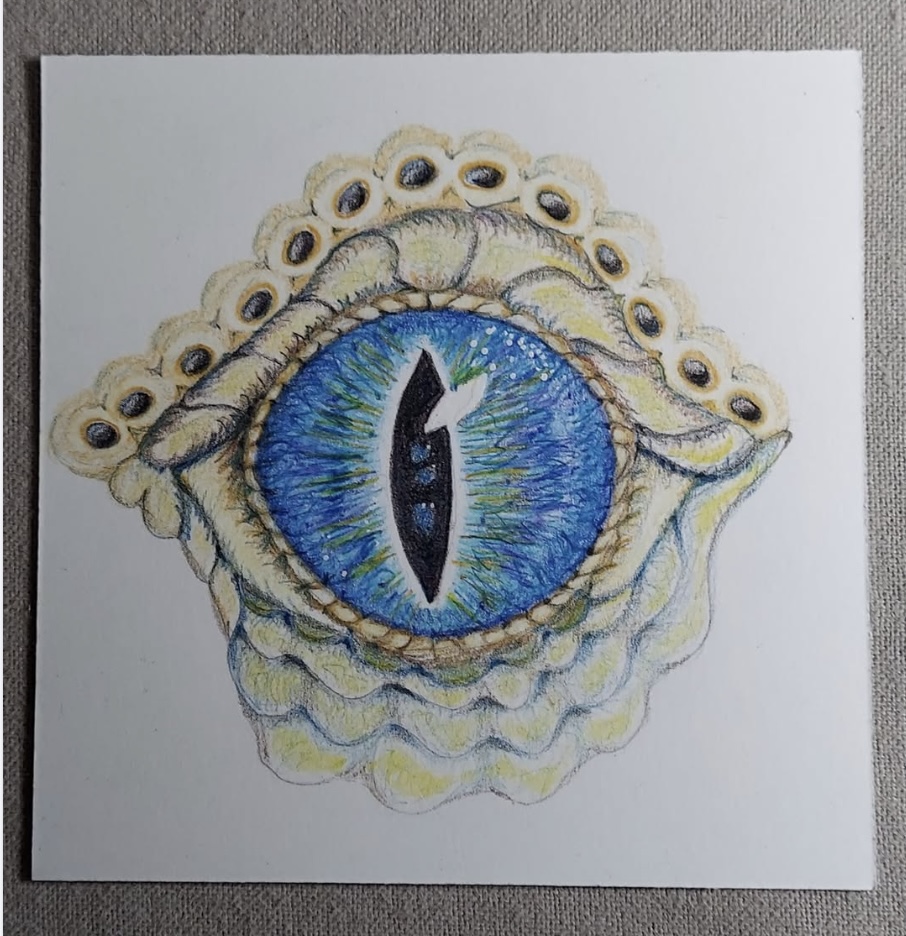
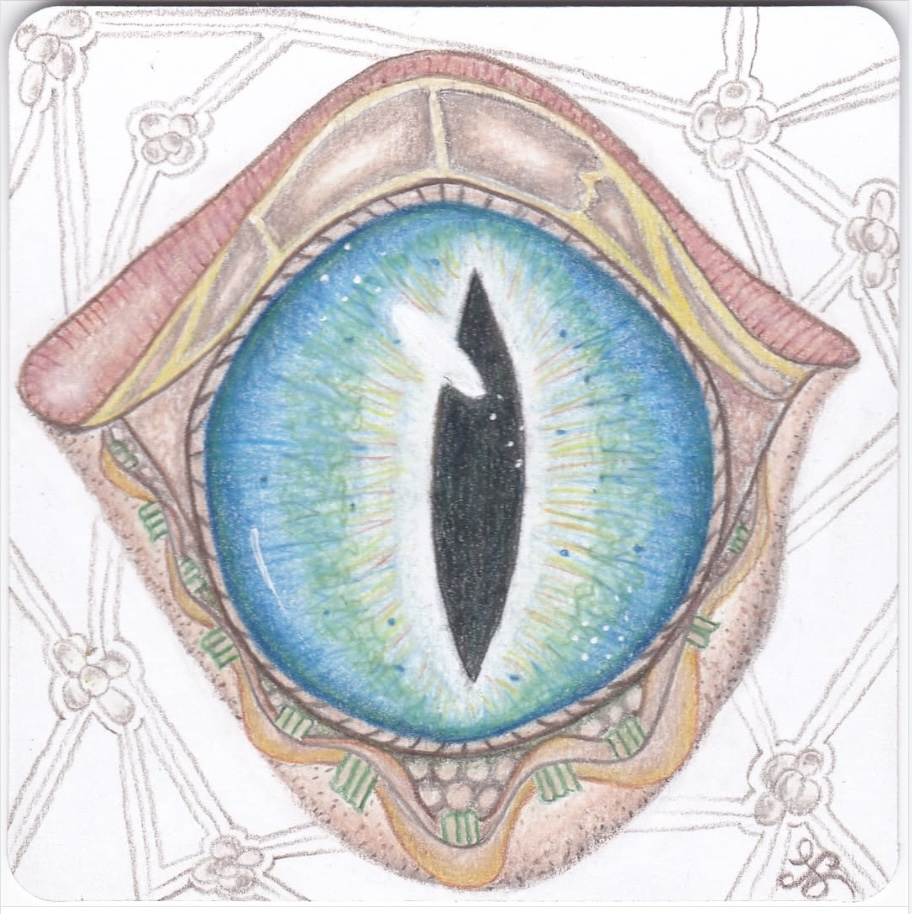
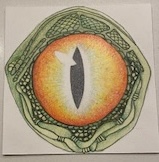
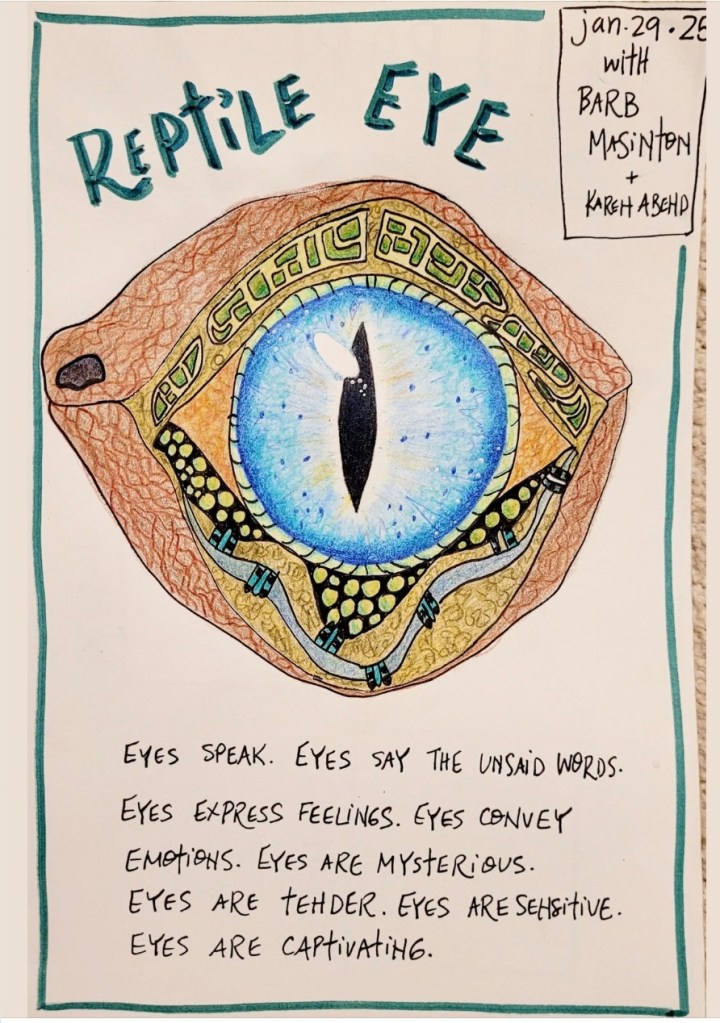
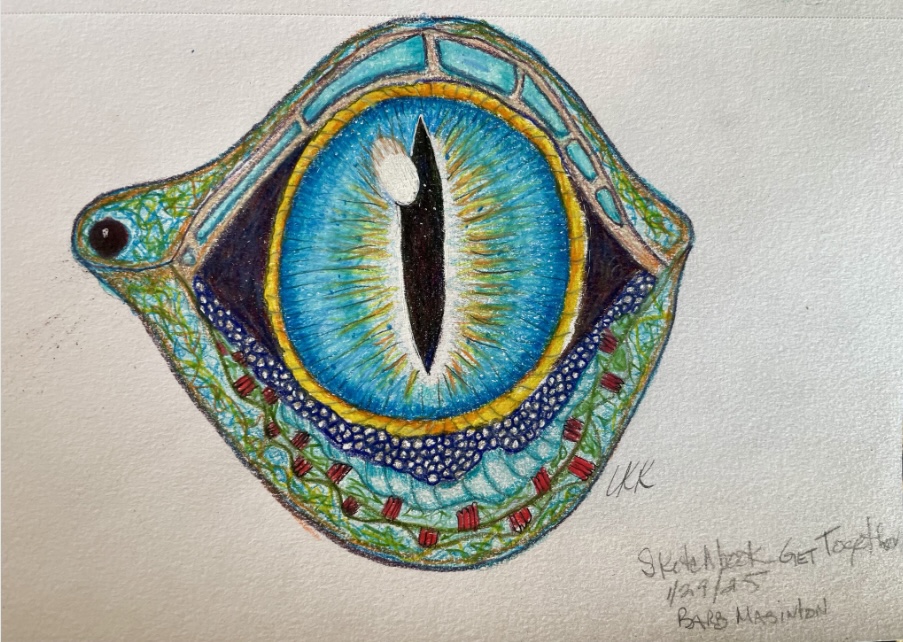
My recent webinar class, “Create a Colorful Reptile Eye1,” sponsored by Host Karen Abend (of Sketchbook Revival fame), generated many new subscribers to my web page and blog, “A Curious Nature.” Wow! And Thanks so much. A special thanks to those who attended the live and/or recorded class. I loved seeing so many colorful lizard eyes (a sampling below). They were incredible!
Sharing the Wonder of Nature
With all the past and current activity on my blog, I feel so fortunate and very encouraged to carry on. Even though new postings have been random lately, there’s lots of works-in-progress soon to be shared. Meanwhile, comments including what you like about my posts and what you’d like to see more of, are always appreciated. What inspired you to subscribe to this blog? If it’s just enjoy, that’s perfect! Or maybe you’d like tips to develop a regular or even a daily creative practice, how can I be more encouraging? I’d love to know if you are an active nature journaler or tangler, or express yourself by creating art in other ways, such as through music, poetry, or storytelling. Send me your ideas by commenting on this or any future posts. I’ve created my webpage and blog because of my insatiable curiosity about the natural world. It’s extraordinarily fun to go beyond learning what the names of flowers, animals, rocks, and clouds are. The excitement of wondering and discovering answers for all the why’s, who’s, when’s, and how’s is so rewarding. Sharing is my joy!
Explaining Kat
Thinking new subscribers may be puzzled by my constantly mentioning Flambé or Kat or both, now might be a good time for explanation and background (and perhaps provide a refresher for those who’ve been following along from day 1 of my blog):
In 2014, a young stray calico cat showed up one day on our doorstep when we (Roy and I) lived in Oriental, North Carolina (U.S.A.). This little wild miss seemed to magically appear from our backyard woods, perhaps in search of a meal or a friend. She sat and meowed for a few minutes, but when we opened the door, she ran away. Efforts to get close to her when she returned several times during the week were futile. Then one day she vanished and never returned. Not knowing what may have happened to this pretty kitty, Roy thought a nice remembrance of her visit would be to add a small cat sketch to my next drawing. A dandy idea!“But only one drawing,” I thought? It was at that moment that Flambé appeared on my creative doorstep, and has never left!
Flambé, aka Kat, is always smiling, popping in and out of all my art, regardless if the piece is imaginatively & whimsically tangled or a serious nature study. Along with forming the best part of my signature “chop,” she’s the heroine of some pretty wild and crazy tangled misadventures, sometimes pushing Kat’s 9-lives threshold to satisfy her insatiably curious nature (and appetite). Flambé adores being noticed, whether she hides inside the story, or shows up front and center. She makes everything creative more fun. Flambé may be just “Kat,” but she’s my inspiration for and reminder about the value of komic relief, and makes the perfect konstant kompanion!
Whew! That’s all for now. Hopefully your questions about this blog, inspiration and Kat have been answered. If you’re craving to learn answers to other related topics, let me know. Meanwhile, Flambé and I wish you an exciting and creative remainder of the year ….. have times full of happiness, creativity, and memorable adventures, but most of all laughter and fun!
Hope to hear from you soon, and as always, thanks for stopping by!
Meow!
1Unfortunately, the class or recording are no longer available for viewing. But I may have another live demo class some day in the future. If so, you can be sure the announcement will show up on my blog.
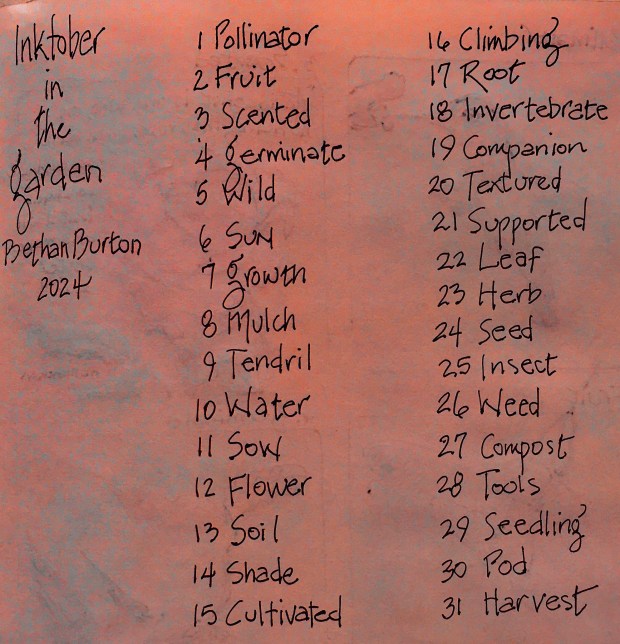
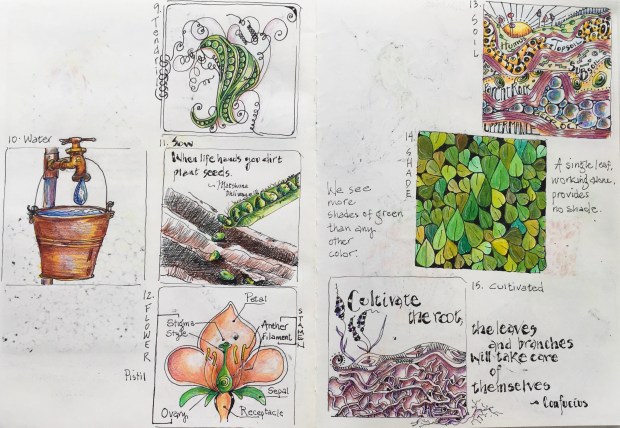
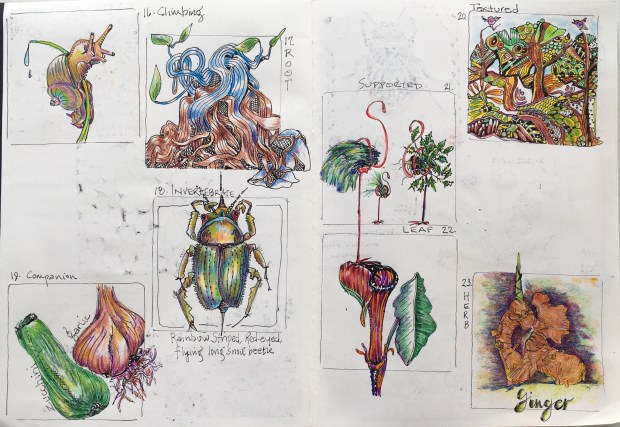
Searching for a theme to follow during Inktober 2024, I was delighted to learn one of my favorite podcasters and nature journal educators, Bethan Burton, shared her original list of 31 prompts. Named “Inktober in the Garden,” she cleverly chose each word to represent a different phase or activity encountered while gardening. To quote Bethan, the prompts are “aimed to get us thinking in different ways about the beauty of our cultivated space.”
Living in Brisbane, Queensland, Australia, where it’s now Spring, Bethan’s garden theme was very timely for her. However, October in central New Mexico where I live, is smack dab in the middle of Fall, so I relied on past gardening experience to create my daily ink drawings.
I hope you enjoy my 31 Inktober2024 tiles, inspired by Bethan Burton’s “Inktober in the Garden” prompts. I decided to only complete one tile/day; in the morning while sipping a cup of tea, I’d sketch a drawing with only ink (using a Pilot Varsity nib pen). Then later in the evening I added the color coaxing pigment from my limited number of Venus Spectracolor colored pencils (the remains of a 40+ year old set which constantly break and refuse to blend).
A big thanks to Bethan for sharing her Inktober2024 prompt list, and for being a constant inspiration through her podcast Journaling with Nature, and for bringing the world-wide nature journaling community together for her annual International Nature Journaling Week, where we can explore, share and celebrate a passion for nature. To learn more about Bethan and nature journaling through her podcast, participating in future International Nature Journaling Week, sign up for her Blog and Newsletter, follow her YouTube Channel and Instagram account, visit her website at: https://www.journalingwithnature.com
Here’s a bit more about this thing called Inktober
Inktober was originally created by Jake Parker in 2009, and since then has been deemed an annual event that takes place throughout the month of October. The rules devised for participants were, and still are, pretty simple …… Every day 1) make a drawing in ink; 2) post or share it; 3) hashtag it with #inktober; and 4) repeat.
Since 2009, there’s been an official prompt list shared every year by Jake and his Inktober group (https://inktober.com). But there are also many alternate lists generated, which participants can follow if they wish, or they can choose to work from their own prompts. Also since 2009, participants have not only worked in only ink, but have created colored drawings. Actually any media is fair game (wonder if anyone uses collage?), as bending the simple rules seems to be the norm. As Jake notes on the Inktober webpage, “you can do it [Inktober] daily, or go the half-marathon route and post every other day, or just do the 5K and post once a week. What ever you decide, just” remember “Inktober is about growing and improving and forming positive habits, so the more you’re consistent the better.”
And if you’re interested in participating in future Inktober events, just do it! Find a prompt list or create your own, and join the month-long party beginning each year in October!
This concludes my 9th year of Inktober! As always, thanks for stopping by!
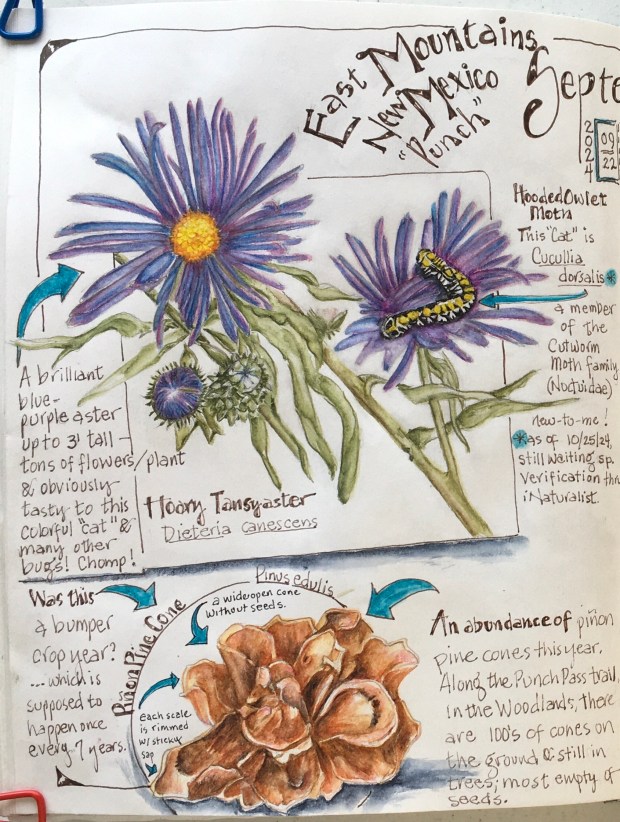
September 22nd was a morning full of new-to-me discoveries in nature. That was more than a month ago; a time when temperatures were still in the upper 80’s and flowers in full bloom.
But plenty of hints of what was to come ….. the inevitable change in seasons ….. existed. There were seeds of spring and summer bloomers blowing in the wind; squirrels stockpiling pine nuts from recently shed cones; darkling beetles mating and laying eggs in the ground to hatch next year’s population; caterpillars feasting on energy-packed flower petals needed to spin their cocoons; the chortling chatter of sandhill cranes high overhead migrating to Bosque del Apache for the winter.
Still it is hard to believe that today, a little more than a month later, everything has turned brown, and our first hard frost is forecasted for tomorrow morning!
In an effort to cling to a not-so-long ago summer, this small selection of the botanical and entomological happenings on the cusp of Fall, is now a part of my nature journal. Enjoy!
Photo display correction has been made in this second post, which has the identical in text as the first post presented earlier in the morning, please disregard the first post and apologies for any confusion. Barb
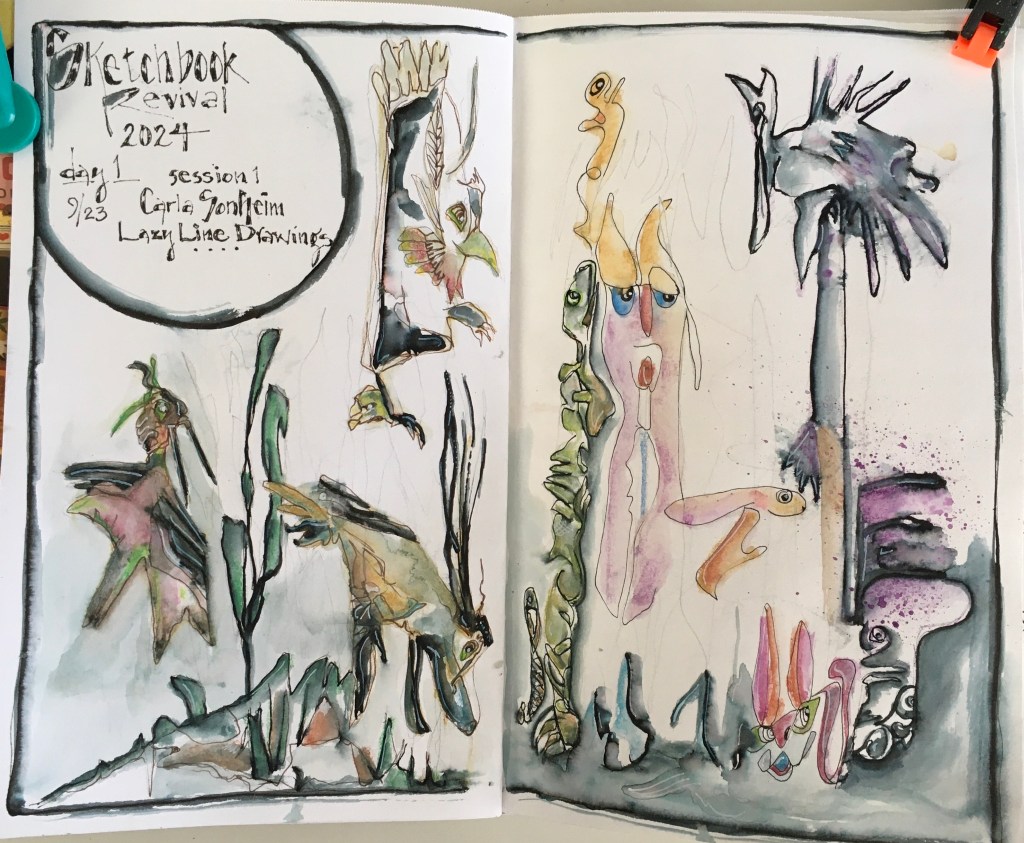
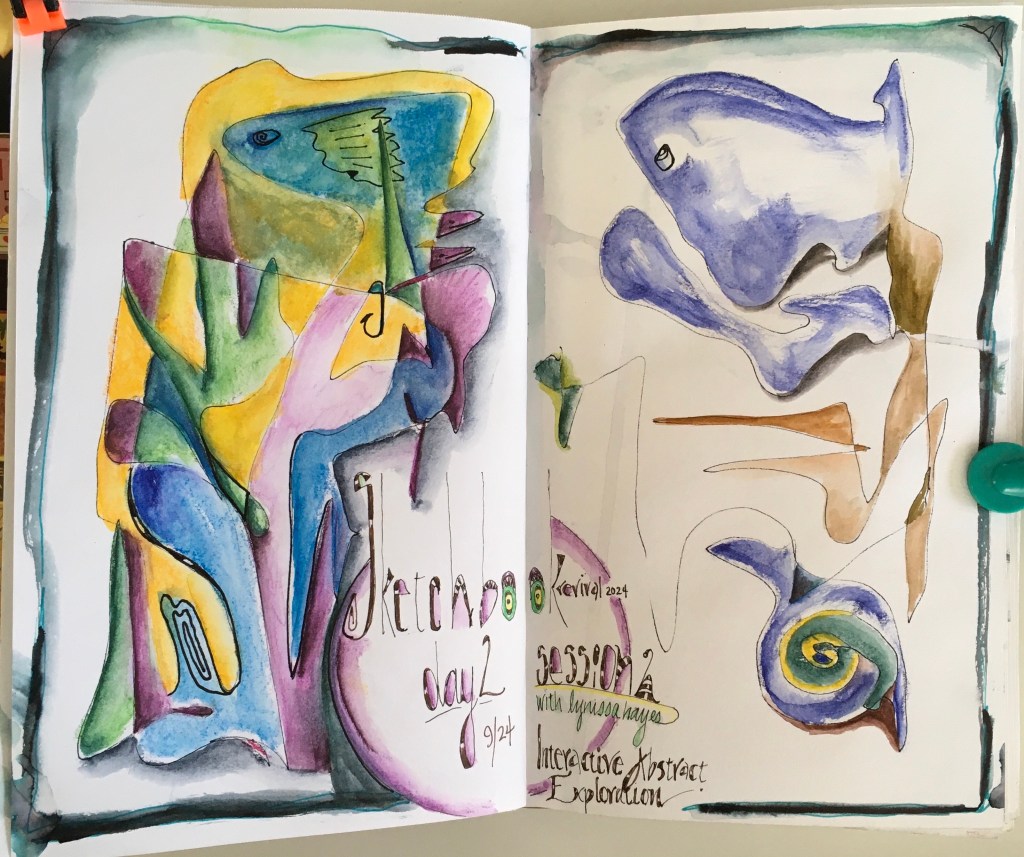
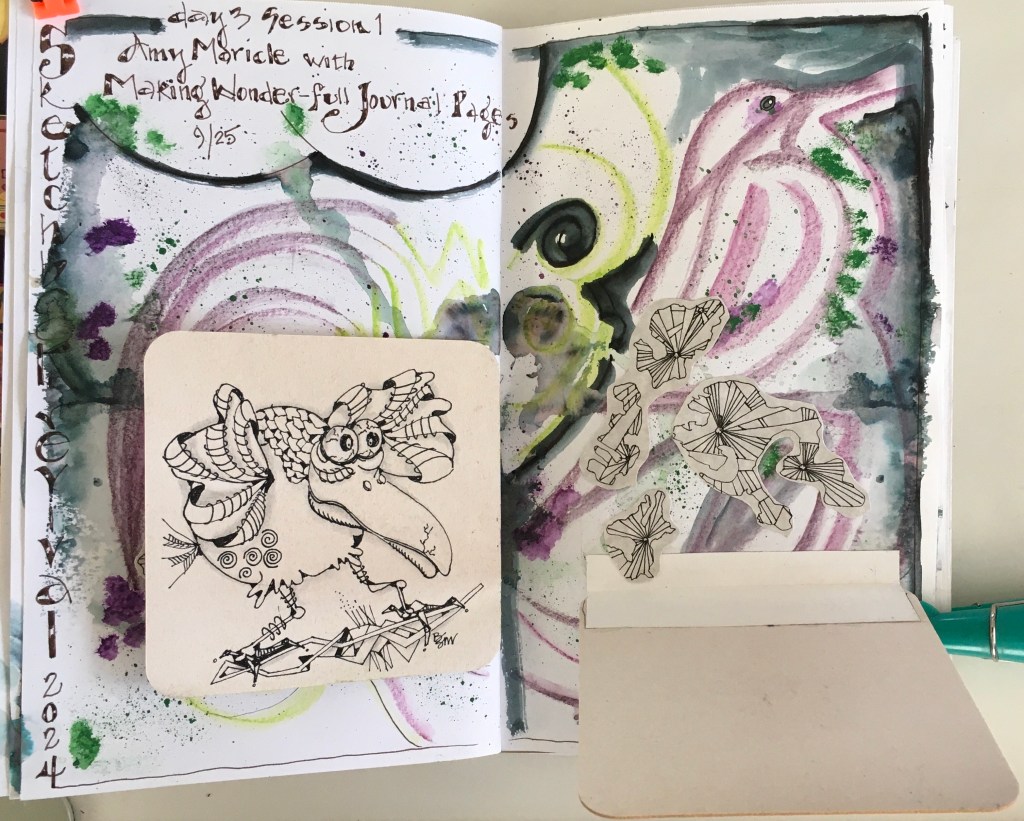
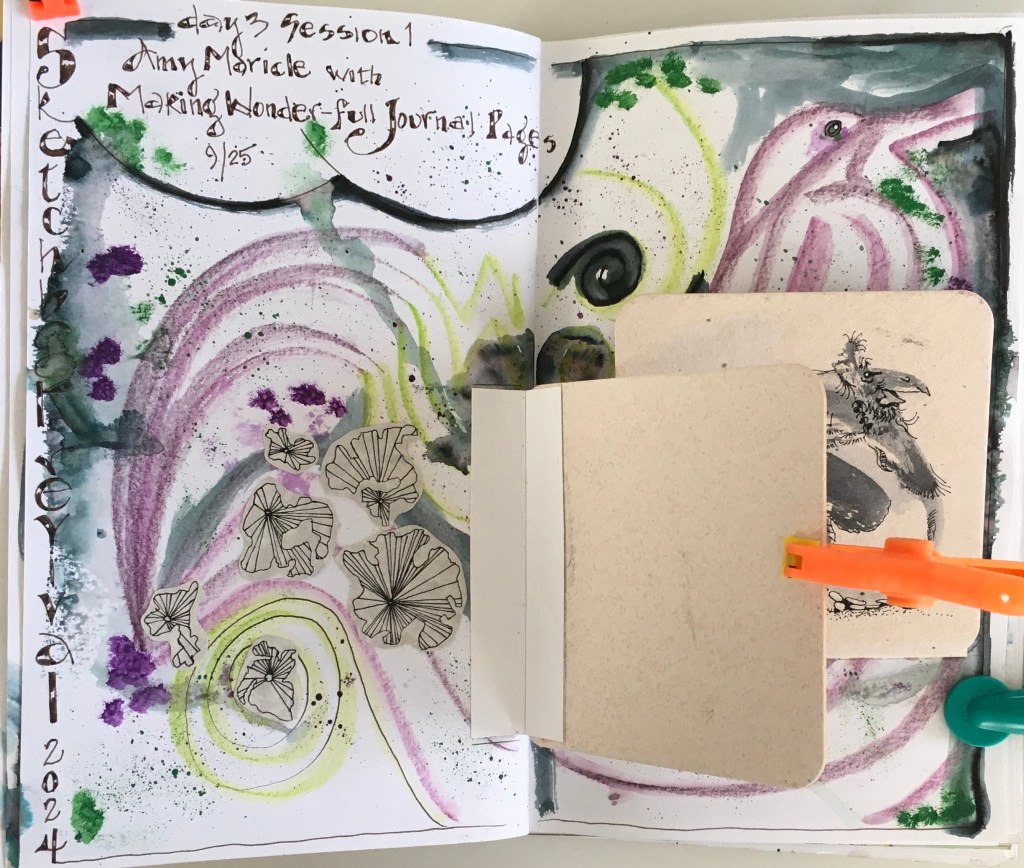
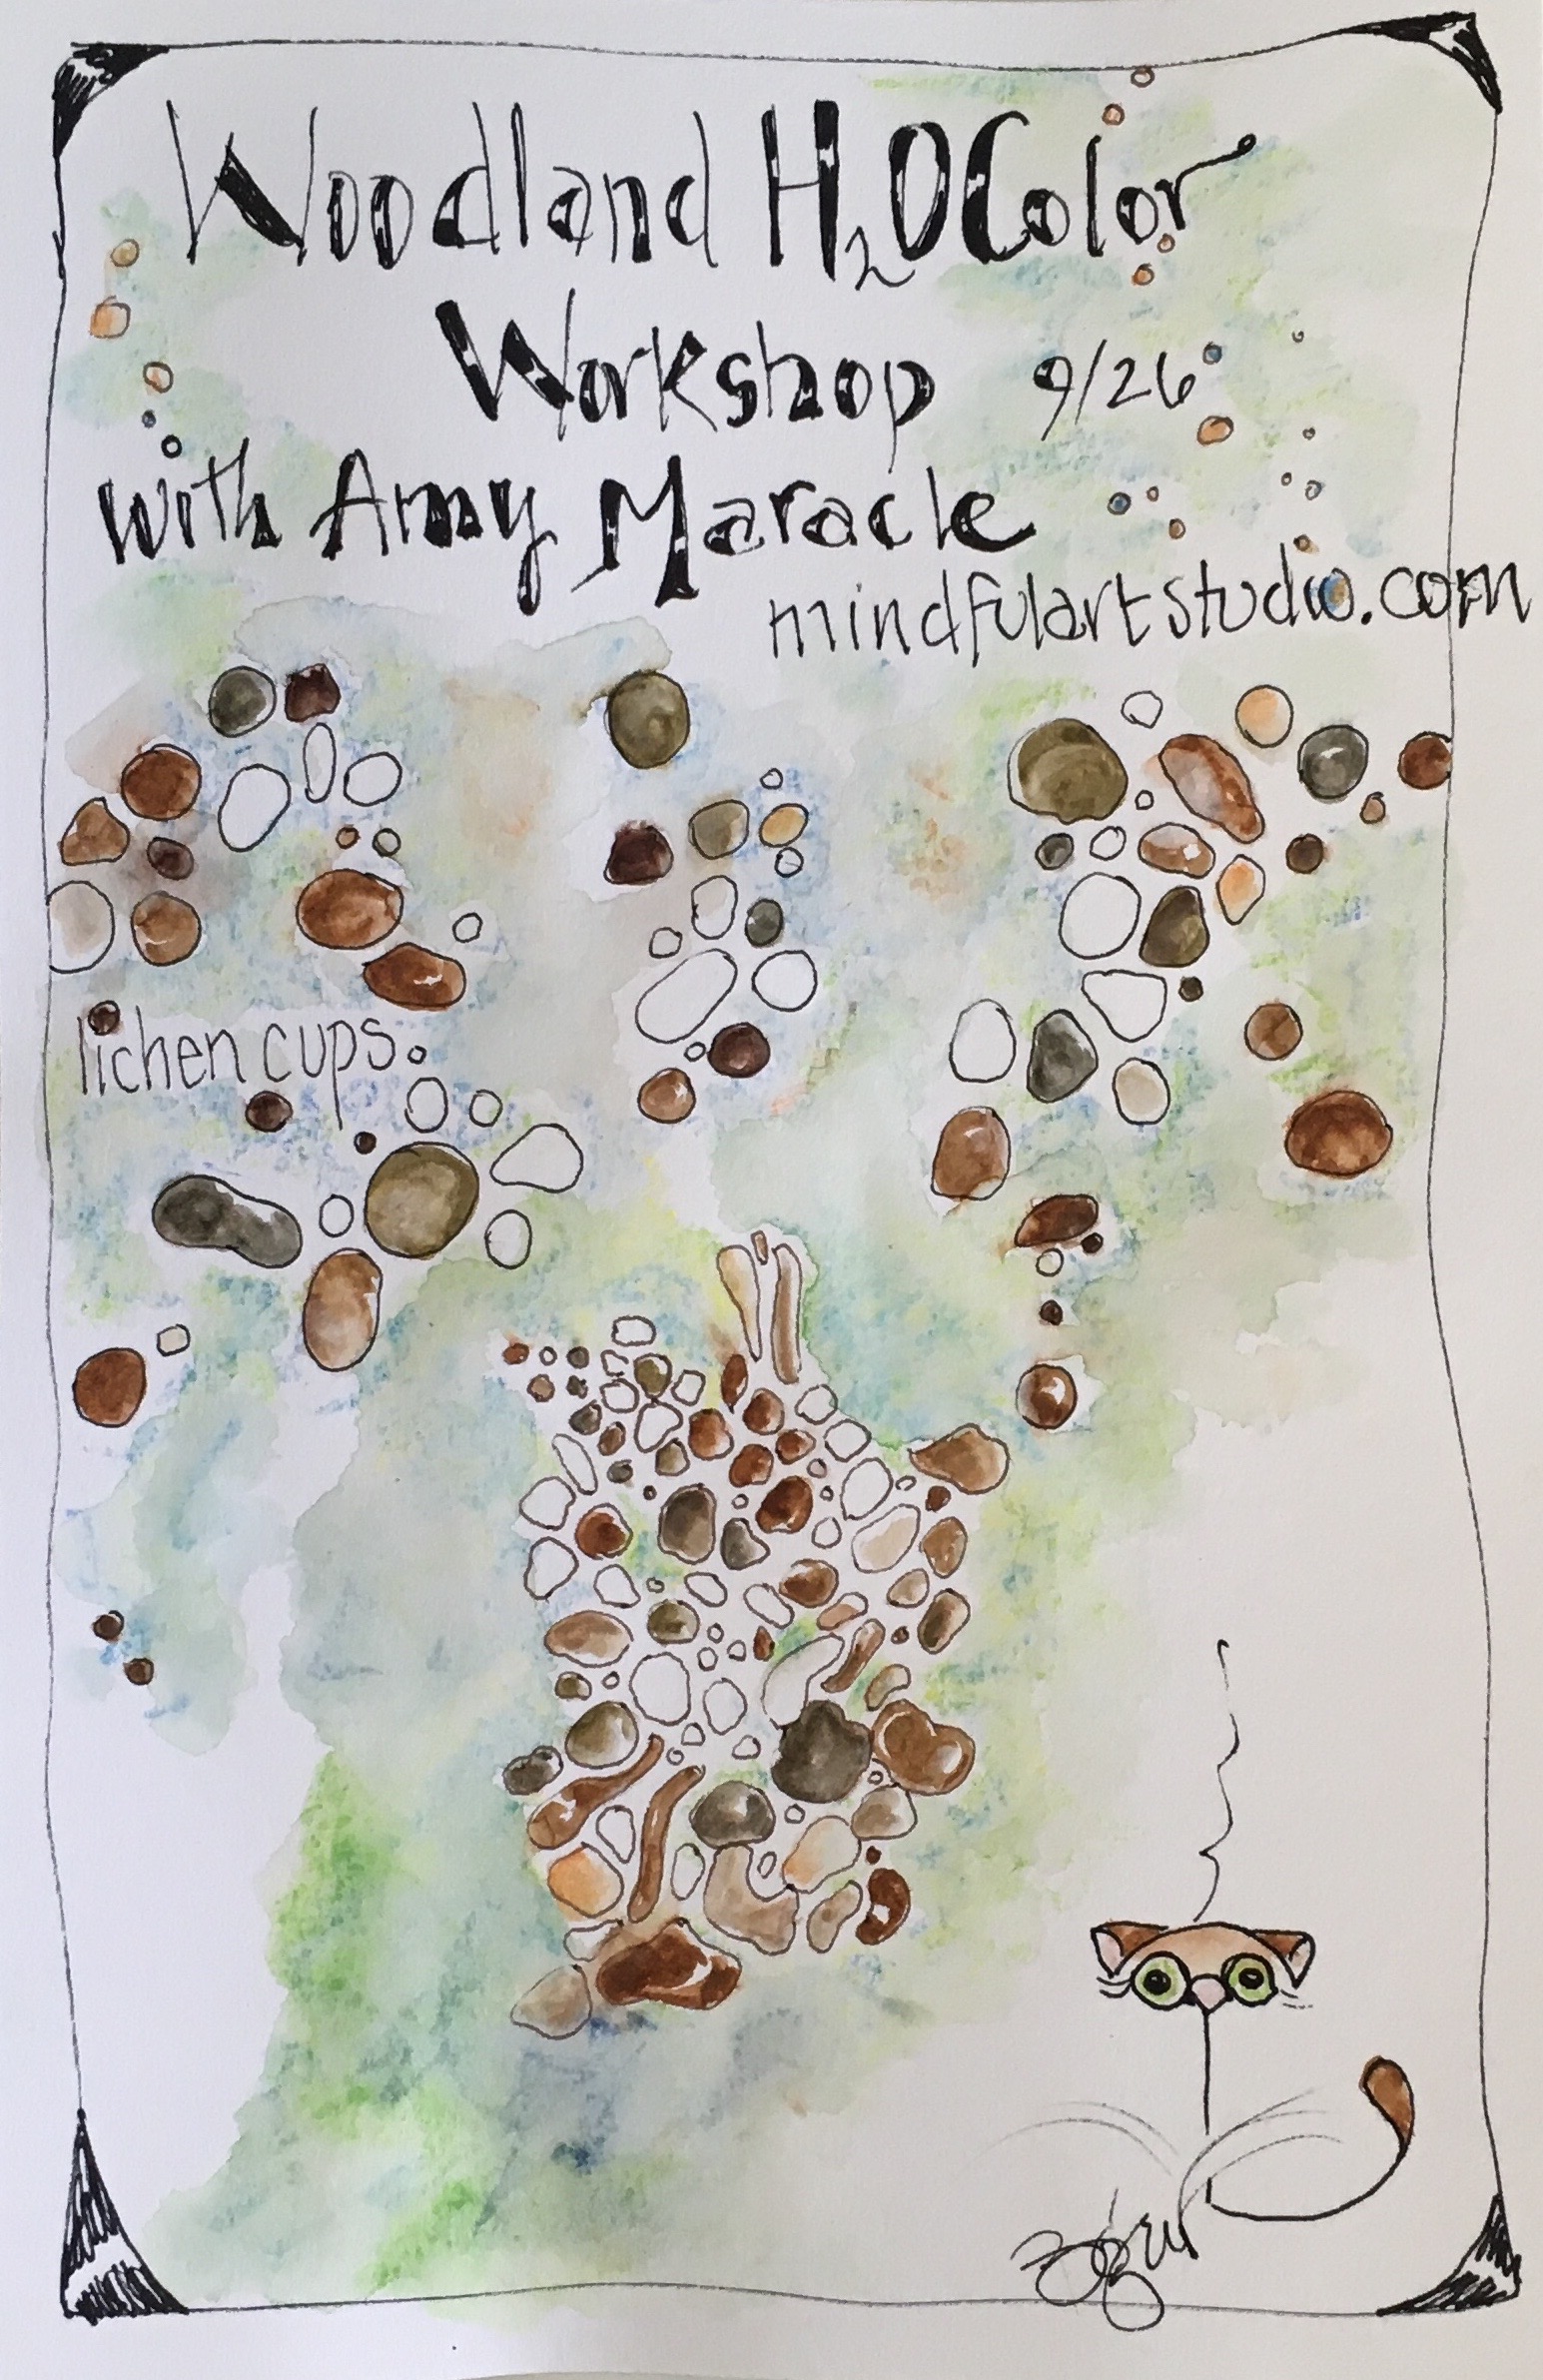
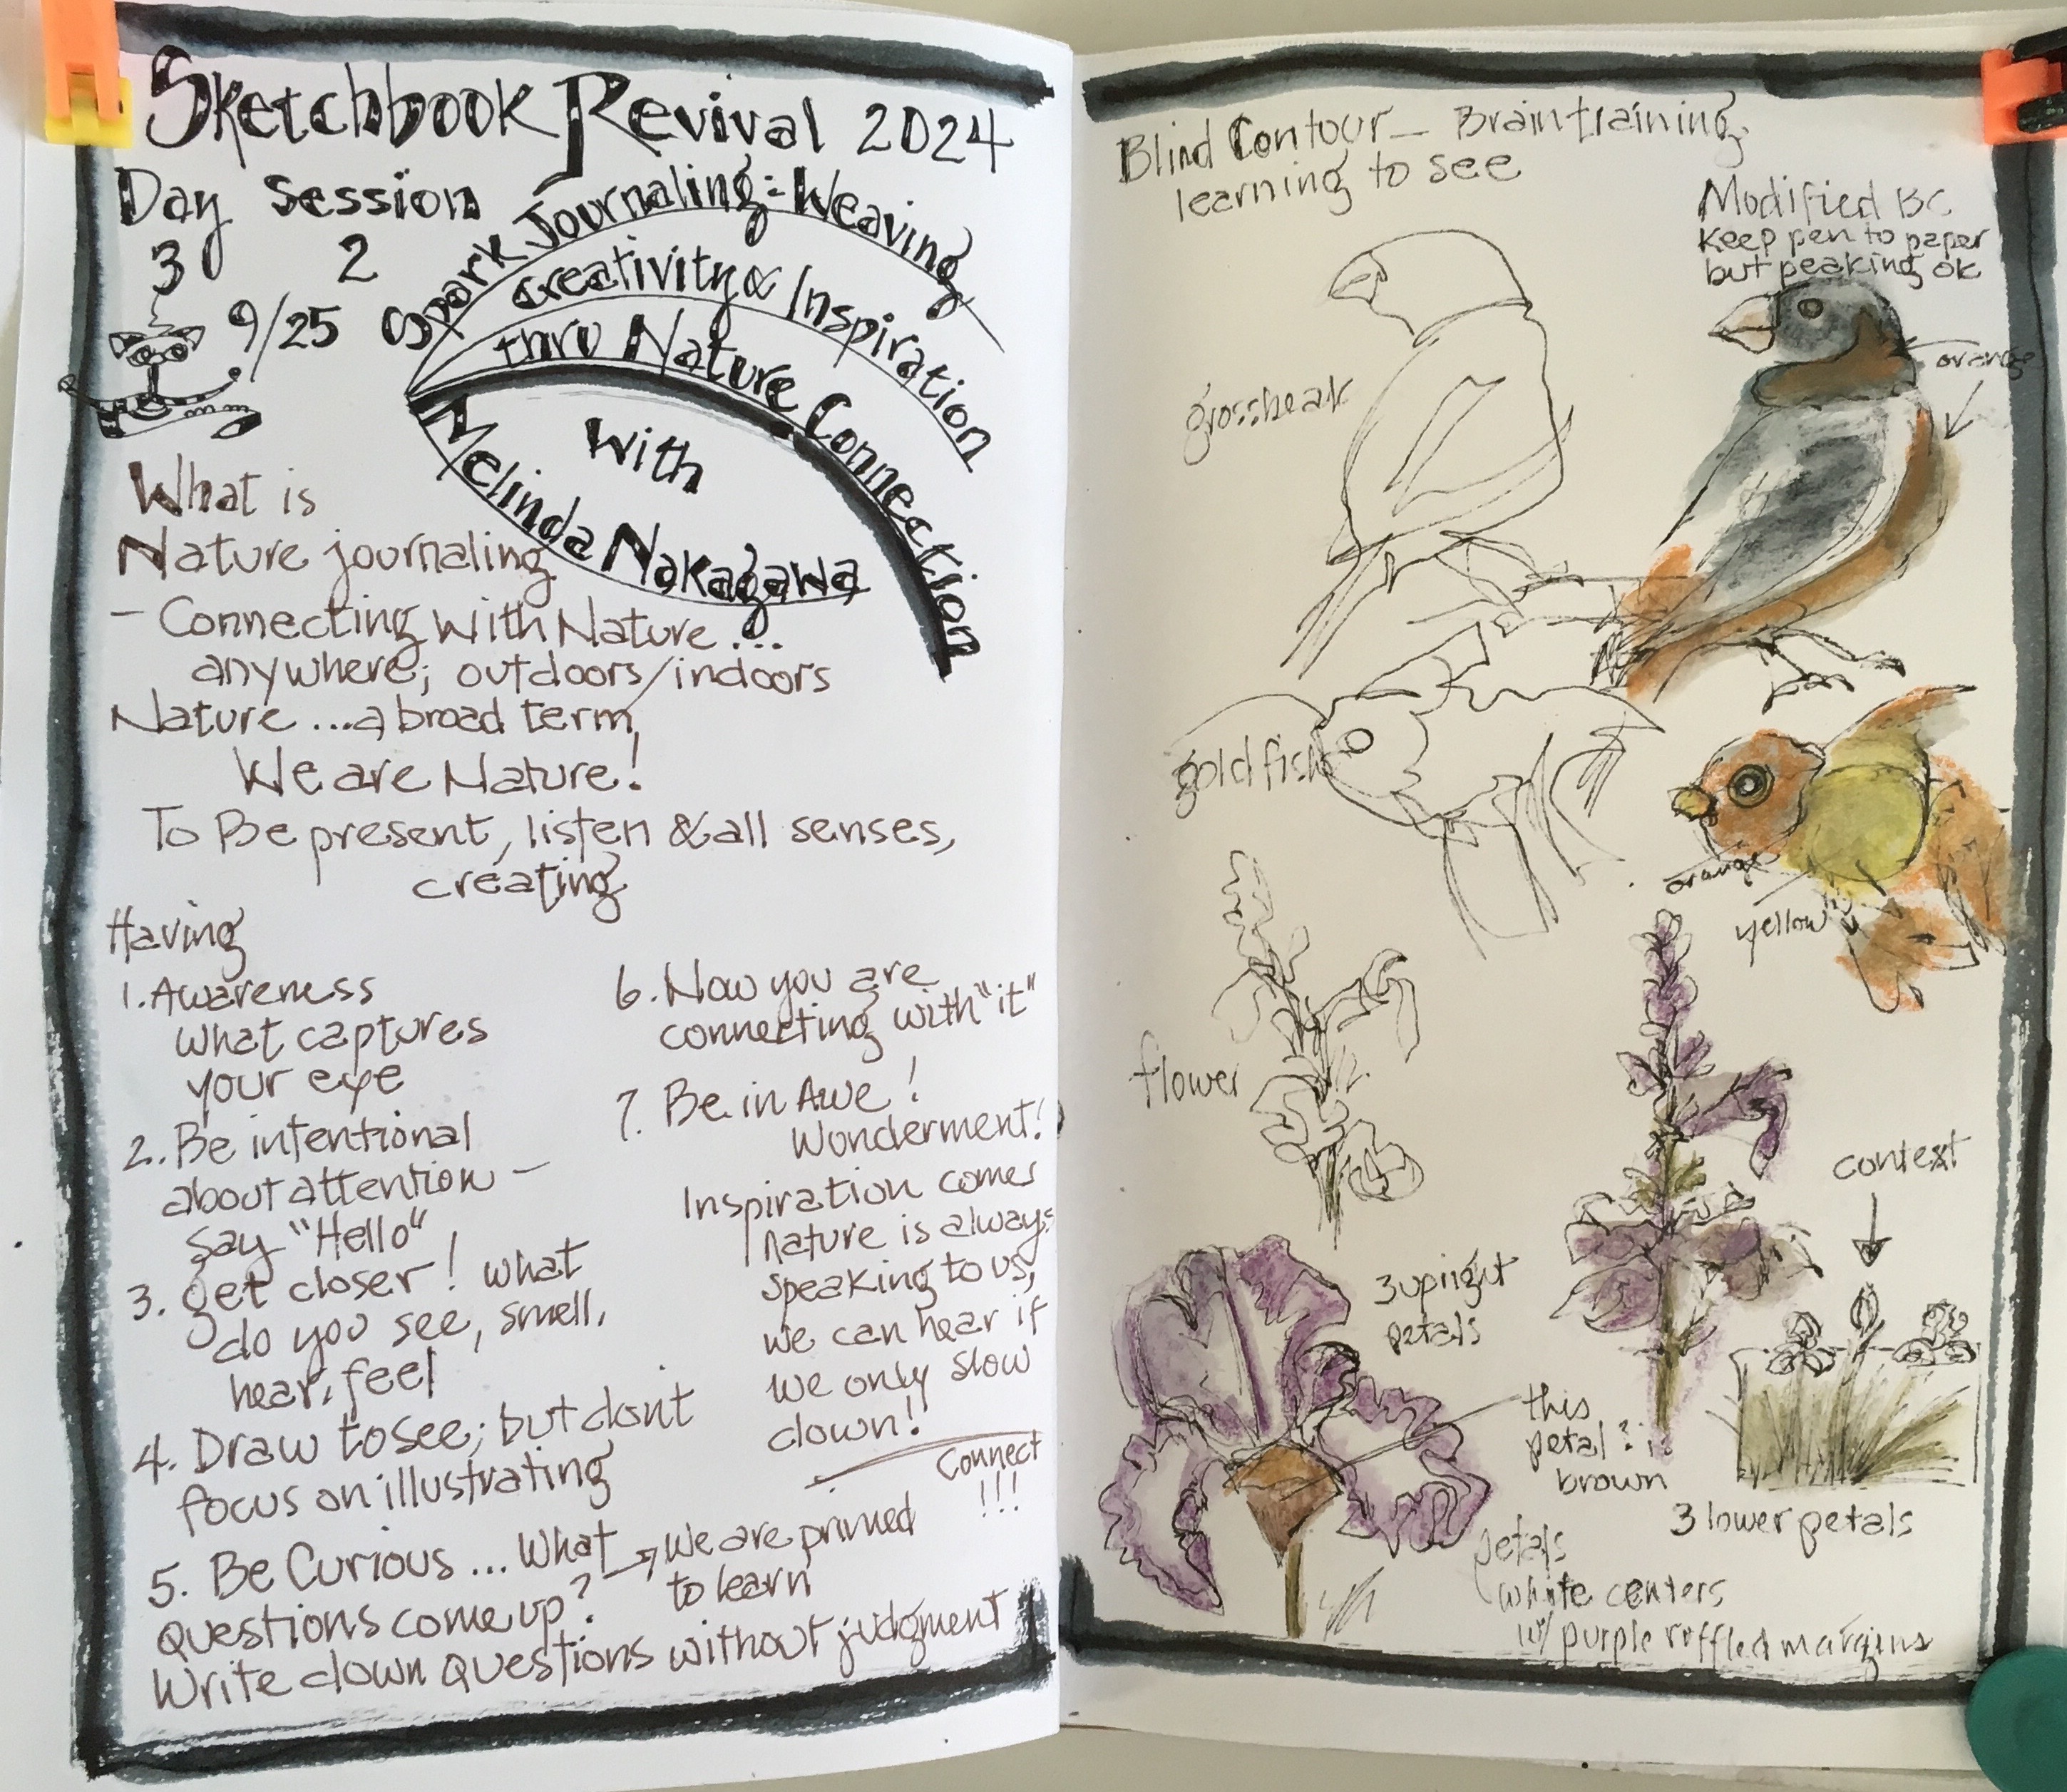
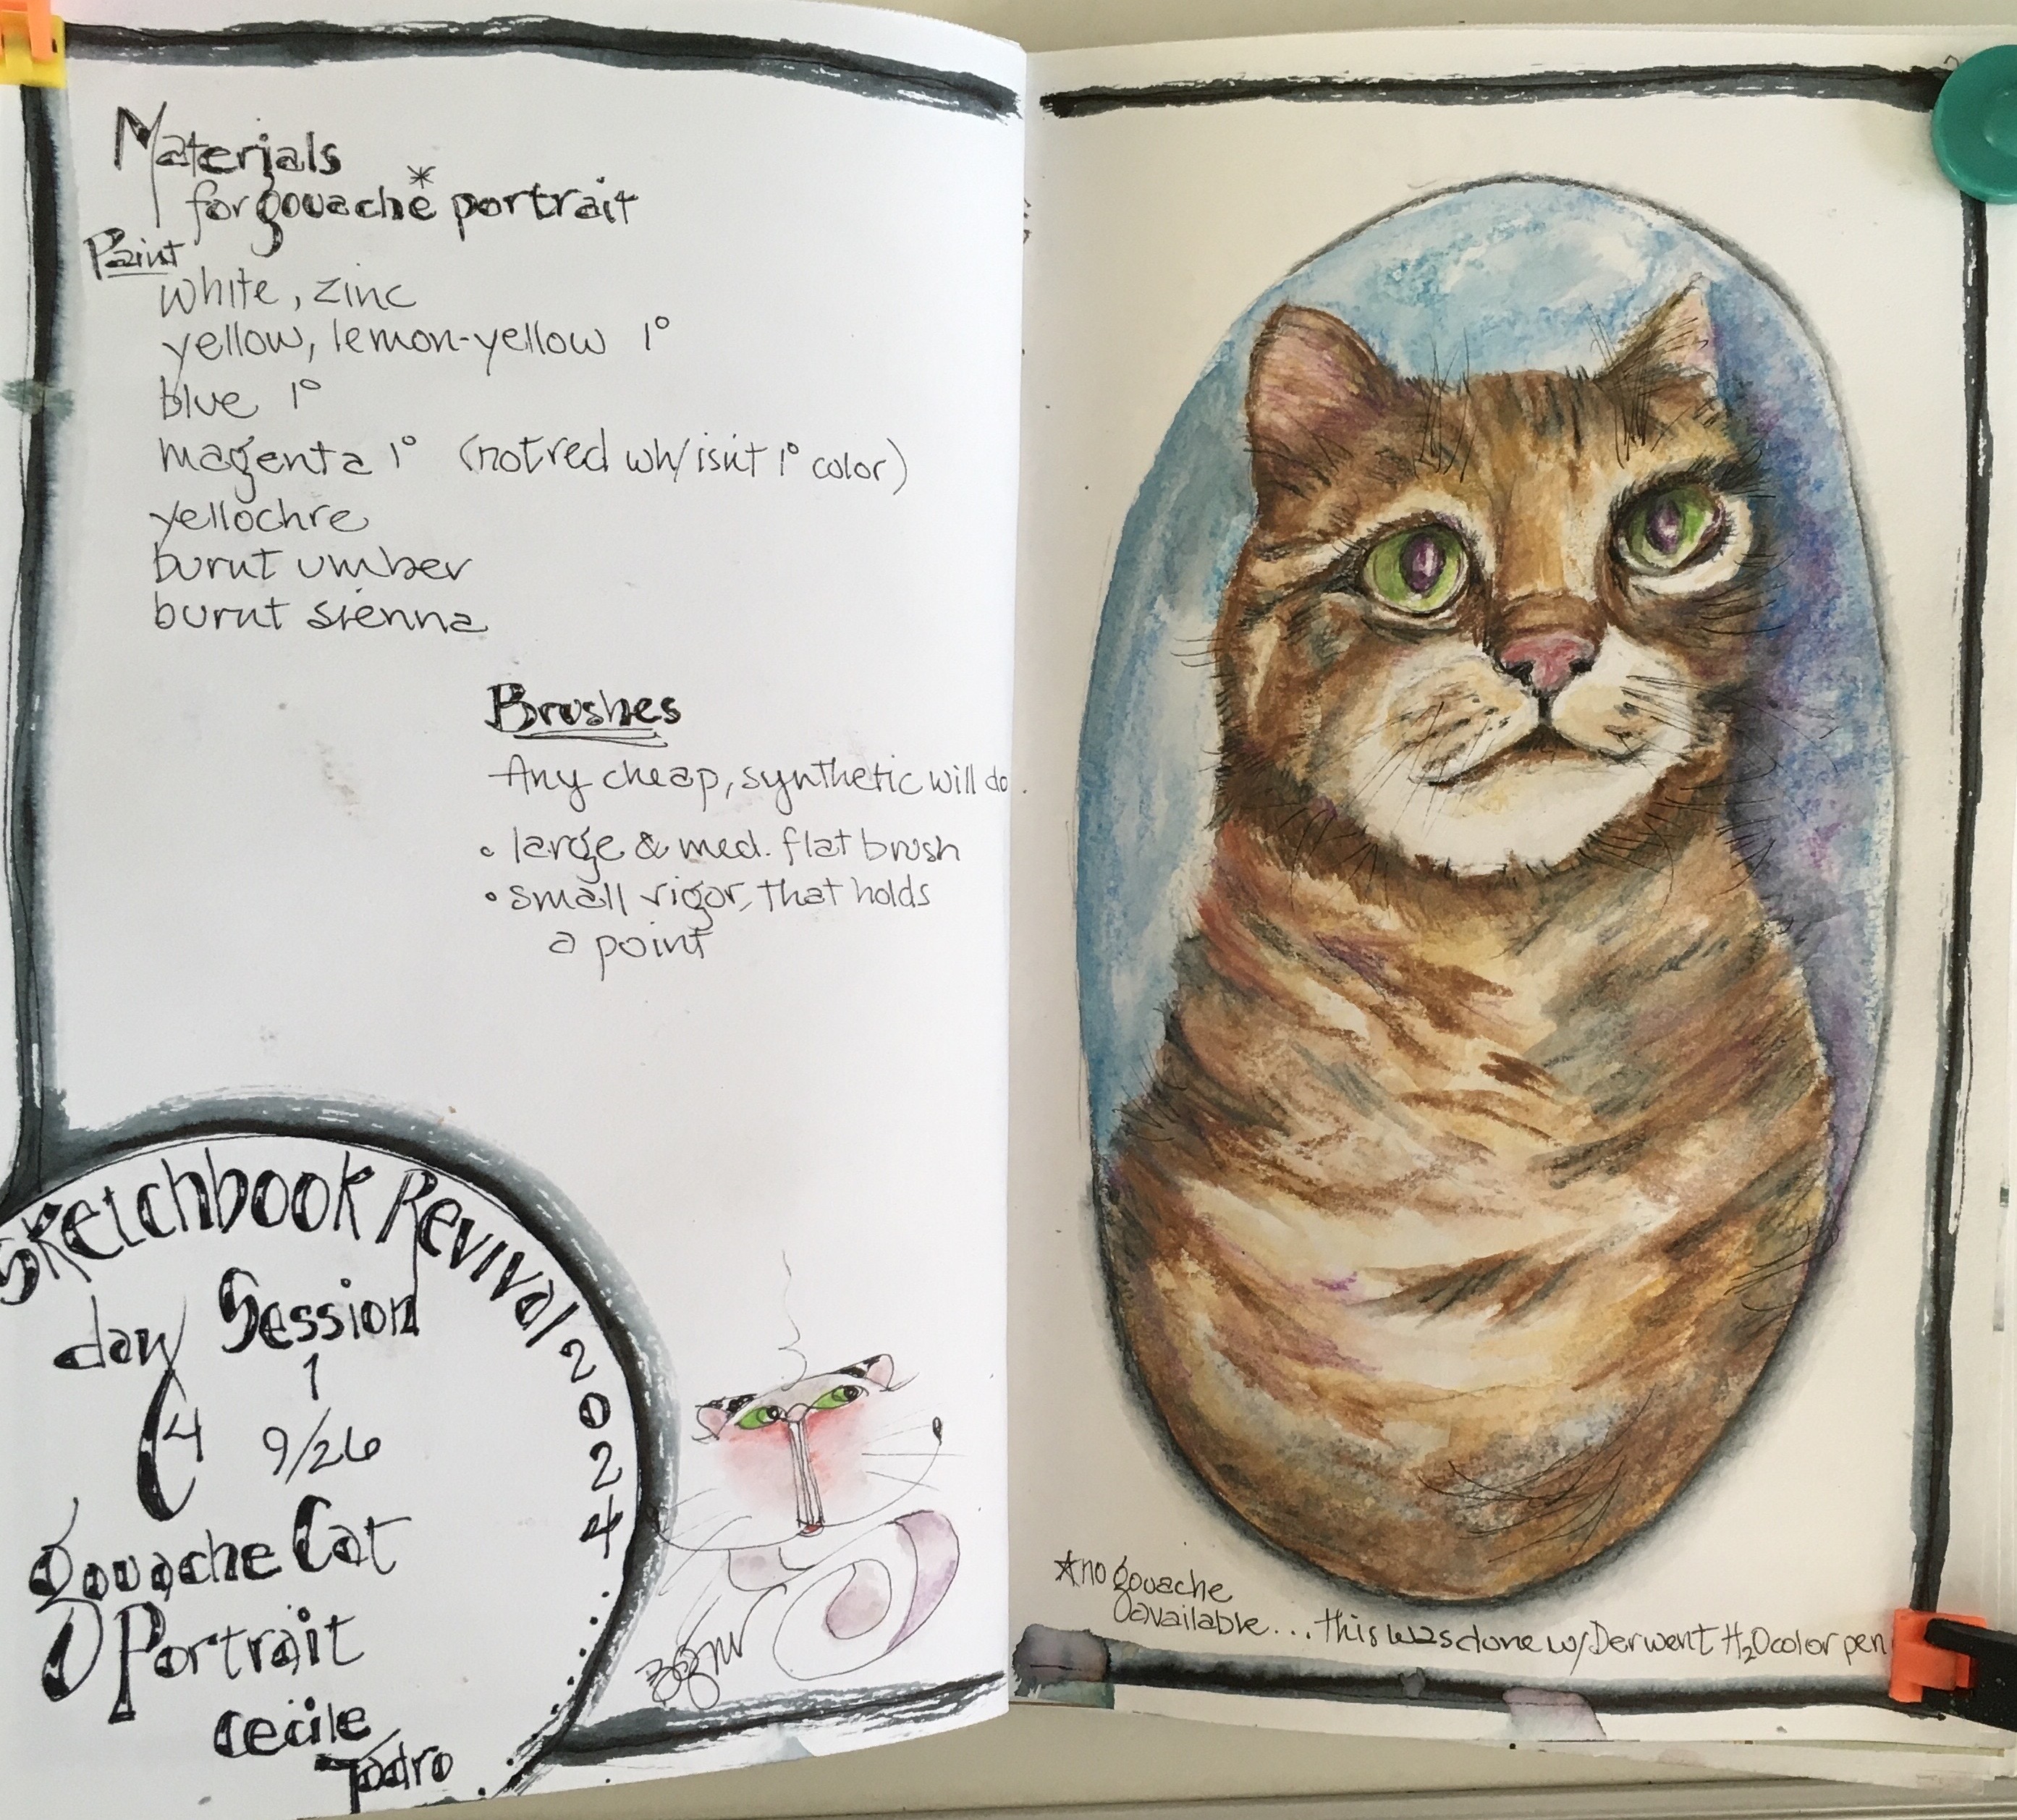
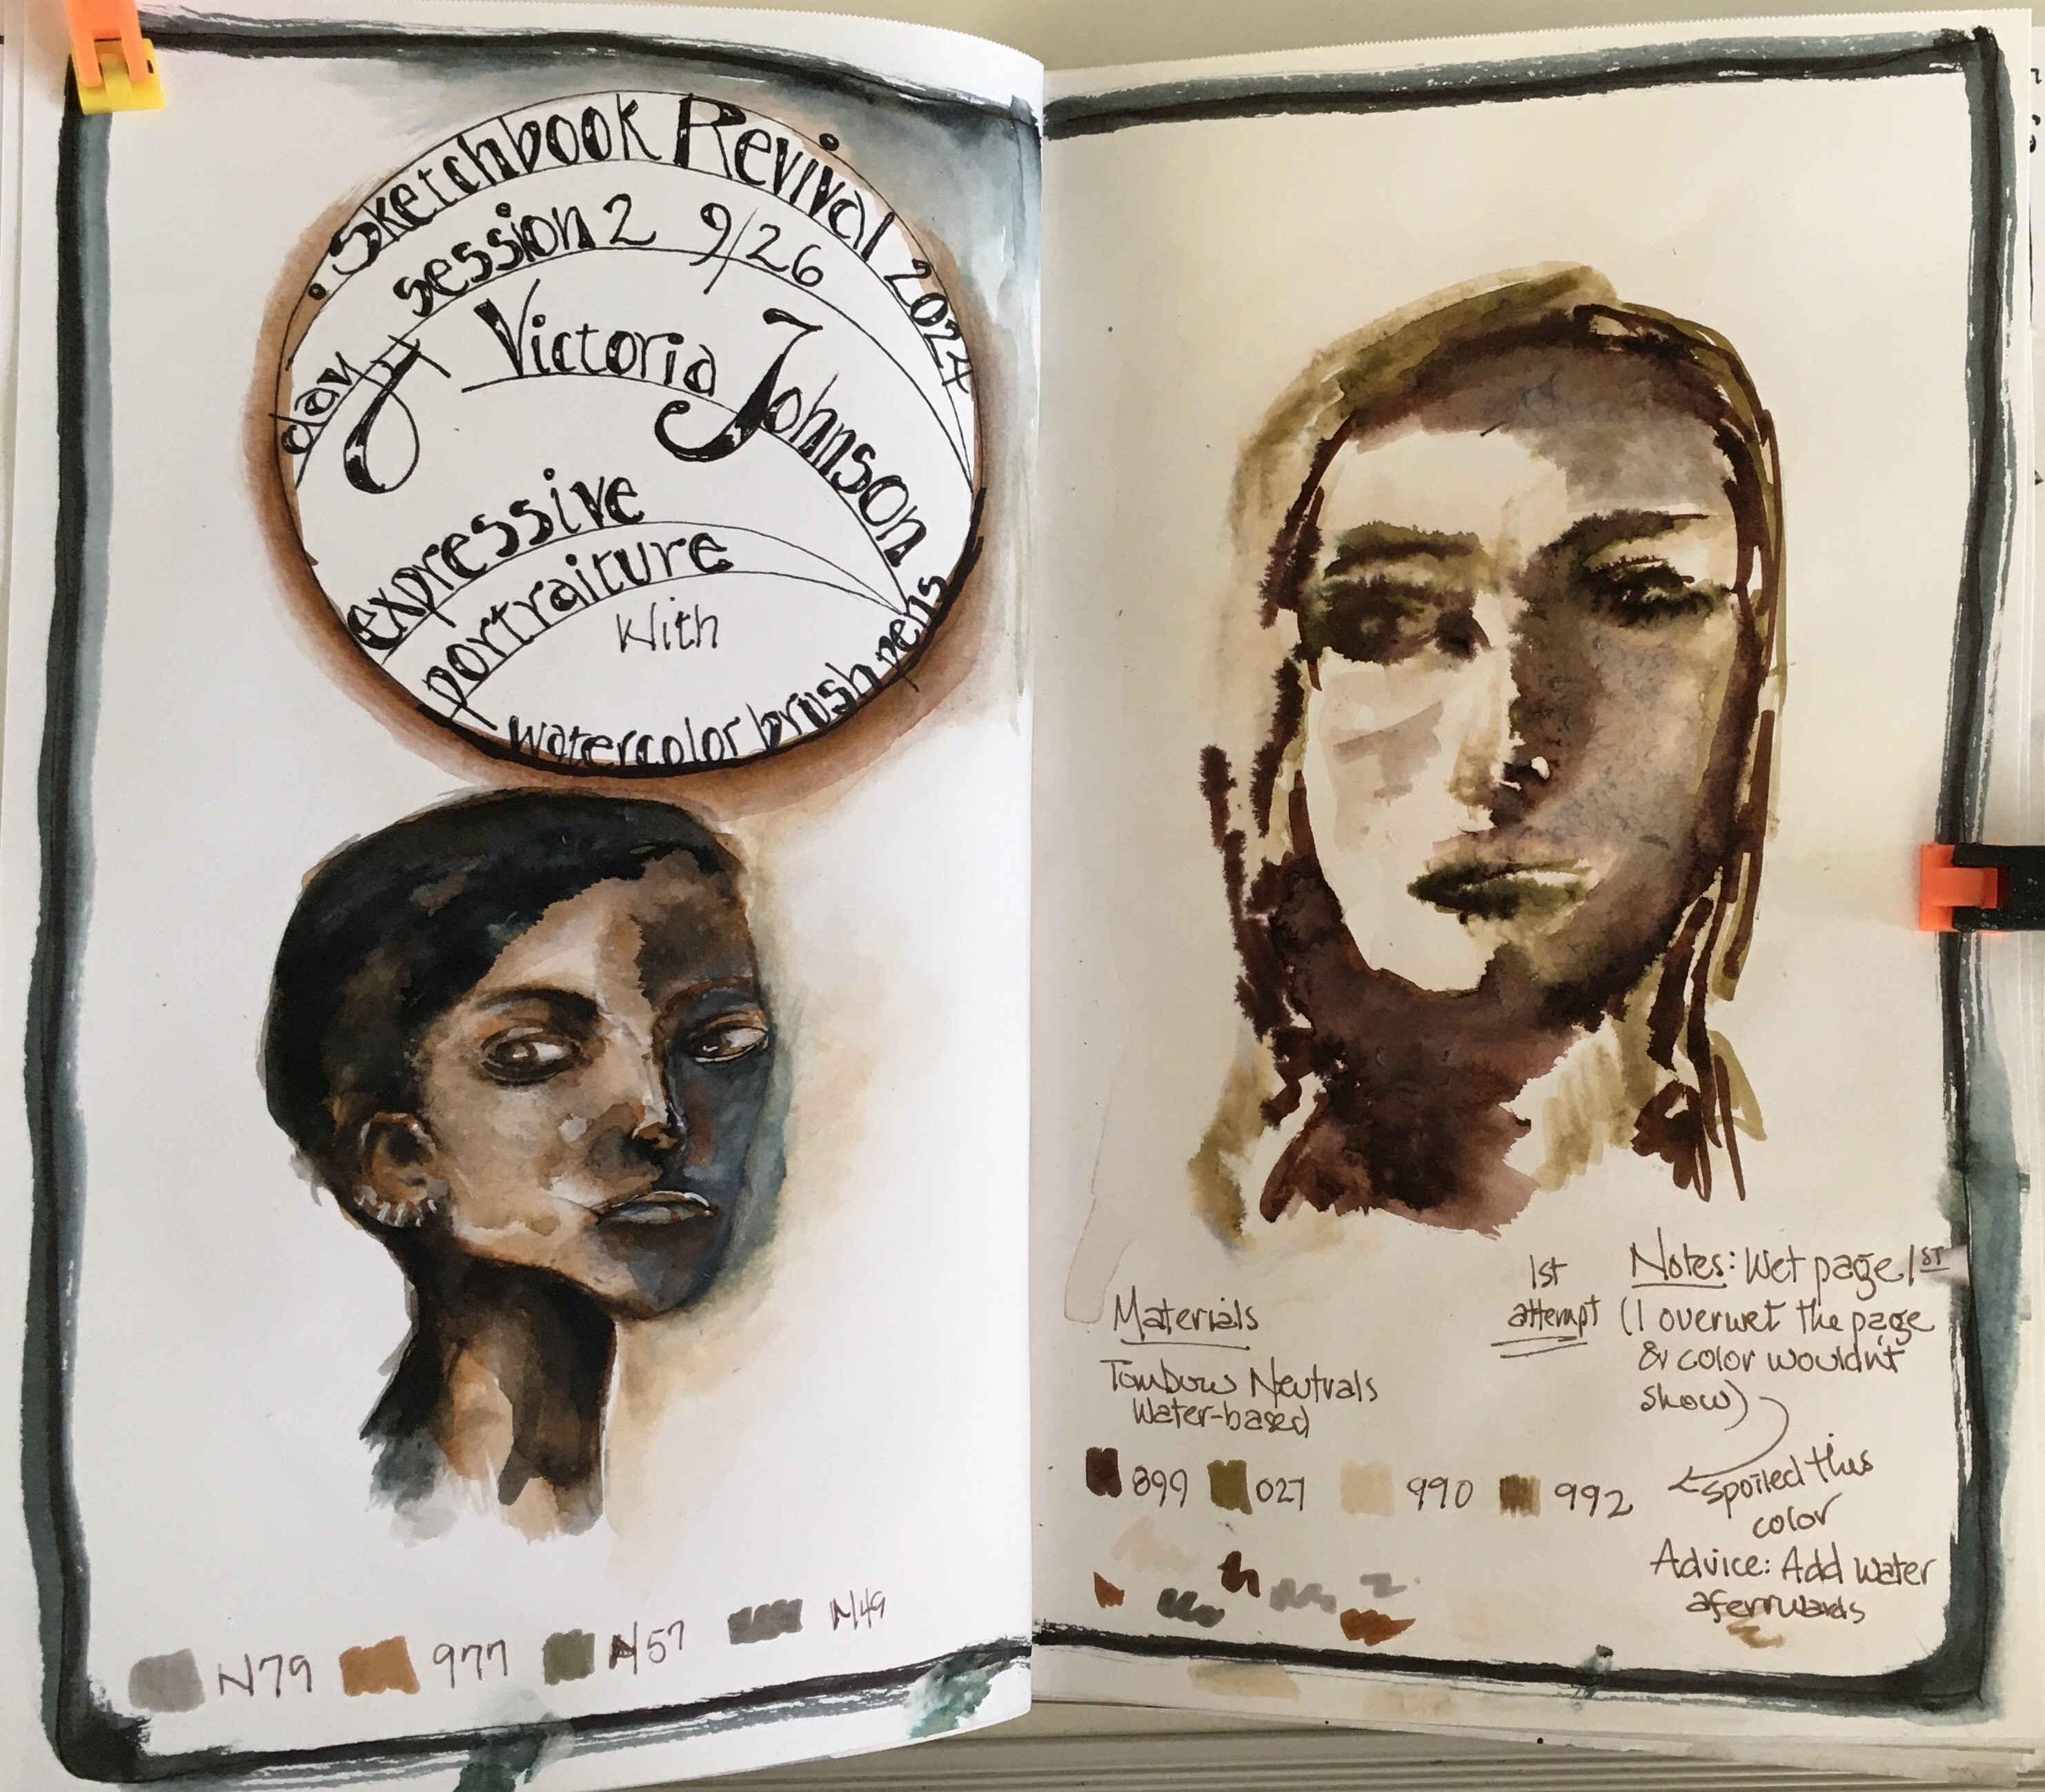
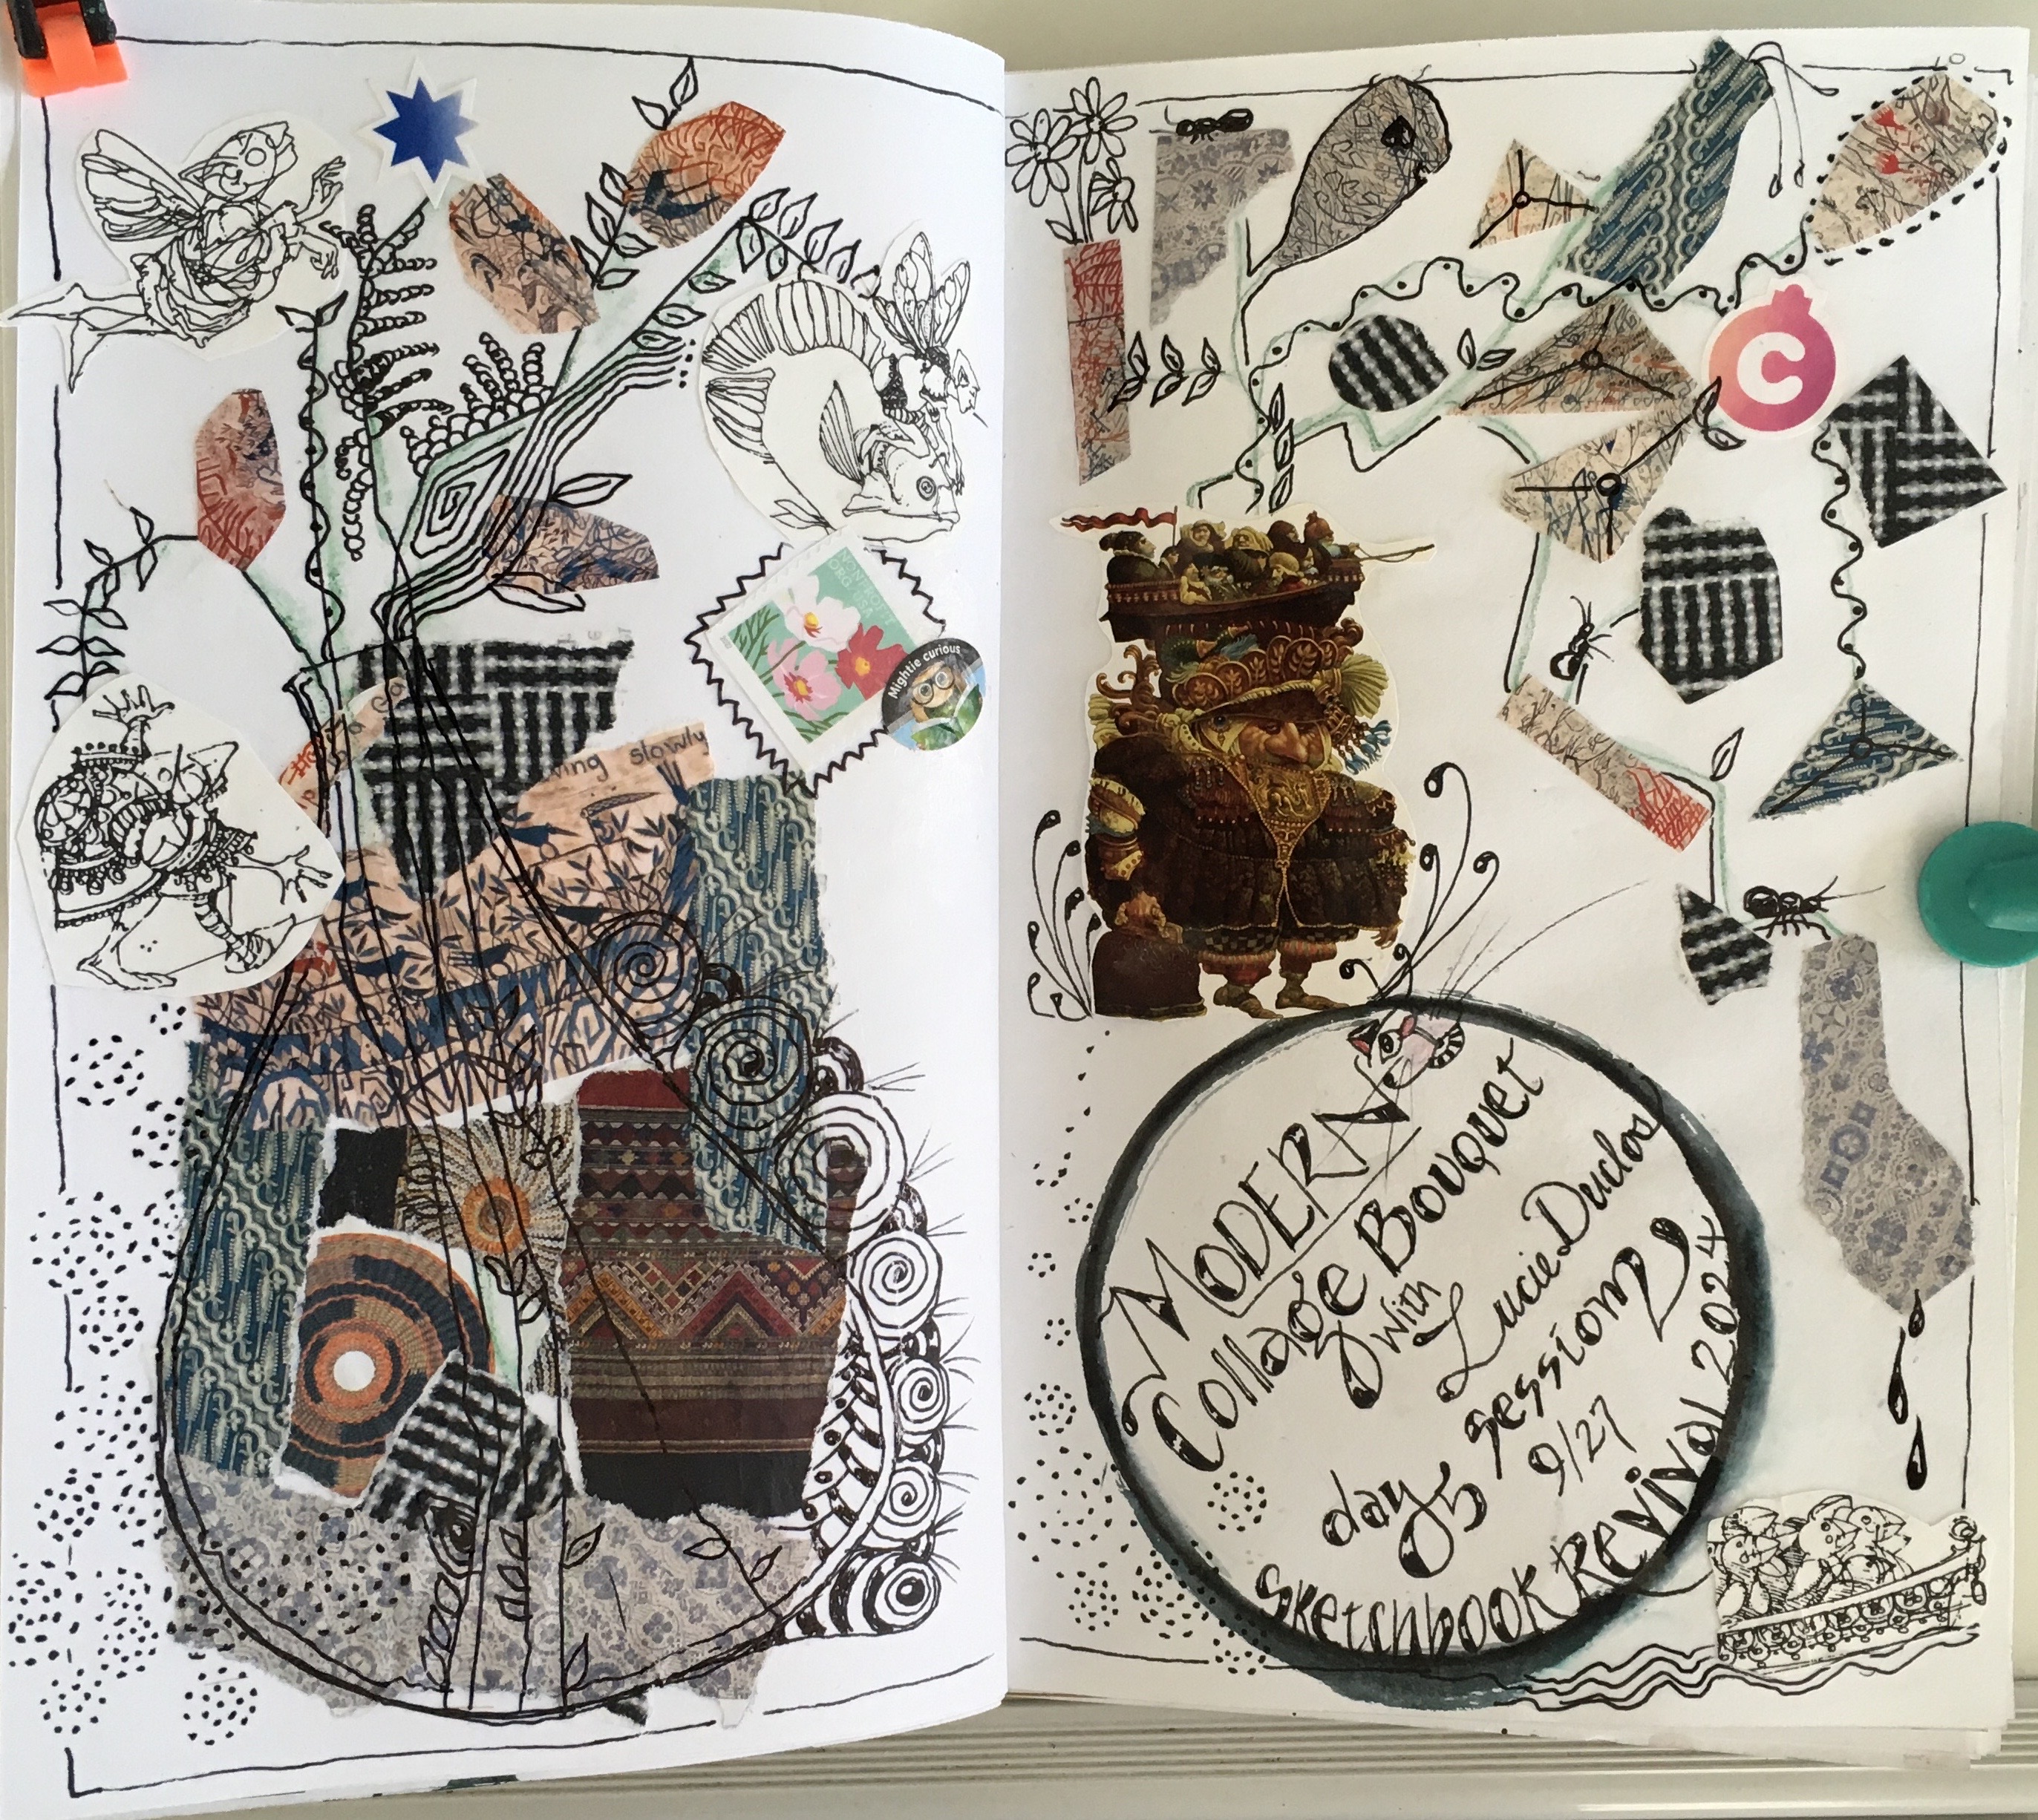
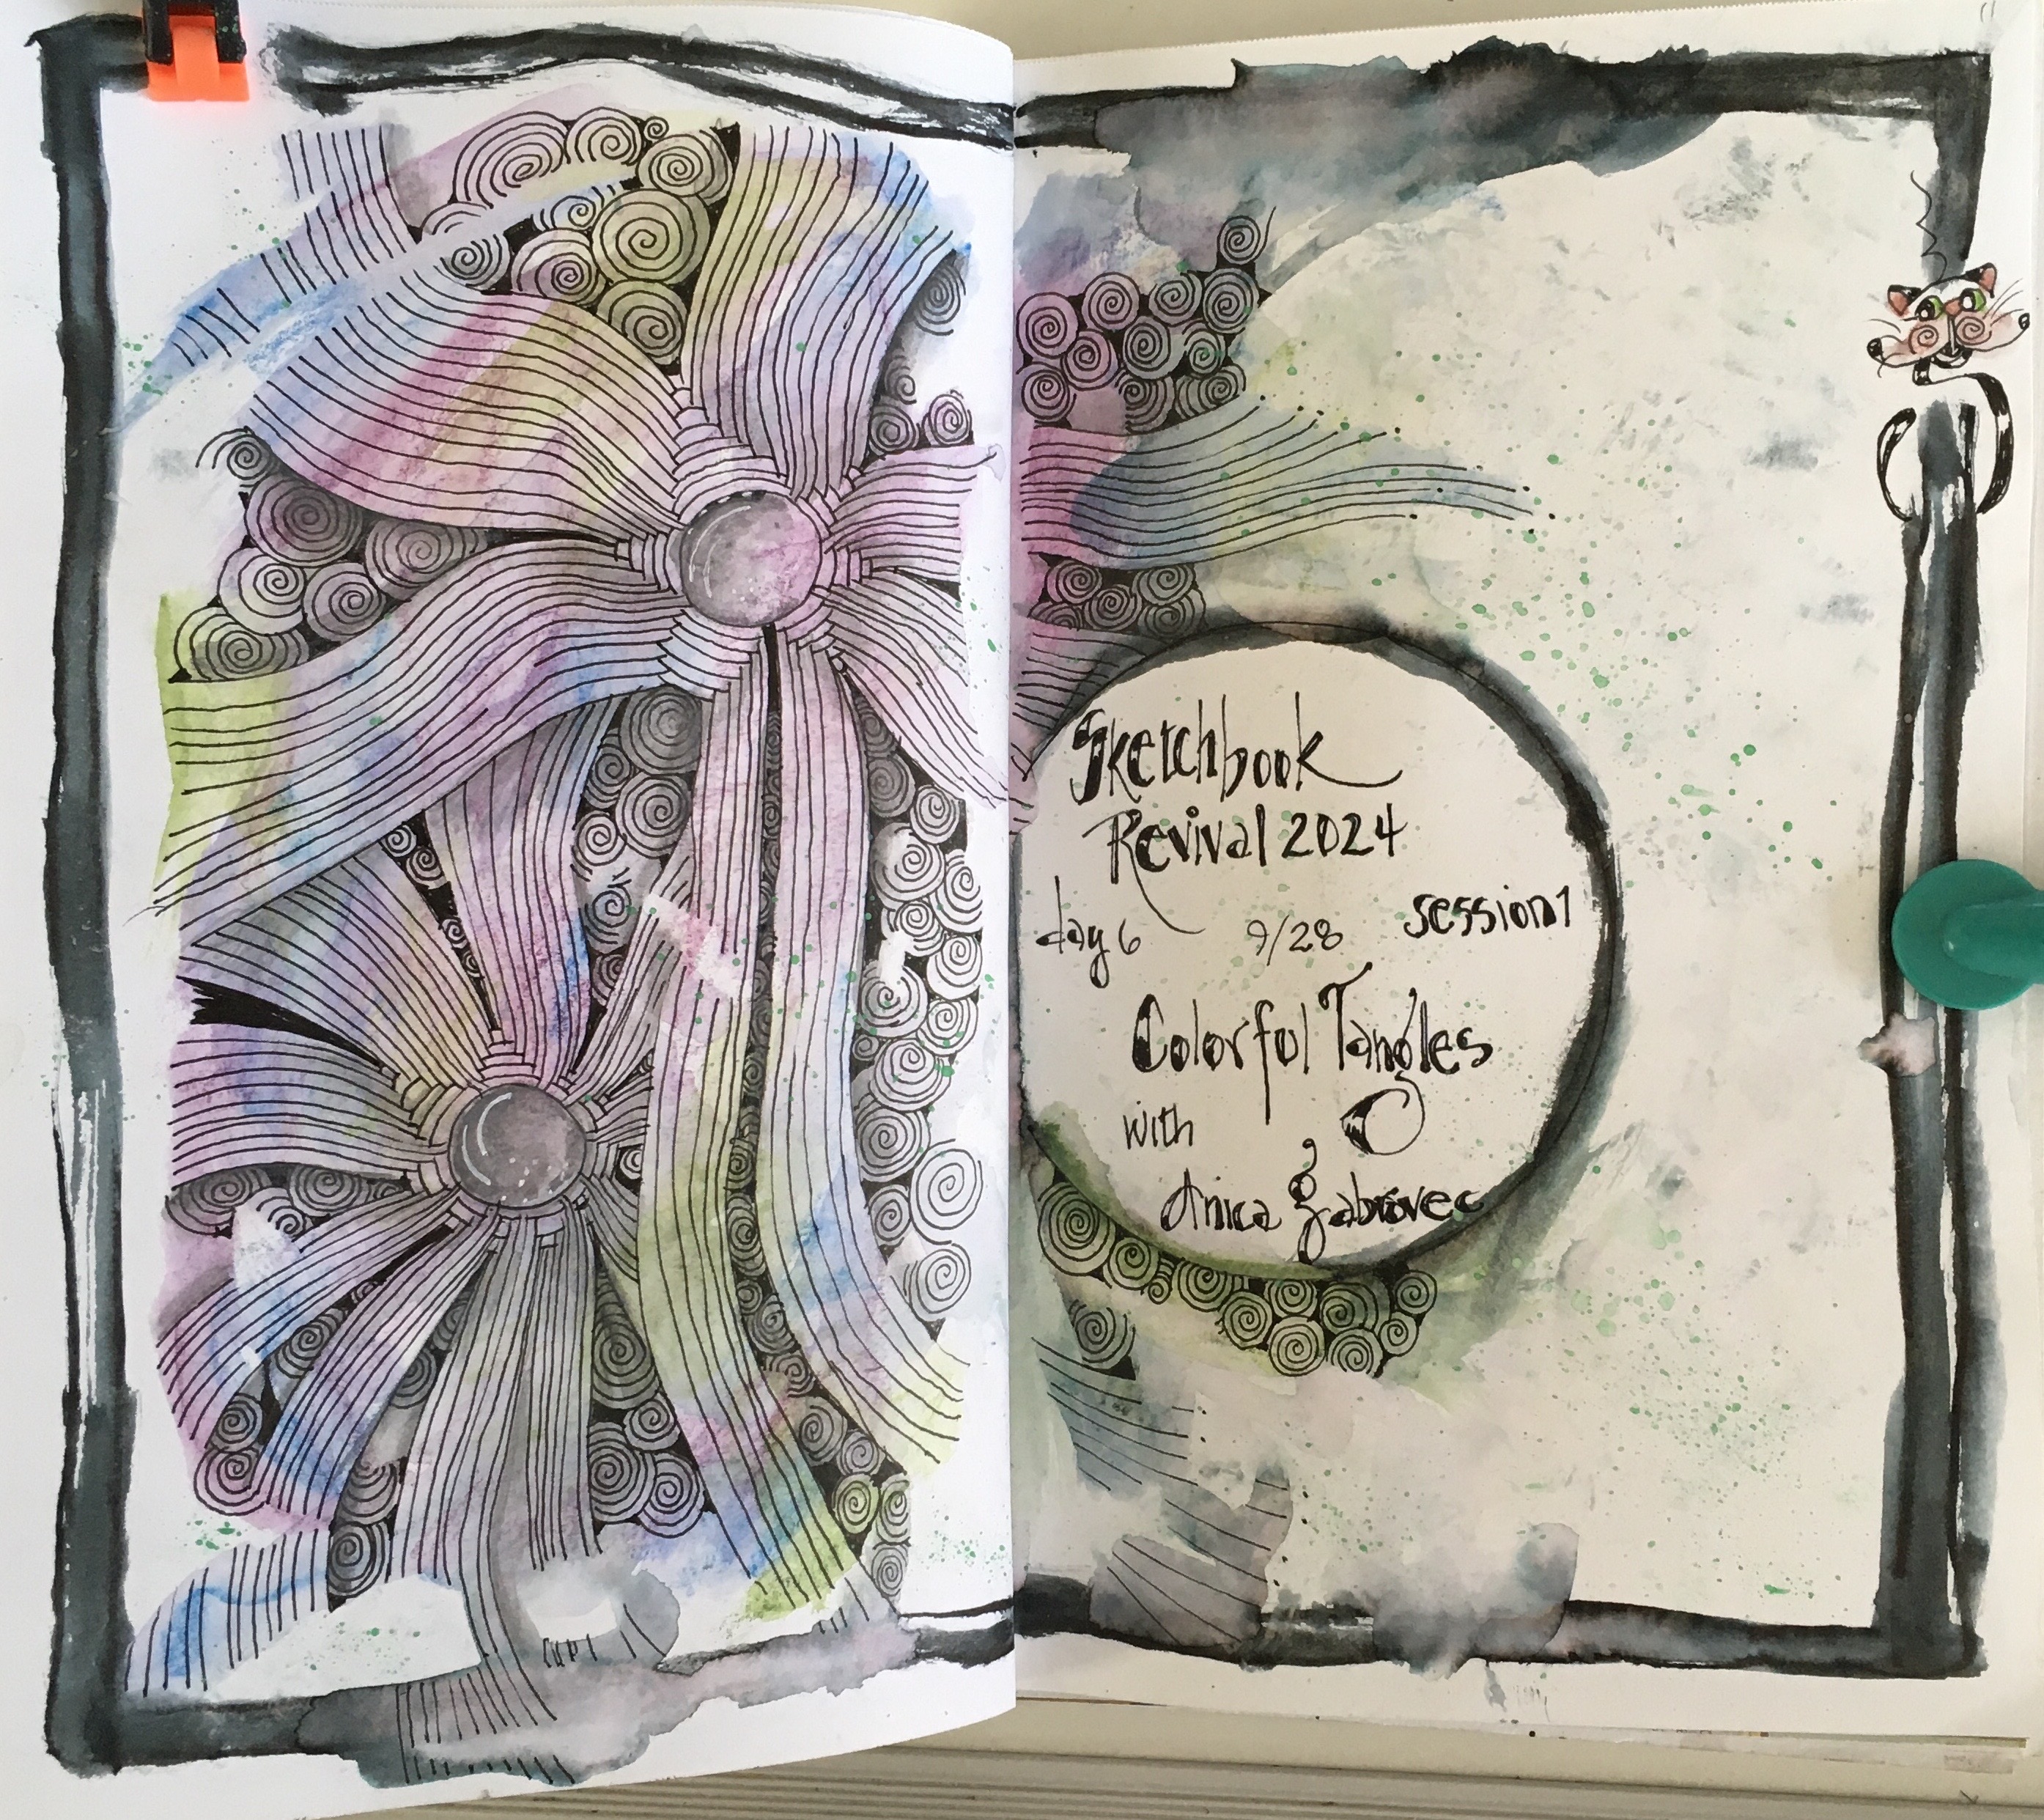
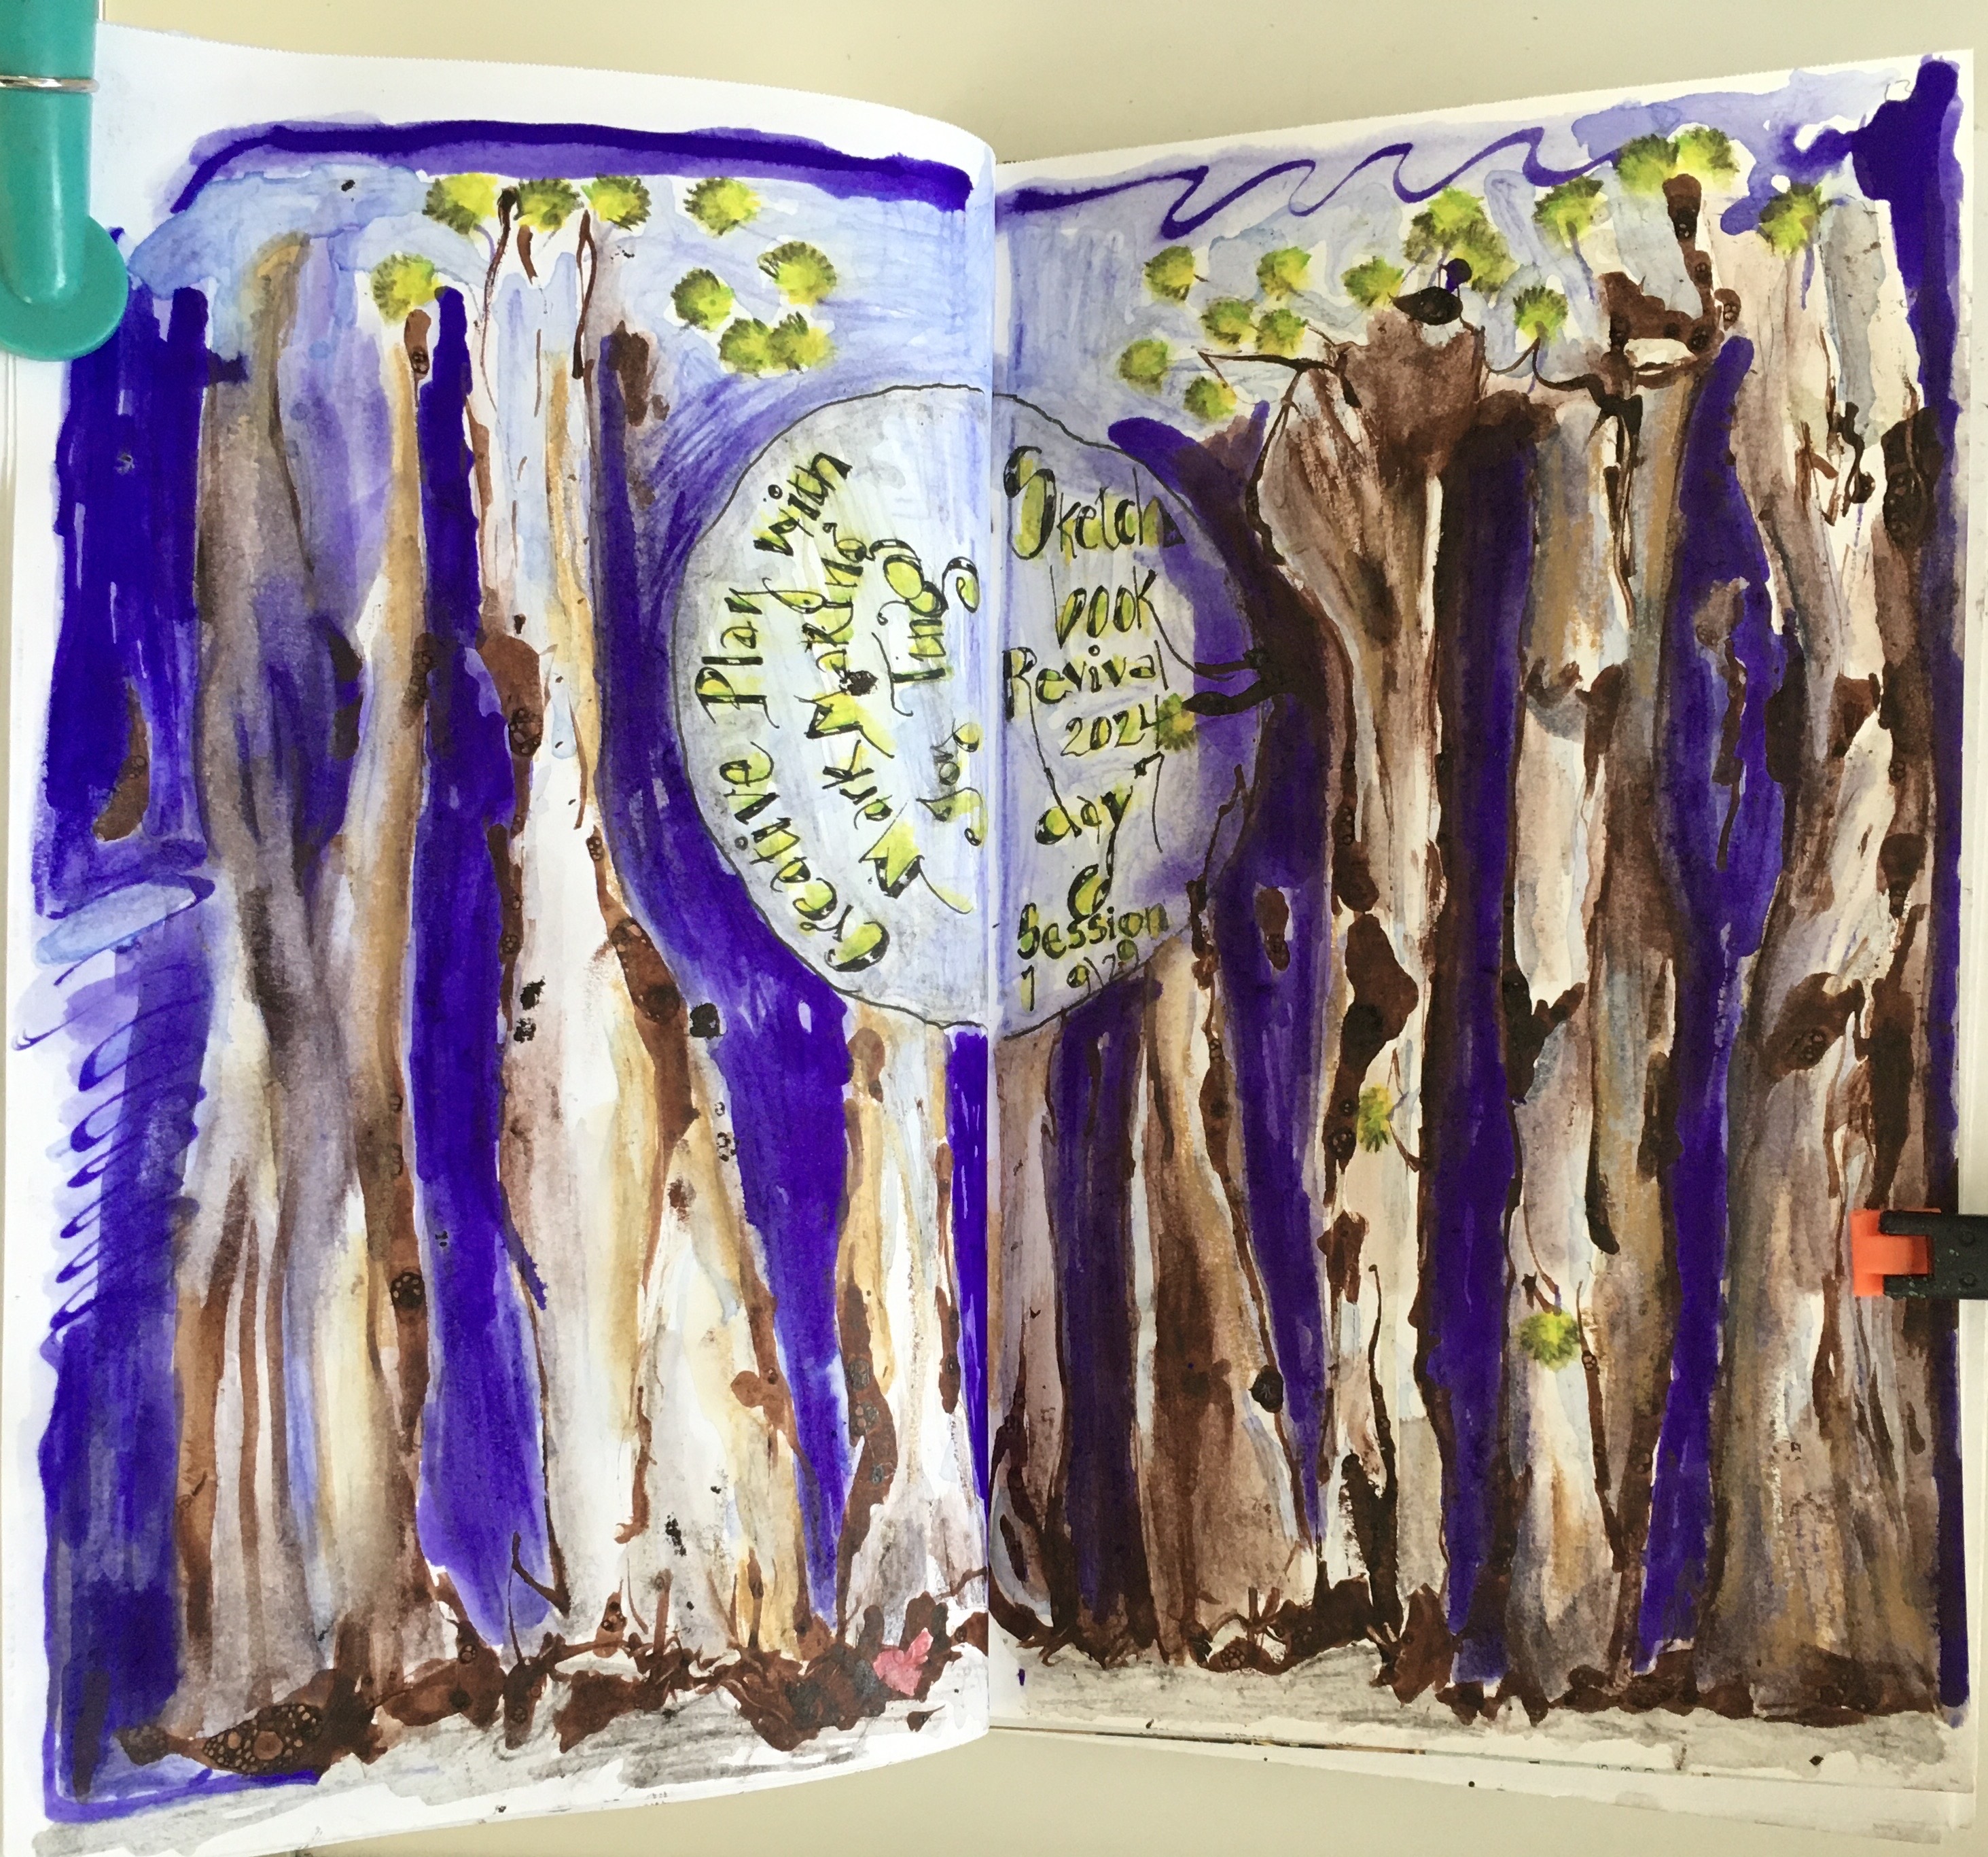
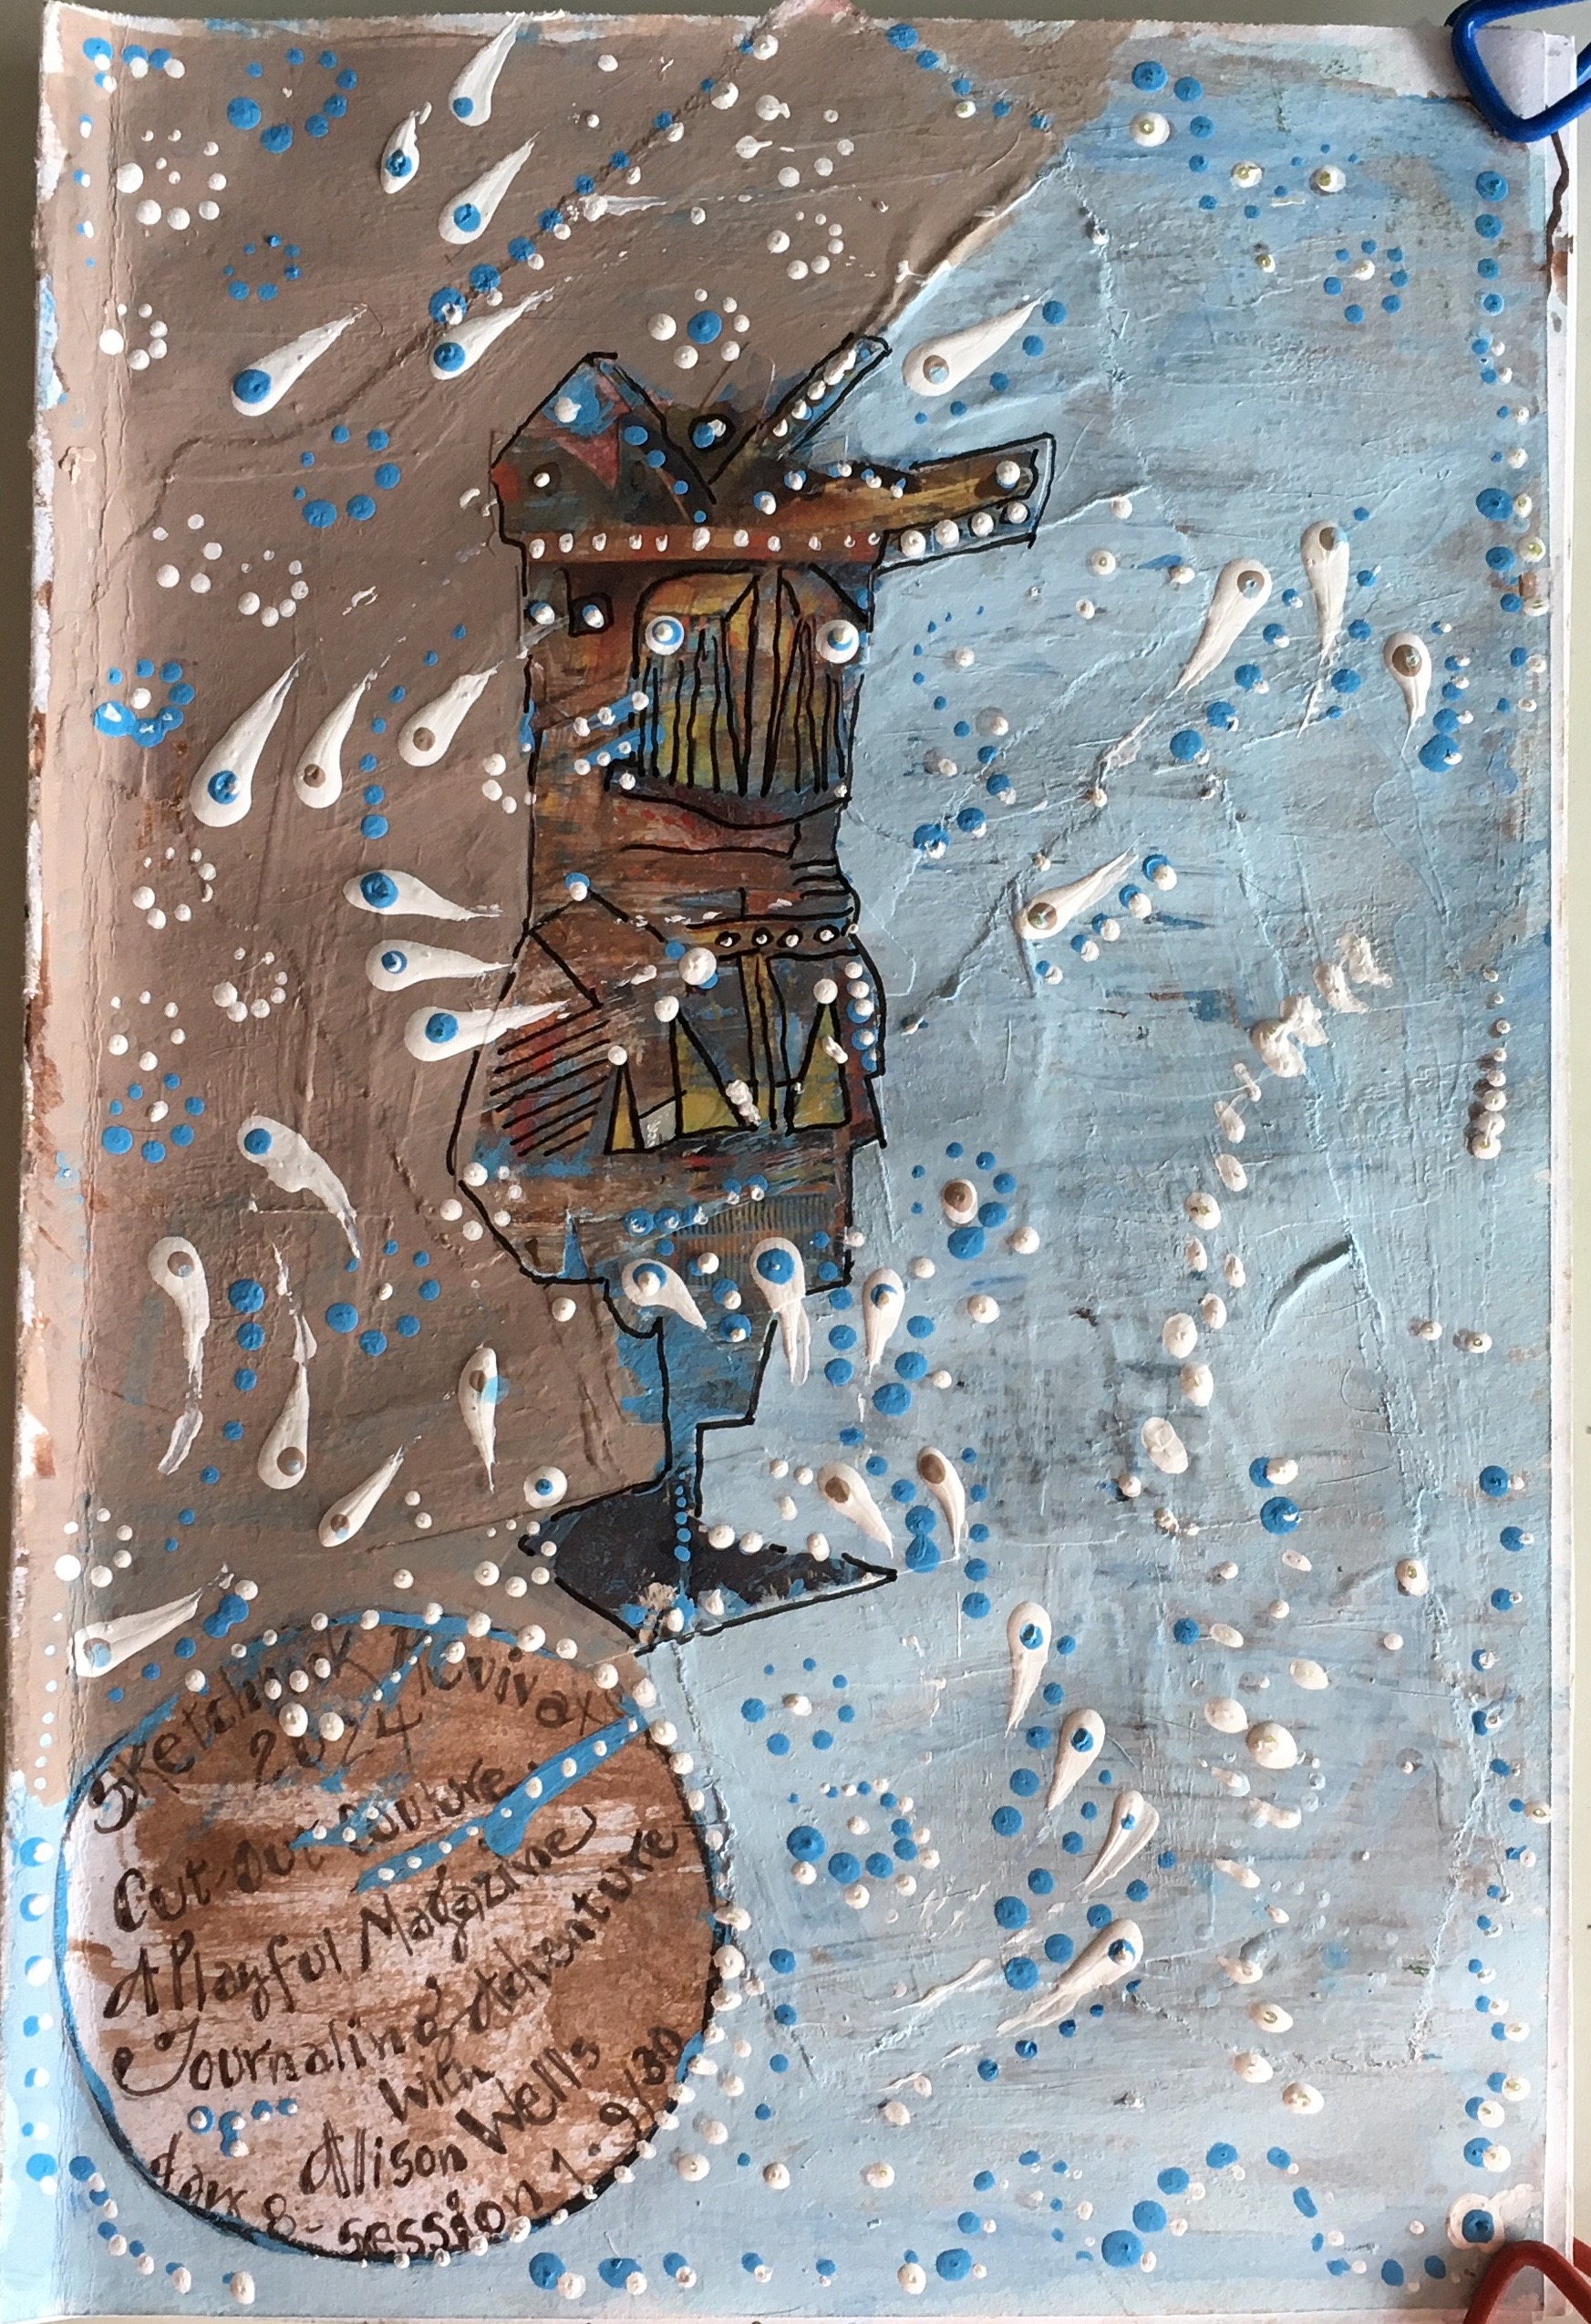
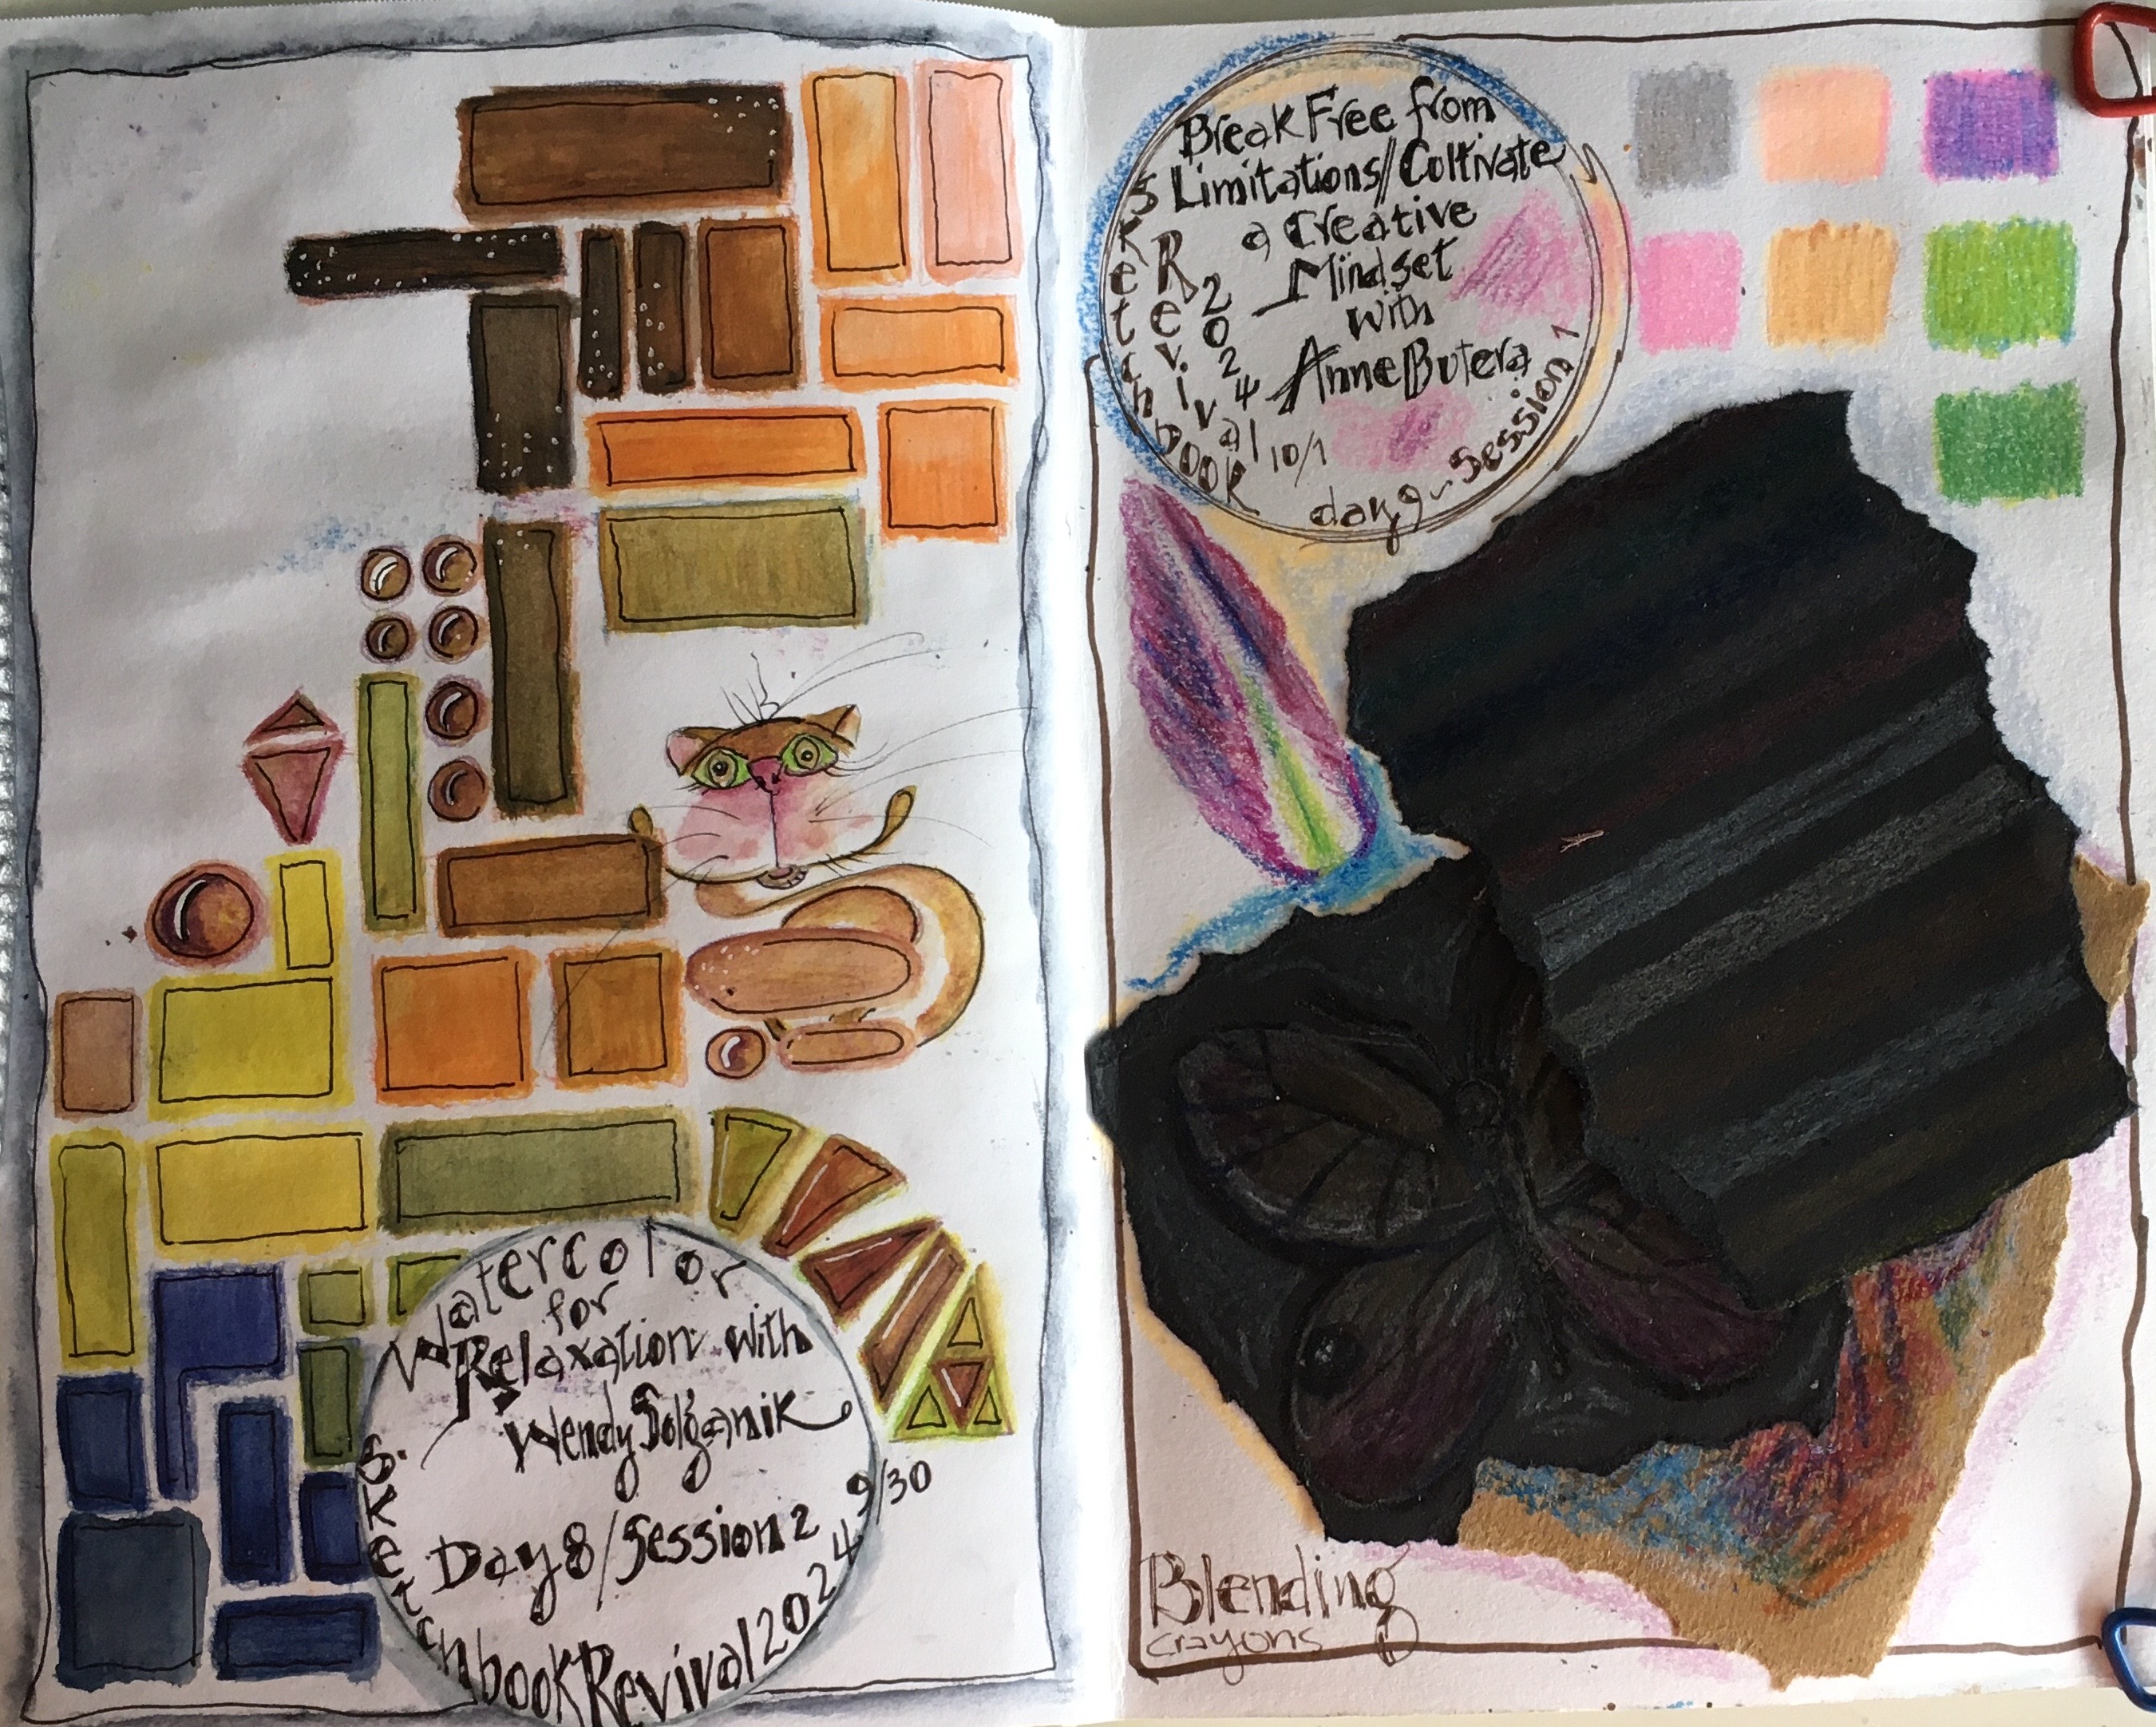
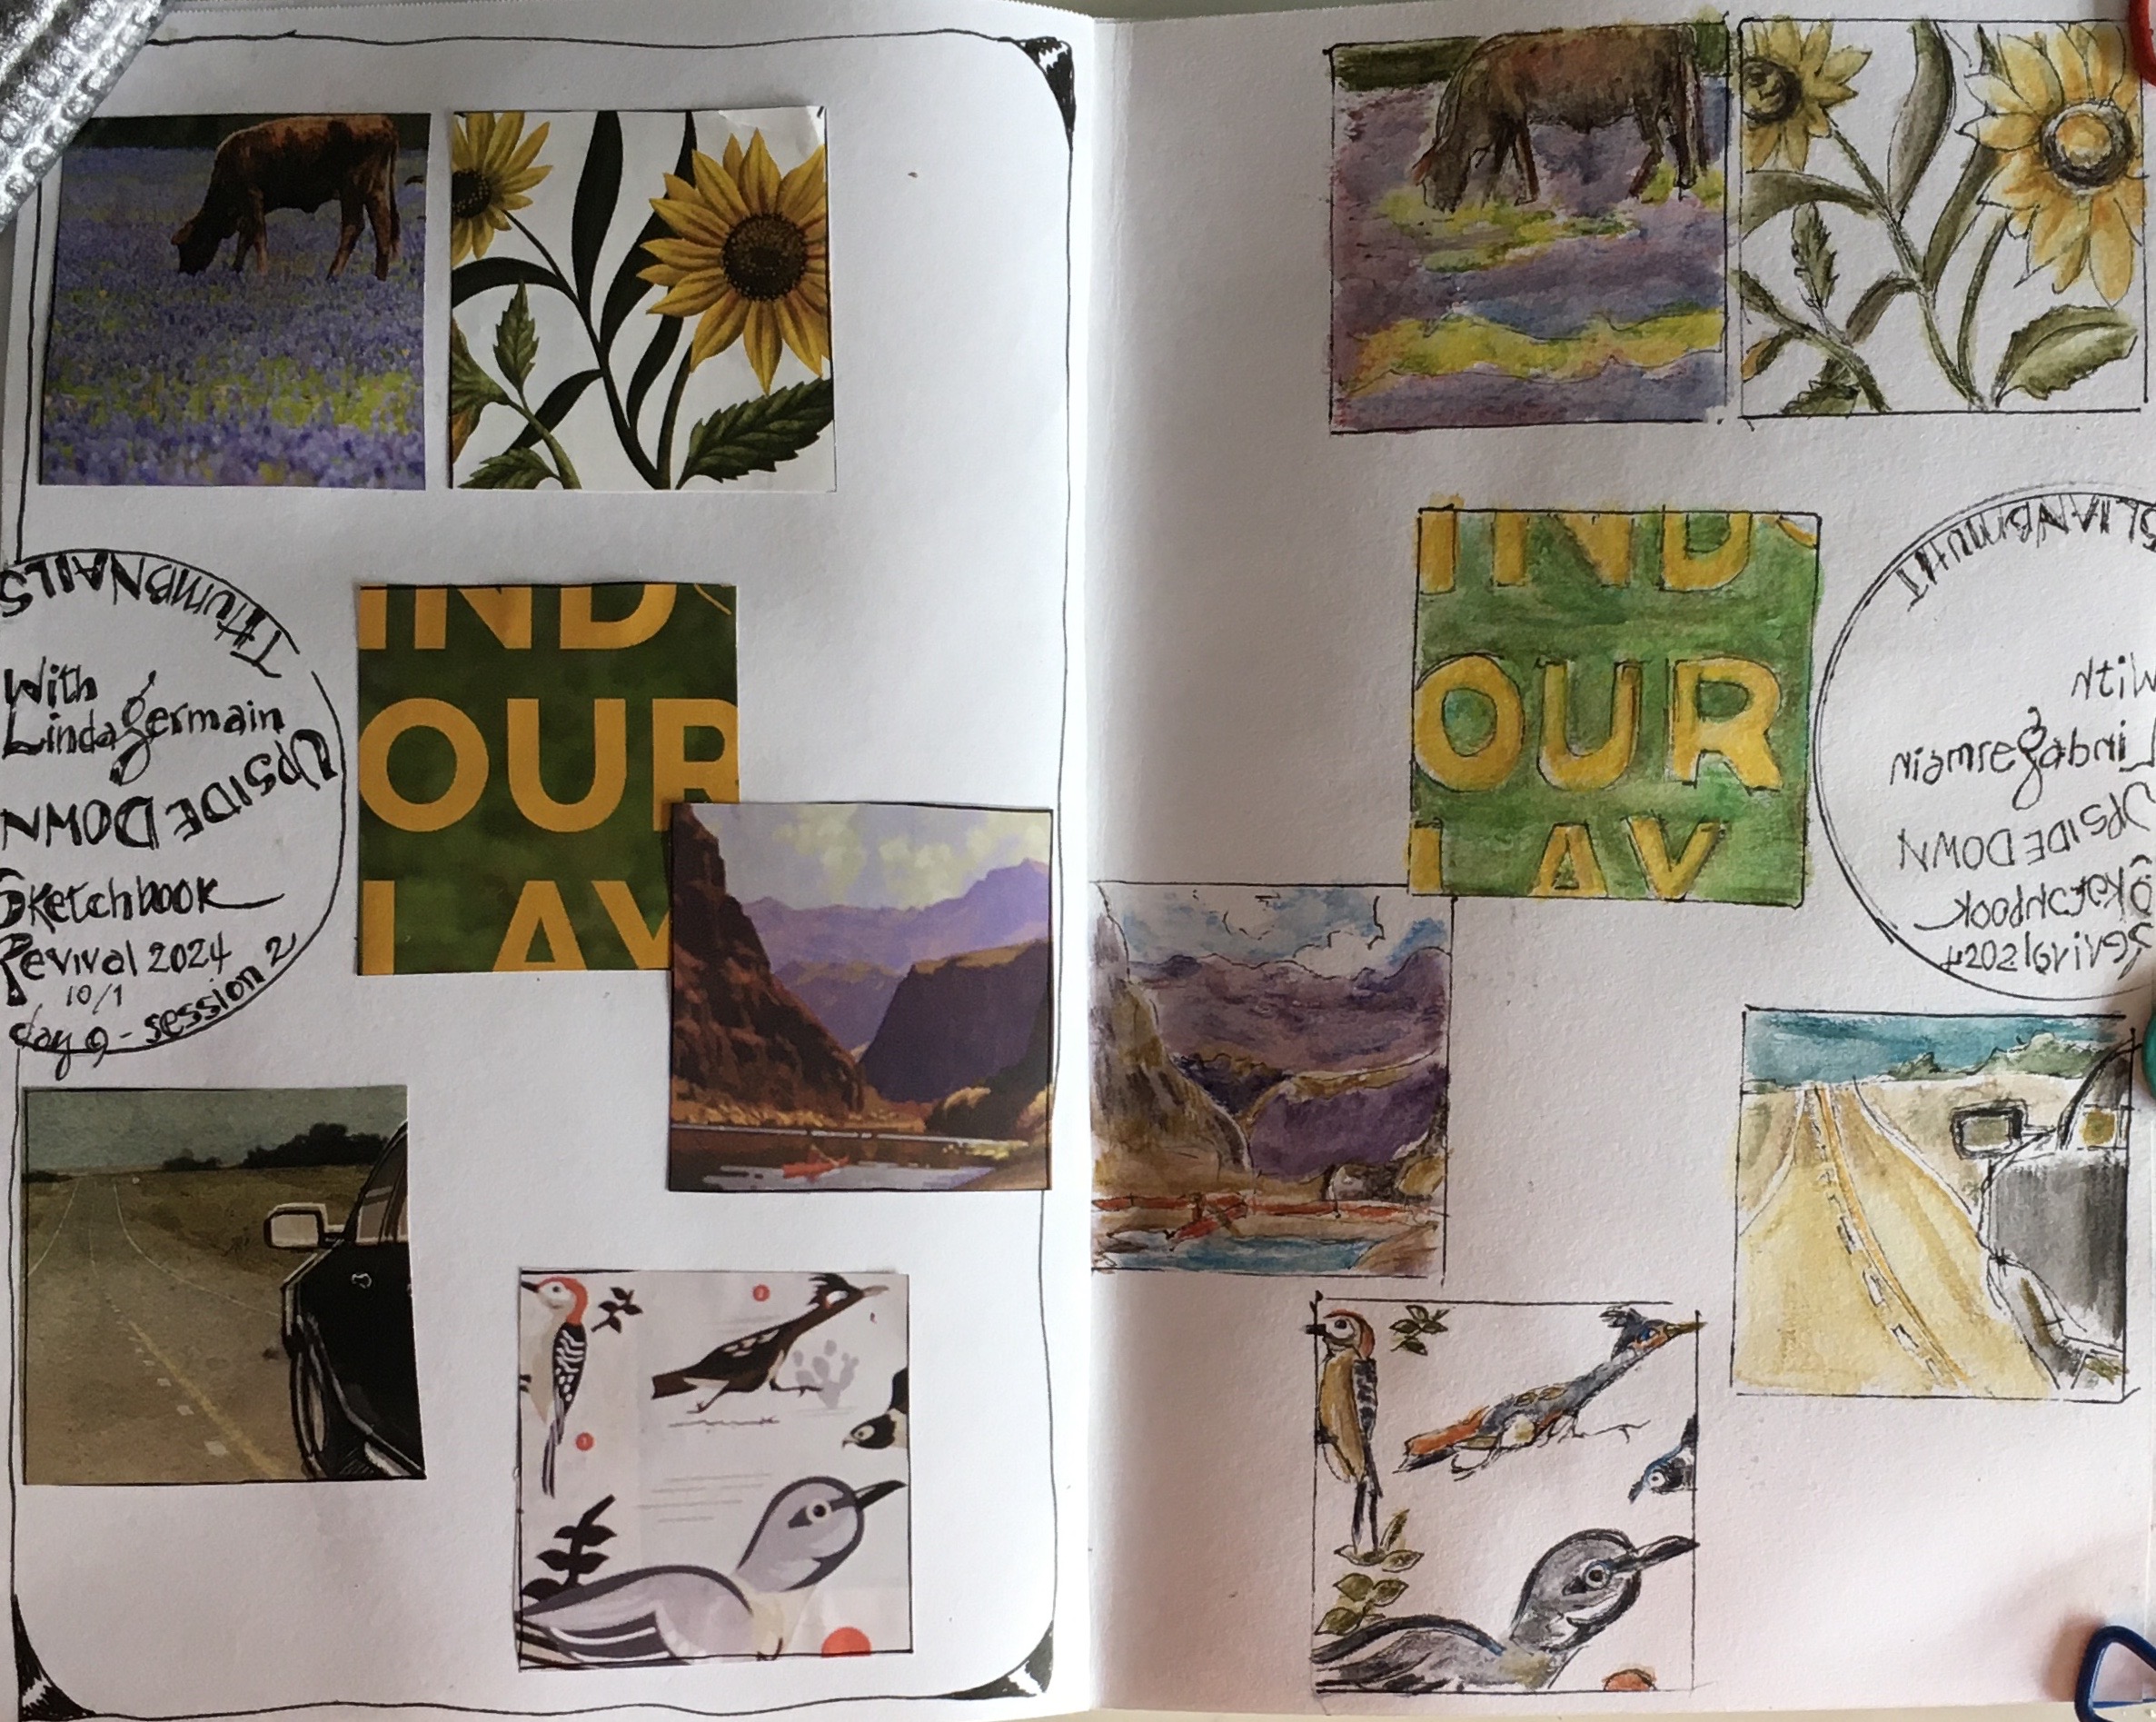
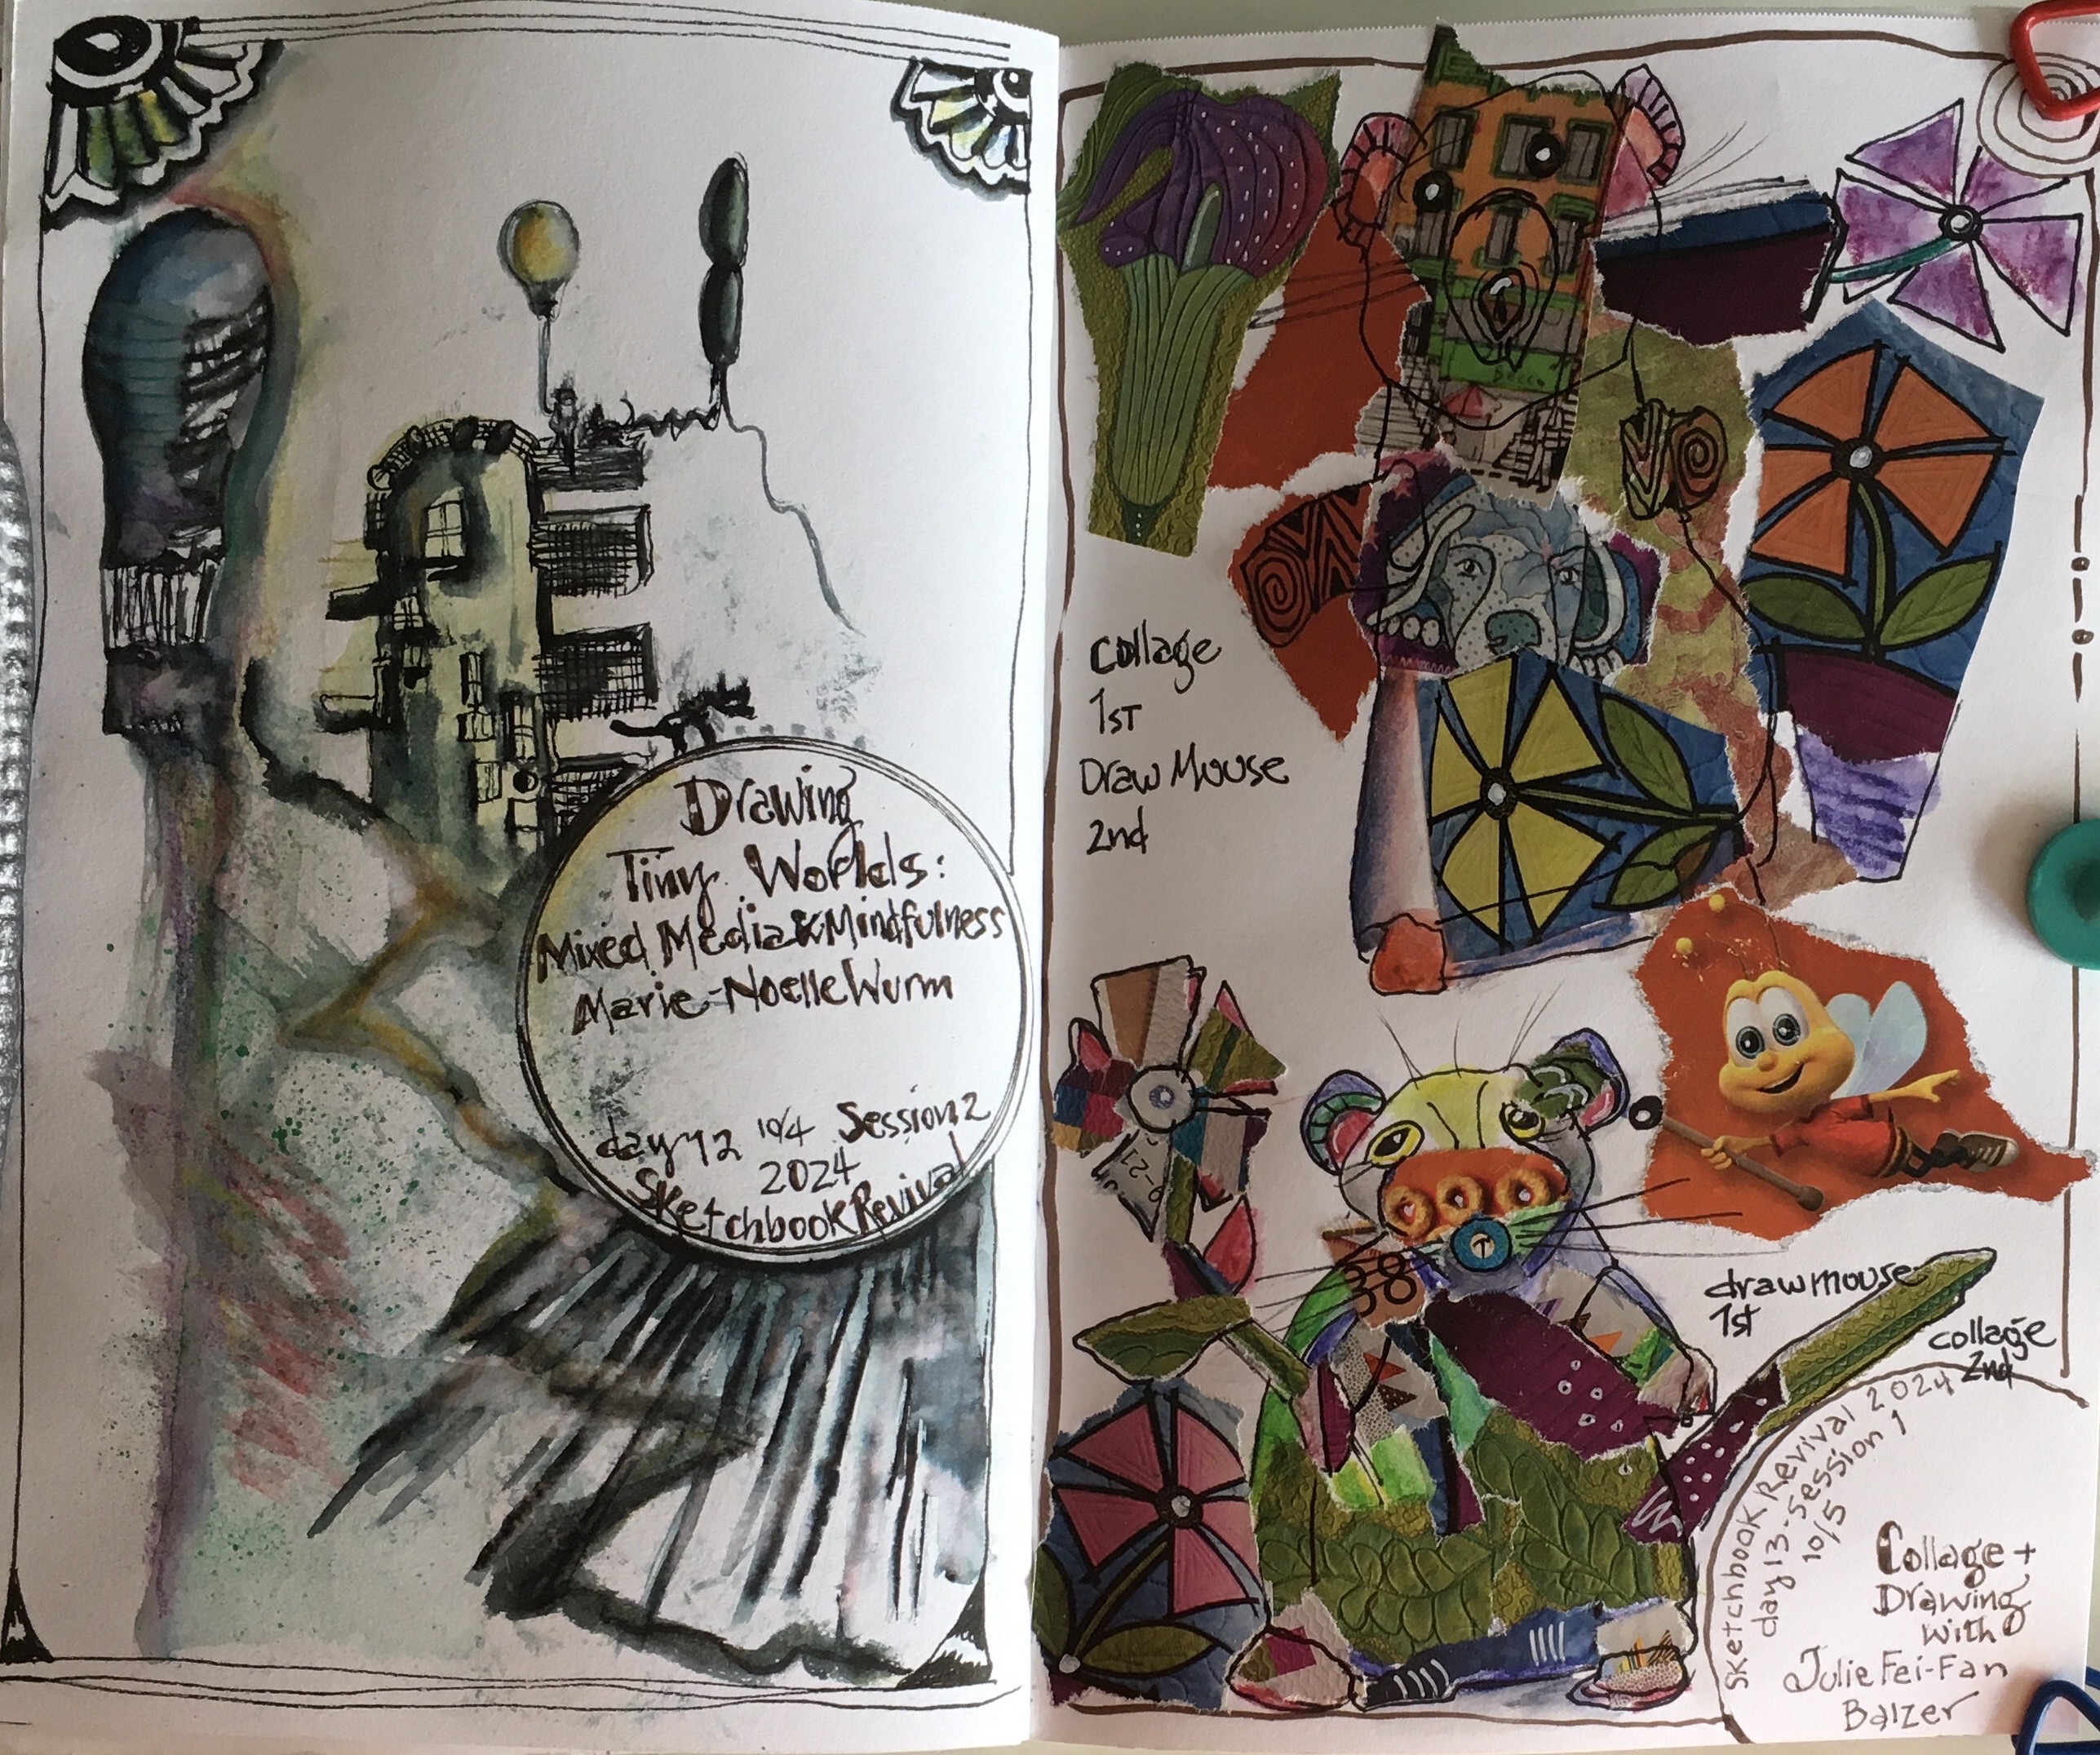
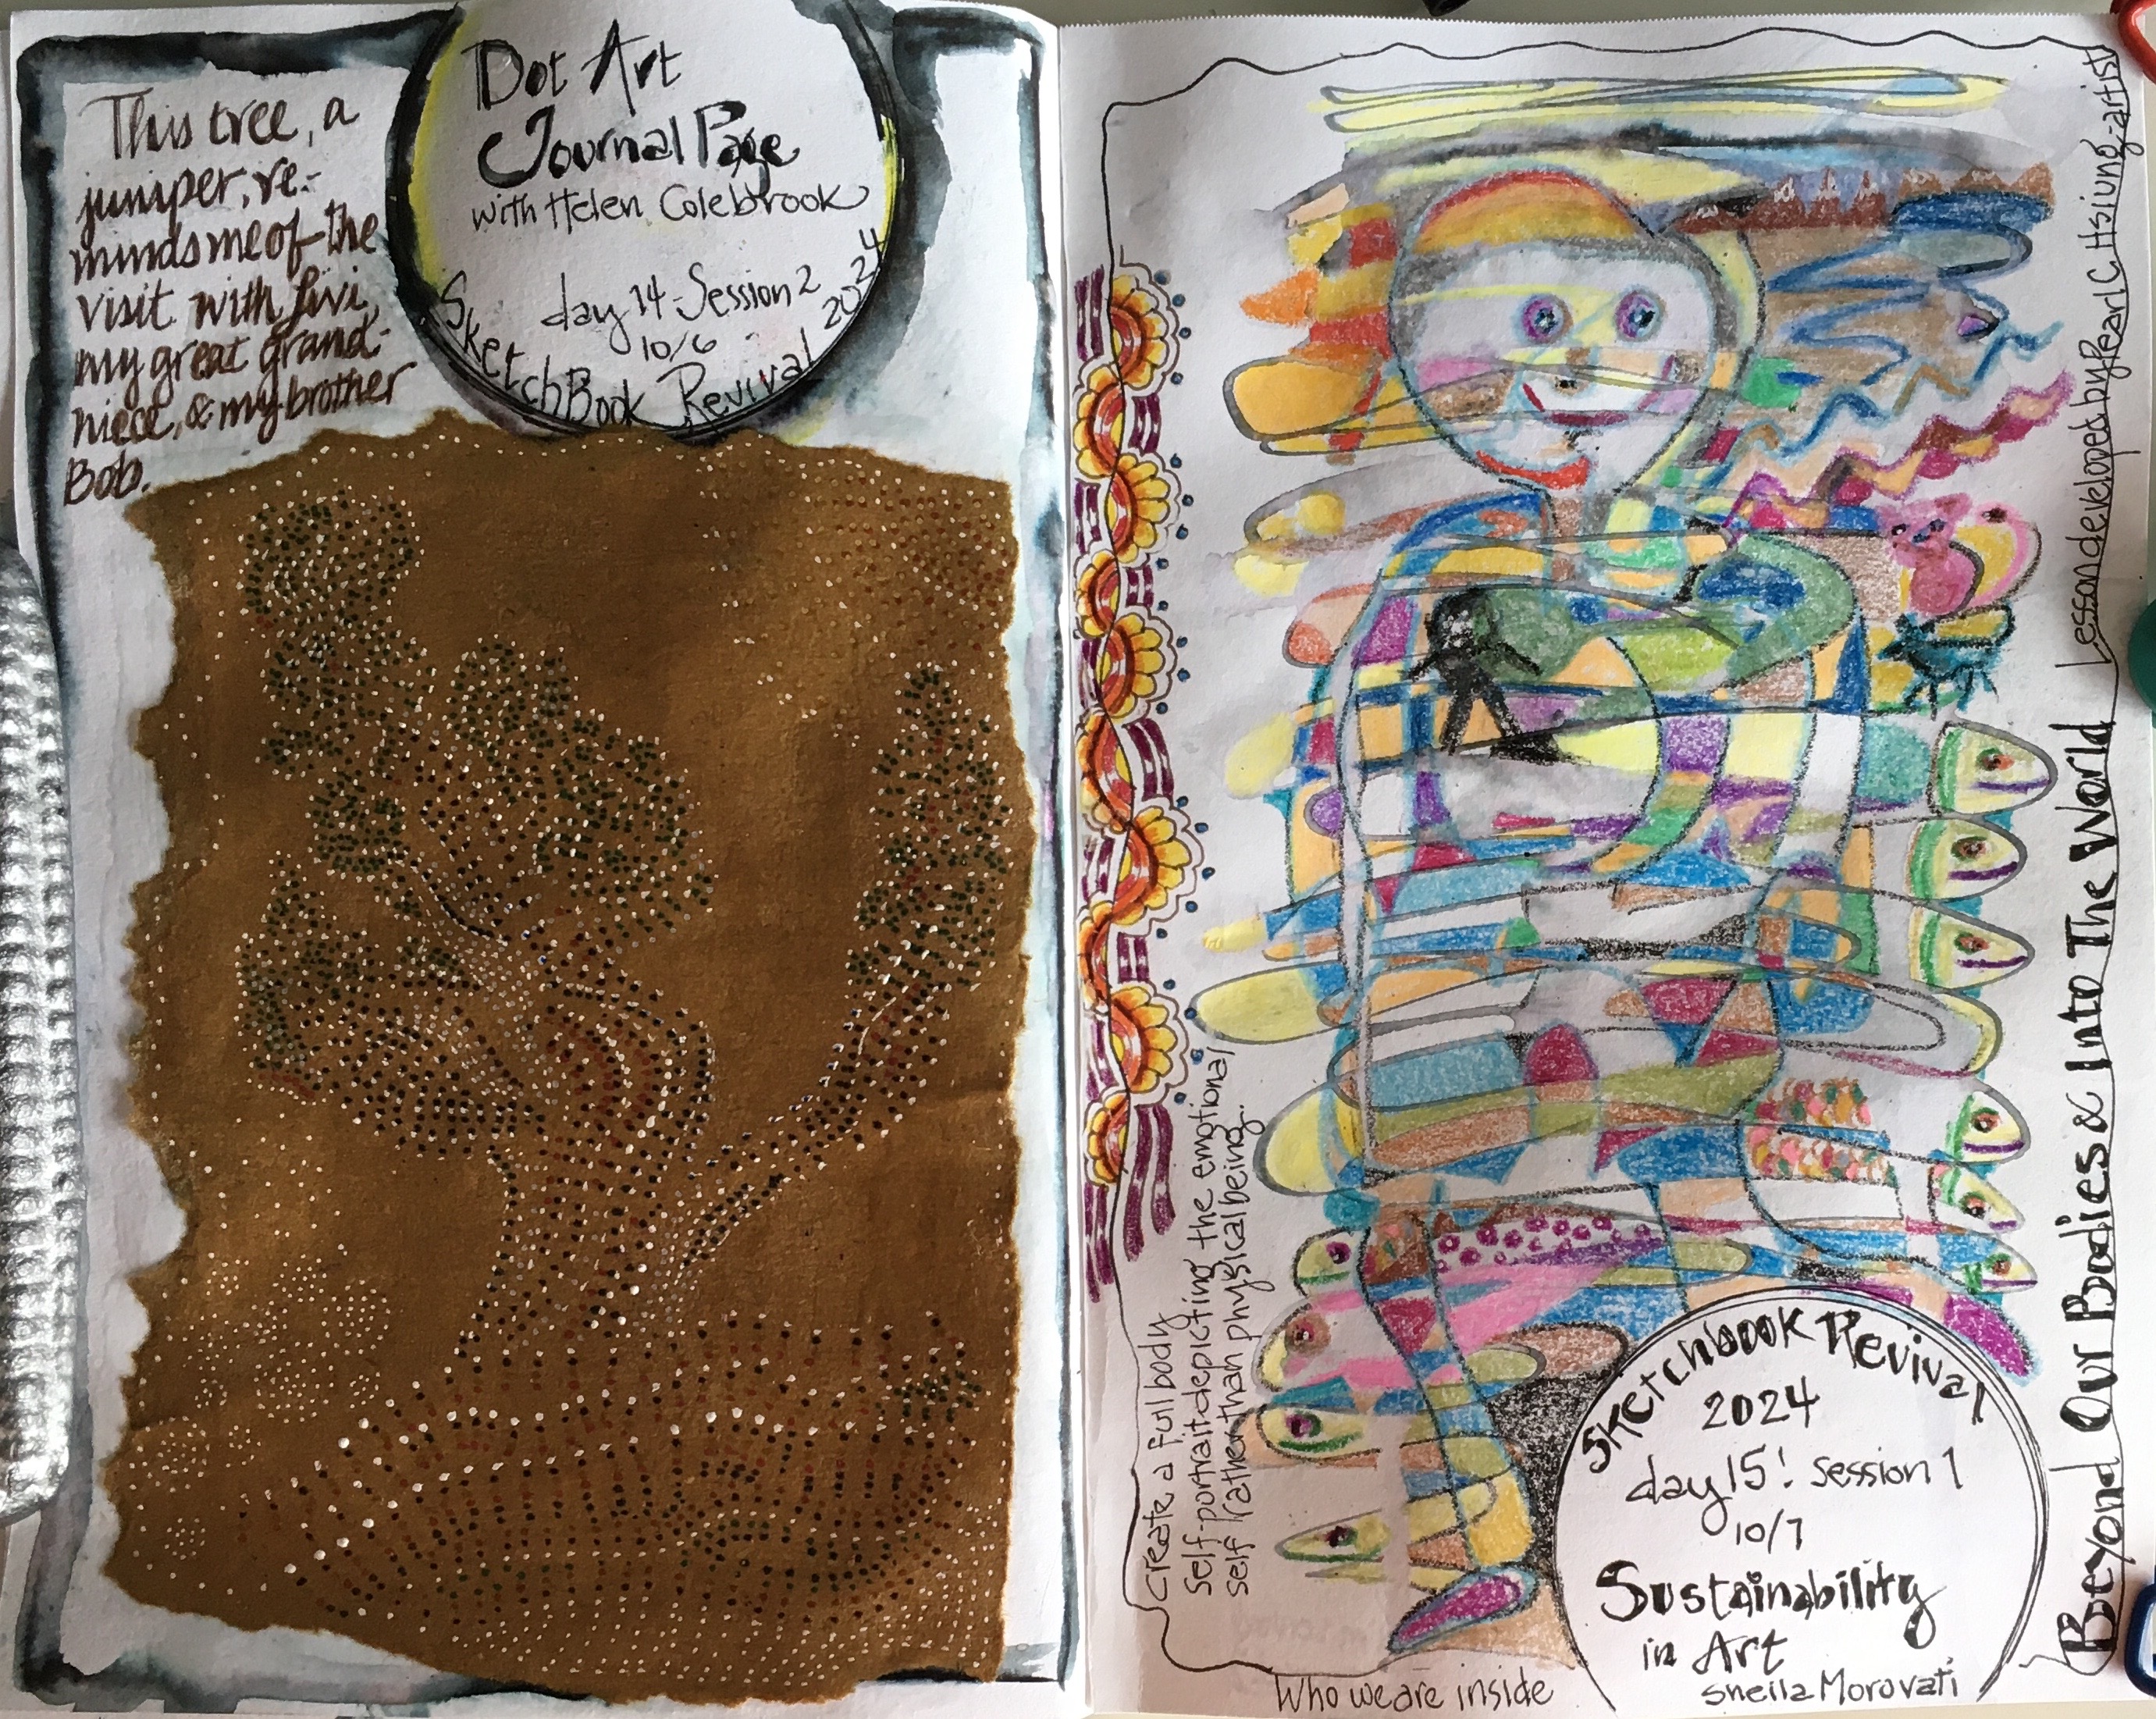
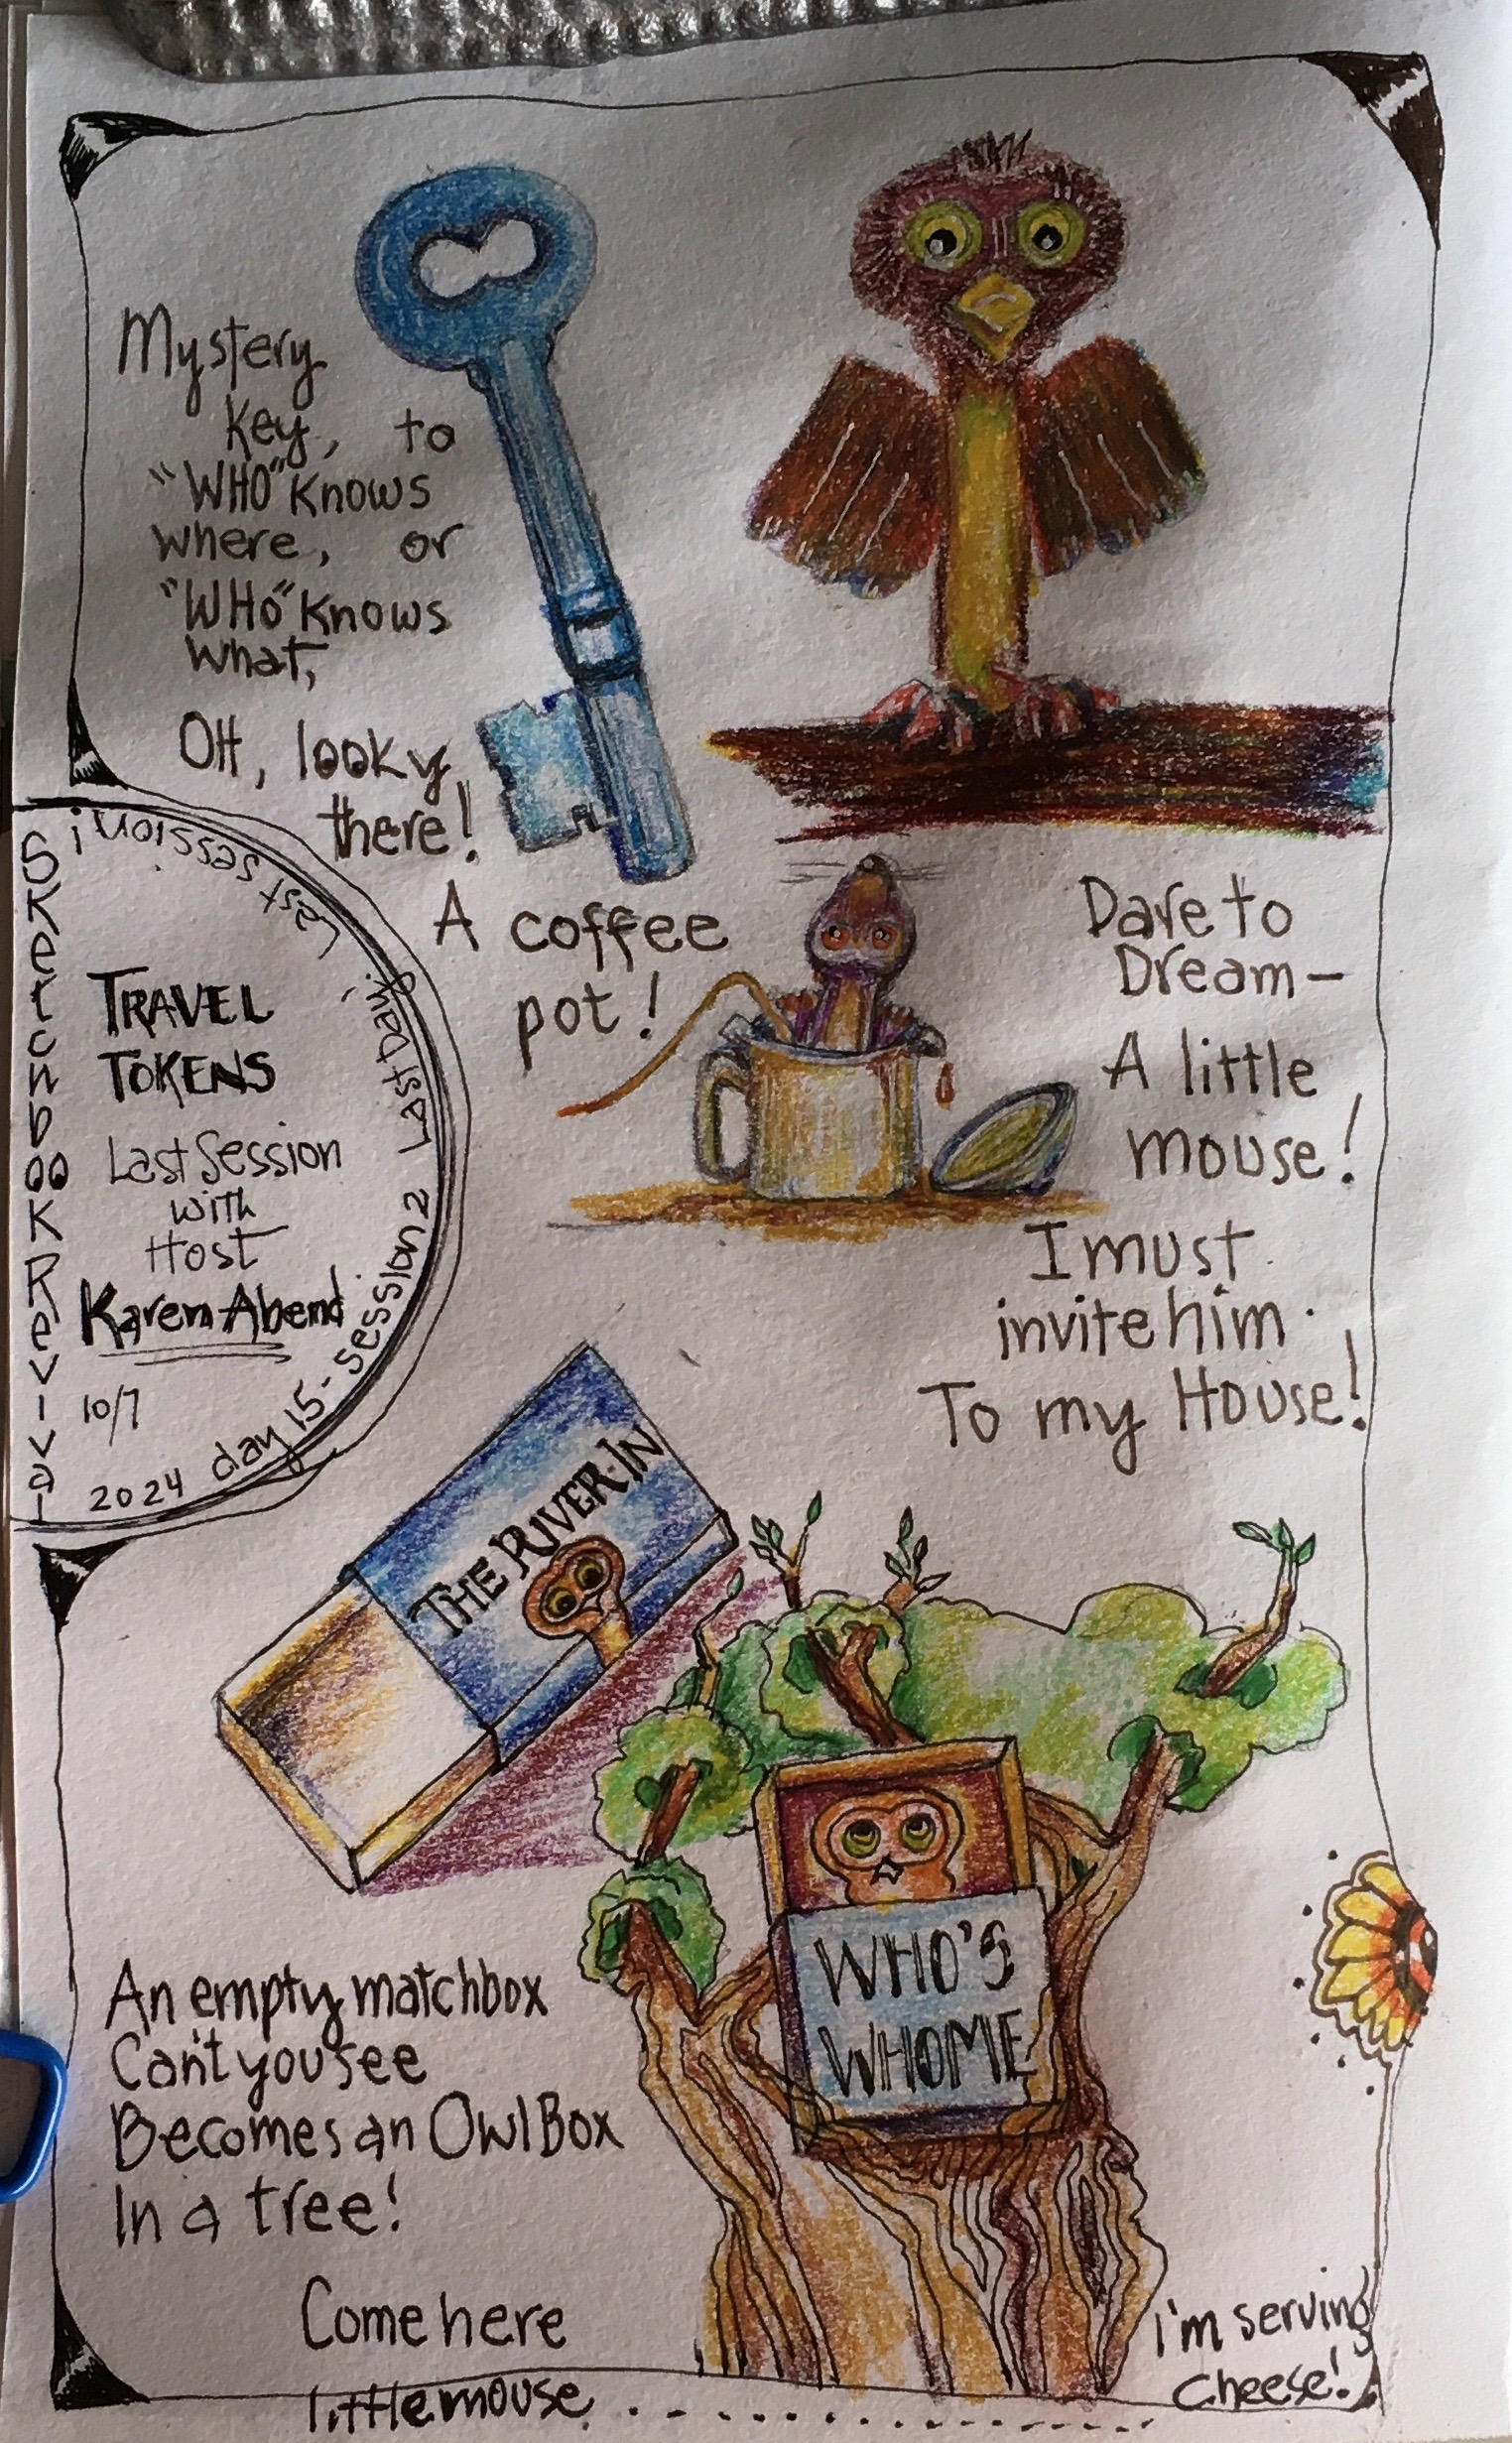
September 23 – October 7, 2024 For the last 7 years, I’ve participated in the annual, 2-week long sketching/drawing, painting and mixed media event, Sketchbook Revival, founded and hosted by a talented sketchbook artist, Karen Abend. Every year, Karen brings together a cast of creative artists for a mega on-line teaching marathon. Each day, 2 1-hour recorded sessions are available to hundreds of participants from around the world, providing an opportunity to interactively learn a skill or technique designed to begin or expand on a regular sketchbook practice. These sessions may include book binding, mark-making, collage, creating imaginary characters, urban sketching, composition, landscapes, flowers, mammals and bird painting, people or pet portrait drawing, nature journaling, Zentangle, map making, story telling, textiles, and on and on! Techniques shared by instructors involve a wide-variety materials, like watercolor, gouache, acrylic, markers, pencil and pen, colored pencil, and many forms of mixed-media.
The whole fun event is designed to stretch your creative comfort zone by experimenting with art supplies and new approaches to art making, and encourages play. And as incredible as it sounds, all you need to participate is your time and whatever materials you have on hand. Otherwise, it’s totally free! Wowza!
Not every session needs to be done (and this year there were 30 sessions in 15 days); I usually find time to complete about half of them. But this year I did all but one session (and may even complete the one skipped). From the very diverse cast of artists/instructors, I was able to learn new tips, techniques, approaches, and was invites to try new art supplies that would be useful in my regular sketchbooking and nature journaling practice.
Hopefully you’ll enjoy my 2024 Sketchbook Revival “play!” Not all are great or even good (a few are downright awful!) but it was so much fun! Maybe something from my collection will have you laughing, or maybe even entice you to give Sketchbook Revival 2025 a whirl!
That’s all for Sketchbook Revival 2024. Let me know what you think!
After years of on-line and email chats, I was delighted when my friend Robin Atkins decided it was finally time we met in person! Bravo!
Robin and her travel buddy Lunnette, drove over 1,800 miles to Tucson to teach a Spirit Doll class to a local beading group. Then after spending 5+ days exploring Tucson and before driving home to Friday Harbor on San Juan Island, WA, they took a “short” scenic 450 mile detour …… to Tijeras, NM. This out-of-the way drive would bring them to our doorstep, and our first face-to-face meeting! While in Tijeras, we were able to spend an evening and full day getting to know each other and spent time hiking, nature sketching, and sharing each other’s art.
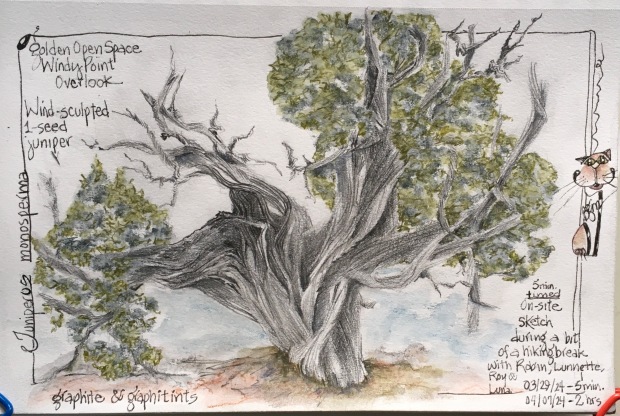
Robin snapped this photo of me sketching out at Golden Open Space. The beautiful wind sculpted juniper trees growing along the precipices of the windy observation areas are absolutely captivating (and tough). Luna thinks they’re tasty!
Meet Robin
Robin, whom I’ve always thought of as an “extreme creative,” is a fascinating, energetic, curious, passionate and bright-eyed adventurer in her early 80s. Her many interests and skills, in addition to creating uniquely designed, hand sewn and beaded Spirit Dolls, include: quilting (many with bead embellishments), thread embroidery, book making, watercolor painting, Zentangle art, nature journaling, making decorative papers, poetry, weaving, collage, crochet, felting and book author. And she shares her skills and techniques by teaching.
This isn’t an exhaustive list by any means! As someone who seems to thrive on learning and developing new skills, Robin never stops seeking artistic challenges to take on.
Check out Robin’s beautiful webpage and blog (http://robinatkins.com) where you can find photos and posts highlighting her current and past creative projects.
A Short-but-Sweet Visit
We had a wonderful time getting to know each other, and what a delight to have also met Robin’s long-time friend and travel buddy, Lunnette. A retired firefighter in her mid 70s, Lunnette is also a nature journaler, calligrapher, quilter, and according to Robin, “she’s a terrific navigator, who always uses her keen sense of direction and map reading skills to keep us on the “right road,” (in both the literal and figurative sense).”
This is my finished graphite drawing of the twisted juniper I spent 5 minutes sketching.
Parting company was hard, but Robin and Lunnette needed to return home. Along their route they visited both Mesa Verde National Park and Arches National Park, soaking in more of the desert southwest sun and culture before taking on the 1,200 mile journey for Friday Harbor.